So! I just HAVE to post this FABULOUS card. I'm TOTALLY in love with it. Once again I find myself propping it up beside my computer and just gazing at it over and over and over again. Sadly I can't take any credit for it. I stumbled across it on Pinterest - it was designed by Danielle Daws (danielledaws.blogspot.com) and HAD to go copy it. OMG - It used one of my all-time favorite color combinations - Very Vanilla, Soft Suede and Cherry Cobbler. And then there is the bow. Oh... the bow. Look at this bow and tell me it isn't the most perfect bow of all time. Look closely. Fabulous, no? Ok - without further adeau ... "The Card":


So here's the story ... a few weeks ago I was surfing the web and for about the 3rd time in a year I came across a bow tying tool similar to this one. For the 3rd time I thought "my Dad could easily make me one of those" so I copied the link, e-mailed him and asked if he could make one". About 2 hours later he had one ready to roll! So .... here is a photo-by-photo of how it works:
Step 1 - depending on the thickness of your ribbon, choose which 2 dowels you want to make the bow with and remove the rest. Hold the ribbon on the right hand dowels with your right hand (in the picture I'm using my left hand ... was hard to take pics and demo at the same time!!) Wrap the ribbon to the left and behind the second dowel:


Bring the ribbon back around the first dowel and over the first portion of the ribbon:
Next push the end of the ribbon under the wrapped ribbon (between the 2 dowels):

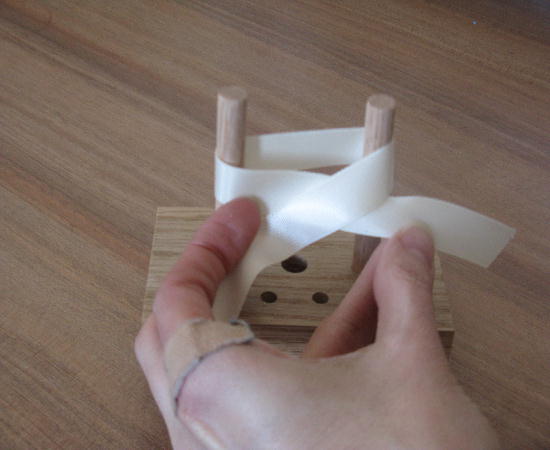
Now bring the end of the ribbon over the top of the wrapped ribbon (again, between the dowels):

Take the first end of the ribbon (in the picture above it is the piece that I'm holding with my 3rd and 4th fingers ... oh look ... I just noticed these pictures all show my lovely band-aid ... which is holding the blood in after "filing" it to the bone with my pumice stone while giving myself a pedicure yesterday ... OUCH!!!!!) But I digress ... right - so take the end of the ribbon and bring it over the second end of the ribbon (the one by thumb is on above) and tuck it under that end piece (oh this is hard to explain ... jsut look at the picture below!):

Pull the ends tight and Wa-low! A pretty bow :)


I have more projects to share so come back soon :) (Oh ... and yes, we will be making this beauty at my Technique Class tomorrow night!) Hope you can come!
Tamara
No comments:
Post a Comment