MCM Layouts

Tuesday, May 30, 2017

2017 RIBBON SHARE

Here is the email I sent out to my customers this morning.  Anyone in Canada can order from my website and can get in on the Ribbon Share.  For long-distance orders, additional shipping costs will be added but I will mail them at the most economical rate (to be determined once I take the whole kit-and-kaboodle to the post office for weighing) ...


Happy Tuesday!

My brain hurts.  

I have spent ALL afternoon yesterday crunching numbers!  I have been deciding what PRIZES to order for the upcoming BINGO night Friday, June 30th (only 2 spots left!!!!  RSVP NOW!!!)  AAAAAAAAAND … crunching number so I can offer you a RIBBON SHARE!

RIBBON SHARES:  What are they?  They are a smaller quantity of LOTS of different ribbons.  There are SOOOO many beautiful new ribbons in the catalogue that goes live THIS THURSDAY (!!!) but to order them all would cost an absolute fortune .. and really, who needs 10 yards of EVERY type and color on offer???  These shares/samplers are the best way to go!

Below I am offering 7 different shares/samplers.  You will get 2 yards (approx 6 feet … or 72 inches) of each ribbon indicated.  Order all 7 of the samplers and you get a discount as well as an extra gift from me (Check it out at the end of the email)

If you were to order all 27 ribbons listed below it would cost you $288.46.  Ack!  Not only that but you would be the proud owner of 270 yards (810 feet!!!!) of ribbon.  Ya.  Pretty sure none of you would ever use it all!

Purchasing all 27 through the share will only cost you $65 (flat) for 54 yards (162 feet) PLUS you get and extra bonus (see below)

He’s what’s on offer …..

1/2" Finely Woven Ribbon.  You get 2 yards of each of the NEW five In Colours: Berry Burst, Fresh Fig, Lemon Lime Twist, Powder Pink. Tranquil Tide. $12


1/4" Ombre Ribbon.  You get 2 yards of each of the following three colours: Calypso Coral, Island Indigo, Lemon Lime Twist $8  (You can’t really tell from the picture but the color fades from dark along one edge to light in the other.  VERY cool!


3/8" Classic Weave Ribbon.  You get 2 yards of each of the following three colours: Crumb Cake, Softy Sky, Whisper White. $8


3/8" Shimmer Ribbon.  You get 2 yards of each of the four colours: Basic Black, Pear Pizzazz, Pool Party, Powder Pink.  $10


3/8" Mini Chevron Ribbon. You get 2 yards of each of the three colours.  Bermuda Bay, Crushed Curry, Old Olive $8


3/8" Striped Grosgrain Ribbon.  You get 2 yards of each of the five 2016-2018 In Colours.  Dapper Denim, Emerald Envy, Flirty Flamingo, Peekaboo Peach, Sweet Sugarplum  $12


1/4” Stitched-Edge Ribbon.  You get 2 yards of each of the four colours.  Old Olive, Pacific Point, Pumpkin Pie, Rich Razzleberry $10


*** BONUS *** order all 7 samplers for $65 flat charge ($3 savings) and I will ALSO add in 2 years of the 3/8” Metallic Edge ribbons in both Gold and Silver!!


I WILL BE ORDERING RIBBON ON THURSDAY.  LET ME KNOW WHICH ONES YOU WOULD LIKE!!


REMINDERS:
  • The 2016-2017 and Occasions Catalogues retire TOMORROW, May 31st.  All orders should be placed sooner rather than later as there is always a surge on the website as the deadline draws closer.  Order through my on-line store at www.tamarabertram.stampinup.net and have your items shipped directly to your door (IN CANADA ONLY).  Orders under $200 that enter the Hostess Code VN4S2MZF at the checkout will receive a gift in the mail from me!
  • The NEW 2017 Catalogue goes “live” at noon Thursday, June 1st.  Again, orders under $200 that enter the Hostess Code VN4S2MZF at the checkout will receive a gift in the mail from me
  • My OPEN HOUSE AND RETIRED ITEMS GARAGE SALE IS THIS SATURDAY!  Swing by between 11:00 and 3:00 to grab the new catalogue, shop through my retired stock, grab a cold drink and check out some of the new toys.  It’s ALWAYS more fun to flip through the physical catalogue then scroll through on a computer screen!  PLEASE RSVP IF YOU PLAN TO COME SO I KNOW HOW MANY TO EXPECT!!
  • BINGO - Friday, June 30th 6:30 pm.  $65.  2 spots left.
  • Summer Stamp-a-Stack Sunday, July 23, 2017.  Watch your emails for the cards we will be making.  Spaces are already filling up - only 6 spots left so RSVP soon if you want secure a spot!  


That’s it for now.  Enjoy the sunny weather over the next few days.  Hope to see you Saturday!

Monday, May 29, 2017

Packing Tape and Glitter Tutorial

Happy Monday!

I've been meaning to post for a few days now but classes and nice weather got in the way!  

I was going to wait until after my June Technique Classes to post these two projects but I just couldn't wait to!  

I was trolling through Pinterest the other day and I stumbled across a technique that I have never seen (how can that BE??  I've been doing this for over 11 years and never seen this???  Sheesh!)

It was a technique done by fellow demo Connie Stewart over at simplysimplestamping.com

Connie called it the Packing Tape Glitter Technique ... makes sense ... since you use packing tape and glitter!

Check out my cards!


I love them BOTH!  I'm not sure which one I like better!  I love the clean, fresh Fresh Fig-ness of the silver glitter card ... but I'm drawn to the soothing Just Breathe card.  It's says "zen" to me ... love it!

Same technique, different thinlits, paper and glitter.

Start with a card layer (I used 4 3/4 x 3 1/2") and cut an image out using whatever thinlits you fancy (I used the Eastern Palace thinlits)

Oops - picture is sideways.  Sorry;  Turn your head *lol*
Next grab some packing tape.  Yes, I imagine you can use scotch tape too but I had this Elmer's packing tape in my Craft Cave (Dollarama - $1.50, I think) ...
Turn your punched base over to the back side and cover the design with the packing tape.  It doesn't matter if/that the tape will need to overlap.  The seam will be covered with glitter and won't show ...
Next turn the card over - the sticky tape side will now be face up.   Grab the glitter of your choice and cover the cut-out liberally. Use your finger to really push that glitter into the tape.  Yes, you will have sparkles on you afterwards!
Tip the excess glitter back into the glitter container and wa-low!  Ooooooo ... ahhhhhhhh .... sparkly!!!

Finished your card as desired and done!

I used a Fresh Fig layer of 5" x 3 3/4" and some Fresh Fig ribbon ... and sentiment from Eastern Palace
This one used the sentiment from Colorful Seasons (I think that's the name!) and different thinlits from the Eastern Palace bundle.  Such a different look by just changing the two inside thinlits!

I embossed the sentiment in gold and added a few gold sequins.  Done!

There are SO many things you can do with this technique!  Us the butterflies, the dragonflies, and of the shapes .. any glitter!  Who doesn't have a stash of EVERY color SU sold in the past ... and maybe a few sleeves of "other" brand glitters???   I have to admit I have LOADS of glitter from my Christmas Glitter Ball Ornament days many years ago.  Can't WAIT to use some of them on the dragonfly thinlits!!!

That's it for today - I should go wrap up my email about my Ribbon Share.  I spend a few hours this afternoon crunching the numbers but it's not going to do anyone any good if I don't send the darned email OUT!

Hope you have a stampy night!


Tam

Saturday, May 20, 2017

Cool Treat Treats

Happy Saturday!

Just a quick-ish one this morning as the sun is shining, there isn't a cloud in the sky and I'm itching to get out for my walk!  (DESPITE the allergies from hell that have my sinuses aching, my nose tickling and my eyes watering!)

Thursday I headed down to the Craft Cave to have some fun and make some treats for my club gals.  I NEEDED to make them to get the 8 bags of DELICIOUS little gummies out of my house as four bags had already fallen prey to my gummy addiction!  Check out these Cool Treat Treats!


Are they awesome or are they AWESOME???

I love how they turned out.  I have been trying to figure our what to DO with these treats for about a month now.  I knew I wanted to use the Cool Treats products (stamp set and matching framelits from the 2017 Occasions Catalogue and carried over to the new 2017 Annual Catalogue - $61 for the bundle but that price is only until May 31st!) ...
... but I didn't know how I was going to PACKAGE them!  I first thought of putting them in little jars I have on hand.  Cute but I'd need to buy a LOT more candy to fill them (the candy is $1 per bag of 18-20 gummies at the Dollarama but each jar need 8-10 gummies to fill).

I then thought maybe our 2" x 8" cello bags ... but I couldn't find my stash ...

I then made a little diaper fold envelope but I just made those back in February and wanted something different ... and I didn't have much of the Tasty Treats coordinating designer Paper.  Certainly not enough to make 25 little pouches .... so I played around  bit and spotted a 2" strip of the DSP on my table.  Bam!  A quick little banner made using my Triple Banner Punch ... and it all came together quickly after that!

I popped 3 gummies into little zip lock bags I always have around (again from Dollarama).  They just HAPPEN to be 2" wide!  The banners are 2" x 4" ... and made into banner.

I stamped the sentiment fromCool Treats directly onto the banner with Chocolate Chip ink.

I cut a piece of Peekboo Peach ribbon about 4" long and stapled it to the banner.

I cut out two popsicle shapes with the framelits - one out of Watermelon Wonder and one from Peekaboo Peach ... and stamped the swirls/indentations in the coordinating inks.  I used my Chocoltae Chip marker to color the sticks then attached them to the banner with snail adhesive.

Stapled the whole piece to the gummies and DONE!
Yup - LOVE how they turned out and LOVE that they are now out of danger of being eaten by ME! *lol*

That's it for today.  I'm off to take that walk now.  Whatever you are up to this long weekend have a stampy time!


Tam

Thursday, May 11, 2017

Nailed It for Father's Day

Happy Thursday!

It's been a lovely day of nothing-ness today ... but I'll pay for that Saturday when I'm all stressed out that I'm not prepared for my Community League Ladies Night function!  Oh well!  It was SUCH a beautiful day today it just called for an extra long walk with my furry buddy before volunteering at the Humane Society with the kids.  Such a great day!

Today I want to share with you the card I made for Father's Day ... and it is also one of the cards we are making in class this week ...
Luuuuuuuvvvvv it!

I have to give inspirational credit where credit is due!  I originally planned to make THIS card .. which is a direct CASE of the one made by Melissa Kerman over at thecraftingtreehouse  It's such a GREAT card!

Here is my version ...
So ... I STARTED with the Happy Birthday card and then realized I wanted an option for Father's Day.  All I did was change the orientation of the metal layer piece and it took off from there ...
So!  If you are anything like me you want to know how I MADE the metal layer piece.  Am I right?  If you Google "tarnished metal technique" you should come up with a lot of great youtube videos.  If that's too much trouble read on ... I have a picture tutorial for you.  You're welcome :)

Start by running Silver, Gold or Copper cards stock through any embossing folder - I used the hexagon folder with silver ...
 I then used a sponge to apply splotches of versamark to the embossed piece, sprinkled copper embossing powder over it and heat set it.
 I then repeated the process but used gold Embossing Powder ...
I then took a sponge, inked it with Archival Black ink and rubbed it all over the embossed piece.  

Finally, I buffed it with a dry paper towel (or dry baby wipe) to remove the excess black ink.  This just gets some black in to the nooks and crannies of the piece and makes it look a little more tarnished.
 Awesome, yes??

I used the Nailed It set for the rest of the card along with the Urban Underground Designer Series Paper ...

Although the "Build It" framelits are now sold out (*sniff) the Nailed It stamp set is still available ... AND IT'S ON SALE!  Only $15.75 (in Canada) for the clear mount set.  It's a great set even without the framelits.  If you want to cut out the pieces you can always do it "old school" with a pair of scissors.  The pieces aren't too fussy!
The Urban Underground paper is also sold out but even just Basic Grey would work well for this card.

That's it for today.  Maybe I'll head down to The Cave and start on my display for Saturday night ... or maybe I'll go watch one of my 49 episodes of Coronation Street .... hmmm

Whatever you get up to I hope you have a stampy night!


Tam

Wednesday, May 10, 2017

Eastern Palace Elegance

Happy Wednesday!

Anyone else having trouble remembering the name "Eastern Palace"??  I keep falling back on Eastern Elegance!  Wasn't that a stamp set?  Dunno ... just rolls off my brain easier than Eastern Palace.  Nonetheless ... I have two Eastern PALACE cards to share with you.  The first one was what I THOUGHT we'd be making in class last night ...
Pretty but ... "meh" ... not my style.  Crazy busy ... and not one I would actually give to my mom ... so, at 12:30 pm I decided to try again. MUCH better ...
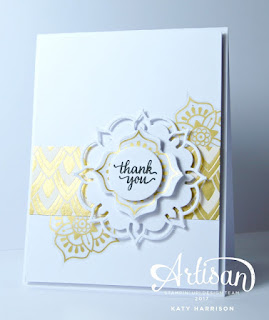
I was inspired by a card by SU Artisan Katy Harrison ...
SO pretty!  I tried to CASE it exactly but had to improvise on the centre a little - I didn't have enough of the centre stickers for 14 stampers ...

I was thrilled that you do get a LOT of the stickers in a pack.  By cutting each flower in half there are enough for 12 of this card ... and although you only get one sheet of the 12" x 12" gold paper in the DSP pack it, too, is enough for a class.  LOVE that!

I cut the DSP 1 1/2" x 4 1/2".
I cut the flourish out with the thinlits and then ran it through the Big Shot again for the inside flower.  That particular thinlit doesn't cut the entire piece, just the petals.  I bent them upwards a bit and sponged the edges with (retired) gold Encore ink.  I used my 1 1/4" circle punch for the sentiment from (retired) "Wonderful Mother" and popped it up on dimensionals.  A glimmer jewel and some sequins finished it off.

THAT'S a card I can (and will) give to my Mom.

I'm off to start my day.  Whatever you get up to I hope it's stampy :)


Tam

Tuesday, May 9, 2017

Hey Chick Meets Just Kidding

Happy Tuesday!

Do you ever make a card that just makes you GIDDY, you love it so much?? It doesn't happen ALL the time but every now and then I just can't WAIT to share a card I love.  Today is that day!!

I.  LOVE.  THIS.  CARD!!!

Bahahahahahaha!  Do you love it??  It's SO delicious "in person"!  That new Lemon Lime Twist is to DIE for … pair it with Island Indigo and … well … ya.  Love it!

I headed down to the Craft Cave after dinner needing my third card for class tomorrow.  I also wanted to make a card for a dear friend who I met 40 years ago in elementary school - Grade 3.  She now lives in Australia and turns the big 5-0 next week.  I've been wanting to make her a card for about 2 months now … alas … life kept getting in my way.  I had the IDEA of this card for ages but hadn't figured out the layout or colour scheme … until last night.  I found two cards that inspired me … and the one hour process began.

My original design idea came from fellow demonstrator Sandi MacIver over at www.stampinwithsandi.com …
I loved the colours and layout of Sandi's card.

Scrolling through my Pinterest board of layouts and colour schemes I love I stumbled across this GREAT layout by fellow demo Kimberly VanDiepen over at www.stampinbythesea.com ...
The colour scheme didn't take long to settle on.  I wanted a find, spring, light feel to the card and the new Lemon Lime Twist was perfect.  Whist I originally planned to make a faux chicken wire design, like in Sandi's cards, I spotted that the new designer paper (available in the new catalogue June 1) has a pattern that was chicken-wire'ish (could be a word!) and thats what I chose.

I struggled to find a coordinating color to go with my new favourite Lemon Lime Twist … so I turned to the new catalogue to see what the professionals over at Stampin' Up! paired with it.  They have another great DSP in the Eastern Palace Suite of products where they pair it with Island Indigo.  Well … who am I to argue with the designers?  Island Indigo it is!

I CASED Kimberly's layout exactly, just changing the colours …

Base - Whisper White - 8 1/2" x 5 1/2"
Lemon Lime Twist Strip - 1 1/2" x 5 1/2"
Island Indigo layer - 2 1/4" x 4 1/4"
Top Whisper White layer - 2 1/2" x 4"

I taped half a doily behind the layers and stapled a piece of Burlap Ribbon to the front.
The fluffy chicken is from none other than the retired SAB set Hey Chick.  Although I use current product 99.9% of the time in my classes this little lady just HAD to be used!

She's inked in Archiva Black ink and coloured using a blender pen and Lemon Lime Twist.  I accented her belly, wing, neck and tail with m Island Indigo marker, just to pull the colours together a bit more.

The splotches came from … hmmm … I forget … bit we all have lot of splotch options.  Gorgeous Grunge anyone?  I WOULD have used that but, to be honest, it was across the room and I couldn't be bothered to get up to grab it! *lol*

The sentiments came from another retired set "Just Kidding".  I bought it ages ago just for those stamps. LOVE them!  I stamped them on scrap white and punched them out with the Classic label punch.  I punched out two more pieces, one in Lemon Lime Twist and one in Island Indigo. I toed them together and popped them up on dimensionals.  The top chick layer is also popped up.

From start to finish the card took me an hour to design and pull together and … as I said, I just love the final look.

I'll mail it today to my friend. I know she won't get it in time for her actual birthday but better late than never, right???

That's it for today - I'm off to start the breakfast / lunch routine.

Have a super stampy day!


Tam

Monday, May 8, 2017

Remarkable You CASE

Happy Monday!

Right!  I've got today well and truly NAILED with productivity so thought I'd take a minute out and do something I WANT to do rather than what I HAVE to do … and share a fab card I made last month for class ...
Love it?  I do!  Now I can't take credit for it.  It's a CASE from the Calgary On rage event I went to in early April.  Alas … I neglected to take a picture of the creator!  So .. to the lovely lady who designed this card THANK YOU!  It provided me with my third class last month AND spot-lighted the emboss-resist technique that I wanted to do.  It's just so striking with the Rhich Razzleberry and black!

I used the (I believe now sold out :( ) Irresistibly Floral Specialty Designer Series Paper and the Remarkable You stamp set.  The great thing about the DSP is that it can be any colour you like!  I just used a finger dauber to in the paper /... and then a dry baby wipe or paper towel to buff it, which reveals the white pattern.  So fun!  I used the new water-colour pencils to colour the flower - again - it can be any colour you like!  I used a blender pen to blend the colours.

This card is a great one for people who don't like to colour!  I really just lightly scribbled the razzleberry pencil crayon, pressed harder around the edges of the petals then blended with the blender pen.  Super quick and easy!

That's it for today … just wanted to share.  Now I'm off to place my 2017 catalogue pre-order … ska-WHEEEEELLLLLLL!

Have a stampy day!


Tam

Sunday, May 7, 2017

Fold Up Album Class

HAPPY SUNDAY!

Ahhh ...a cool, rainy Sunday.  If you know me at ALL you know that is my favourite kind of Sunday!  I foresee a day of cozy leggings, an old, pilled over-sized sweater, fuzzy socks, cooking, crafting, napping.  Ahhhh - relaxing family day from start to finish.  Love it!

Lots has been going on this week (when is it not in Tamara-world?) but I've been taking it in stride and trying to relax and enjoy more.  Spring has sprung and it has me smiling :)

Not feeling to chatty this morning so thought I'd share one of my all-time favourite album projects.  Local peeps are invited to my class May 19th.  Long distance peeps - I can mail you a to-go-kit with supplies and instructions (just no adhesive), if you're interested.

This is a little 5"x 5" fold up album.  Check it out!


*** FOLD-UP ALBUM CLASS *** (HUGELY POPULAR!!!)
  • Friday, May 19th - 6:30 pm *** note this is the Victoria Day long weekend
  • These make FAN-FLIPPIN-TASTIC presents for Grandma, newley-weds, new parents brag book ... They fit in your purse easily and the finished size is only 5" x 5"
  • Best. Album.  EVER!
  • $35 - what you get:
    • Full printed instructions to keep
    • Pre-cut card stock and ribbon
    • $26 in product - you keep what is left over!
      • Tear & Tape Adhesive
      • Fast Fuse Adhesive (complete dispenser and adhesive)
  • Can't make the class?  Take it "to-go" for the same price
  • Refill kits (i.e. just supplies, no adhesive) can be pre-ordered for $15 each ** printed instructions are not included in this option - printed instructions $5 extra
  • ** Bring up to (3) 4" x 6" photos - the album can hold (1) photos that AREN'T sliced on the diagonal and 20 that are ...
  • *** Bring a small paper trimmer if you have one to crop your photos to 4" x 4" - or pre-trim them
  • *** The album we are making will be black/white and/or grey - ya, still haven't designed a current version!
  • RSVP by Tuesday, May 9th - only 10 spots available - RESERVE YOUR SPOT EARLY

I hope you can come!

Im off to find a blanket - kinda chilly in here.  Yay!

Have a stampy Sunday Friends!


Tam

Wednesday, May 3, 2017

A Sara Thing April 2017 Paper Pumpkin Kit Class

Happy Wednesday!

It's been a busy week with appointments - Alicia got her braces, the animal got their shots and today is my standing "date" with my parents.  Yes, the purging continues!  I wonder what treasures I'll find today!  It's also Craig's birthday so I guess I should get on making him a pineapple upside down cake!  But first … a quick class invite for all mu local followers!

I'm sure by now you've seen the April 2017 Paper Pumpkin kit … and hopefully you took all of the demonstrators' advice and ordered a kit … but if you didn't this class is for you!
These cards started a Watercolor FRENZY amongst us stampers … and the kits sold out in record time!  Lucky for YOU I was up early ordering refill kits so I could hold a class!  

Here’s the scoop …

*** WATERCOLOUR PAPER PUMPKIN CLASS ***
  • Two Sessions - Maximum of 10 people per session
    • Sunday, May 28th 9:30 am - 11:30 am
    • Sunday May 28th 12:30 pm - 2:30 pm
      • 12 cards - 4 each of the above 3 designs
      • *** EARLY BIRD REGISTRATION $30 ***  if registered by Wednesday May 3rd (that's TODAY!!!)
      • $35 if registered after today
      • Everything you need to create the cards is included
      • Space is limited - RSVP NOW to secure your spot and get the Early Bird pricing!!
If you want to get in on the class make sure you message me!  I hope you can come - these cards a LOTS of fun to make .. and yes, you can change them around, add different sentiments, use different colours and make it your own.

Off I go!  Have a stampy day friends!


Tam