
Happy Blog Hop Day!
Welcome to the Stampin' Creative Blog Hop for November, 2019. I'm Tamara Bertram, coning to you from Edmonton, Alberta, Canada. I'm THRILLED to be hopping with so many AMAZING demonstrators from around the globe (in fact MANY of them are ranking amongst the very TOP demonstrators in their country AND globally!!!). This month we are bringing you projects with a "Deck the Halls" theme. I hope you find some inspiration from my projects and from those along the hop. Please don't be shy to leave comments as you go along. We all love to read what others think of our creations. Thanks you for popping in - happy hopping!
When I sat down to come up with a "Deck the Halls" themed project I immediately wanted to do Christmas ornaments. The first Christmas I was a mom I started a new tradition. I made a handmade ornament for my baby girl. My dream was to one day have a tree that was covered in only handmade ornaments. That dream is now a reality as ornaments have been made by me, the girls, my mom AND my dad. Every year I enjoy coming up with something new. Sometimes simple; sometimes complex but every year special.
My first ornament I'm sharing was RIDICULOUSLY quick and easy ... and so FUN, as I LOVE to colour!
 I ordered these wood "wafers" or "slices" through Amazon. I got 40 for $22.00. I simply stamped the image and sentiment (from the Brightly Gleaming stamp set) with Memento Black ink and then coloured them with my Real Red and Shaded Spruce Blends. For a little sparkle I added some Wink of Stella. I have seen other stampers "seal" the image by inking the wafer with Versamark and then covering it with clear embossing powder but I like these just the way they are so "naked" they stayed.
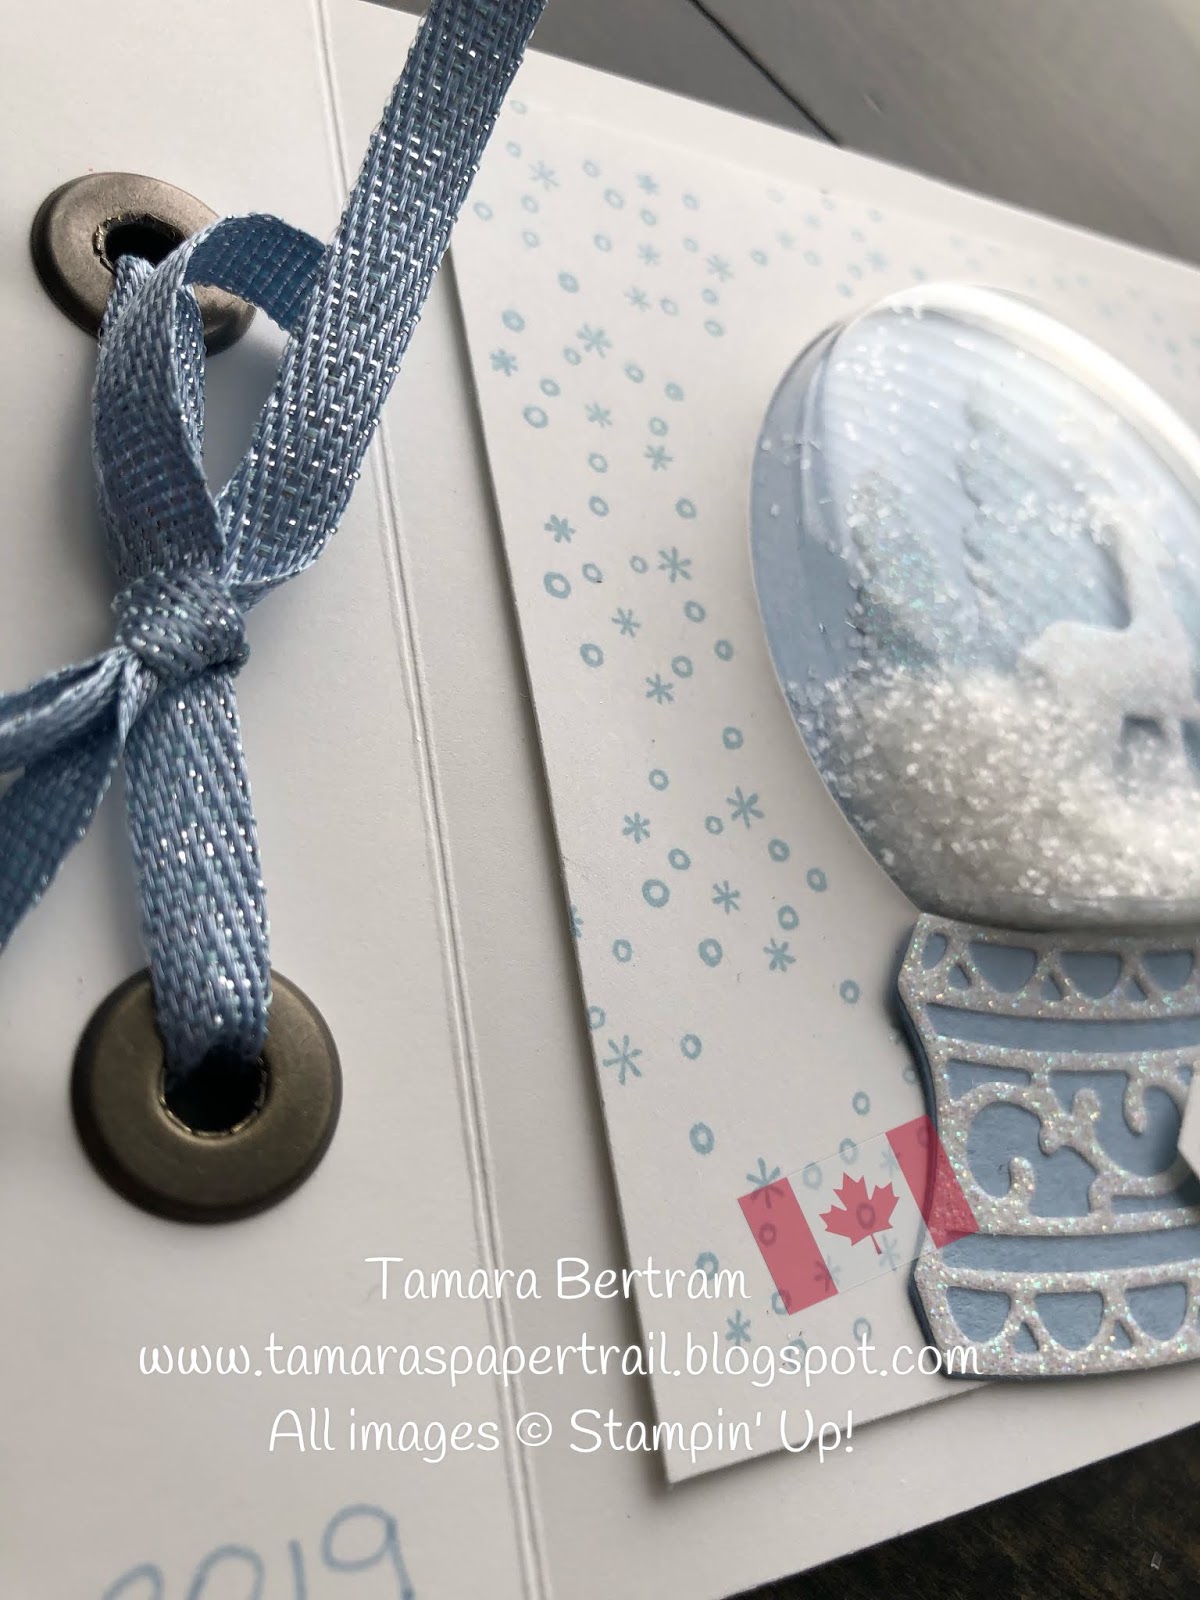
Next up I created a dome ornament using the Still Scenes bundle. One side show the polar bears and the other the deer. I see that I didn't secure the bears quite firmly enough, as the glitter must have gotten under the dimensionals and the bears are lifting. If you try this make sure you press down on those little cuties!

 Thirdly I made the skate from the Free Skate set into an ornament. Notice the laces? I coloured our White Bakers Twine with my dark Smoky Slate Blend marker. I also use that blend to colour the blade of the skate.
 Lastly, although this isn't an ornament I thought I'd throw it in as it, too, is a tradition that I have had for about as long as I have been a demonstrator. Check this out ...
It is a "Wish List Booklet". I make two every year for the girls. They fill it out with everything the want for Christmas. Of course, when they were young, I had them fill it out quite early in December to leave for "Santa" on Christmas Eve. The last few years I'm lucky if I have them FINISHED by Christmas Eve *lol*. ANYWAY ... on Christmas Day, after all the presents are open and everyone has wandered off to enjoy their morning I sit and write down in the back of the book everything they GOT, and from whom. It's just a great little keepsake that they can look back on when they are older and see all the fun toys they wanted .. and got. I will be posting detailed instructions on how to create these little books in a future post.


 I hope you enjoyed my projects and got some inspiration. If you need supplies to make any of these projects you can do so from my online store (if you are in Canada) by clicking the catalogue over on the sidebar. If you have any questions feel free to leave a comment and I'll help you out!
Check out all the other posts from my friends ... and have a stampy day!
Tam
Welcome to the Stampin' Creative Blog Hop for November, 2019. I'm Tamara Bertram, coning to you from Edmonton, Alberta, Canada. I'm THRILLED to be hopping with so many AMAZING demonstrators from around the globe (in fact MANY of them are ranking amongst the very TOP demonstrators in their country AND globally!!!). This month we are bringing you projects with a "Deck the Halls" theme. I hope you find some inspiration from my projects and from those along the hop. Please don't be shy to leave comments as you go along. We all love to read what others think of our creations. Thanks you for popping in - happy hopping!
When I sat down to come up with a "Deck the Halls" themed project I immediately wanted to do Christmas ornaments. The first Christmas I was a mom I started a new tradition. I made a handmade ornament for my baby girl. My dream was to one day have a tree that was covered in only handmade ornaments. That dream is now a reality as ornaments have been made by me, the girls, my mom AND my dad. Every year I enjoy coming up with something new. Sometimes simple; sometimes complex but every year special.
My first ornament I'm sharing was RIDICULOUSLY quick and easy ... and so FUN, as I LOVE to colour!

Next up I created a dome ornament using the Still Scenes bundle. One side show the polar bears and the other the deer. I see that I didn't secure the bears quite firmly enough, as the glitter must have gotten under the dimensionals and the bears are lifting. If you try this make sure you press down on those little cuties!


It is a "Wish List Booklet". I make two every year for the girls. They fill it out with everything the want for Christmas. Of course, when they were young, I had them fill it out quite early in December to leave for "Santa" on Christmas Eve. The last few years I'm lucky if I have them FINISHED by Christmas Eve *lol*. ANYWAY ... on Christmas Day, after all the presents are open and everyone has wandered off to enjoy their morning I sit and write down in the back of the book everything they GOT, and from whom. It's just a great little keepsake that they can look back on when they are older and see all the fun toys they wanted .. and got. I will be posting detailed instructions on how to create these little books in a future post.


Check out all the other posts from my friends ... and have a stampy day!
Tam


