Sunday, January 30, 2022

Daffodil Daydream Bundle - Stampin' Up!

 Happy Sunday!

How's THIS for a surprise??  I'm BLOGGING ... and it isn't a BLOG HOP!  Whaaaaaaat????  lol.  Yup.  I  have a few hours to myself this morning so I'm playing a bit of "catch up"!  I was originally going to post this on FB and thought "Heck No!  Let's do it as a BLOG POST!" ... so here it is!

Have you been loving on the new 2022 Mini Catalogue this month??  I sure have ... and you better believe I absolutely have about 90% of it already.  Yes, it's THAT good!  There aren't enough hours in the day to craft as much as I want to (stupid adulting! lol).  Today I wanted to share with you a bundle that I wasn't sure I would use much ... but I have already made several cards (and counting!) using it.  It's the Daffodil Daydream Bundle.  It's $75.50 CDN plus tax and shipping (Ooooooo!  It's over the magic $60 mark so it qualifies you for a FREE Sale-a-brations item if you order it!  Click the SAB photo over on the right side bar to check what you can get for FREE!)

When I first saw the dies to this bundle I was intimidated.  SO many pieces ... and how do they all go together?  I promise you, it's one of the easier "complicated" dies I have worked with!  Here is how they go together ...


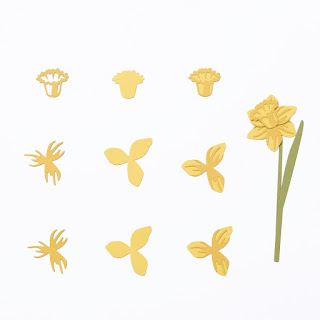
They really are quite intuitive!  The easiest way to  adhere the pieces together is by applying out Adhesive Sheets to the back of your card stock before die cutting the pieces.  SO easy!  If you don't have any or can't be bothered, our liquid glue and even our glue dots work too.  Ask me how I know lol.

Here are the cards I have made with this bundle so far ...


So pretty!  This bundle is a great "staple" to have in your stash.  It works well for Mother's Day, Sympathy, Birthday, Easter, Just Because ... VERY versatile.

Check out my video from a recent "Check It Out Tuesday" where I should you how easy it is to pull together:

If you're interested in purchasing this, or any other items, click on the product photos below (organized by project) and you'll be taken to my Canadian on-line store.

So that's it!  A quick post today.  74 more things to crack on with.  Thanks for popping in and have a stampy day!


Tam

Product List

Thursday, January 27, 2022

Love is in the Air - Stampin' Creative Global Blog Hop


Happy Blog Hop Day!

Every month my friends from around the globe and I bring your projects using Stampin' Up! products surrounding a common theme.  Our hope is to inspire you with our projects.  Let us know how you like them - we love your comments!

This month the theme is "Love is in the Air".  I was inspired by a swap card I received from my friend Diane Hutchinson over at "Crafts by the Bow".  This was my take on her card:
SOOOO pretty!  Have you tried the new Butterflies & Flowers Layering Masks yet?  I'm SO glad I bought them!  Oh sure - I almost ALWAYS buy the masks (after all they ARE quite affordable at only $13.50 CDN!) ... but I don't always USE them (can anyone else??).  Well THESE masks are different!  You LAYER them and they give you an amazing look and depth we haven't seen in our masks before!  

My colour palette is Fresh Freesia, Highland Heather and Soft Succulent.  Our Blending Brushes are your best friend on this project - LOVE them!  Your OTHER best friend are you post-it-notes.  Trust me on this one - don't scrimp!!  Cover EVERY space you don't want inked up!

First, my layer dimensions:
Basic White base - 8 1/2" x 5 1/2"
Highland Heather layer - 3 3/4" x 5"
Basic White layer - 3 1/2" x 4 3/4"

Next up, we get inky!

Start by choosing the "thin" floral image on the mask ... and cover EVERY space you don't want inked with post-it-notes:
Apply your Fresh Freesia ink with your Blending Brush:
Ta-Da!
Next you cover your image with the "thick" floral image.  You'll know it's lined up correctly when you can't see any white in your image:
Apply your Highland Heather ink with your Blending Brush:
Ta Da!
Do the same thing for the leaves - mask off EVERY space you don't want inky with your post-it-notes and ink up the leaves with Soft Succulent ink:
Ta Da!
Ta Da again .....
Adhere your top layer to your Highland Heather layer using Stampin' Seal and then attach the Highland Heather layer to the card base using dimensionals.  

I used our Tailored Tags to cut out the smallest tag, stamped the sentiment from "Love & Happiness" in Highland Heather, popped it up on dimensionals and added a twine bow.  I added a few Pastel Pearls and DONE!  SO pretty ... and a perfect Engagement card for when Love is in the Air :)
Thanks for popping in!  A list of supplies used are at the end of this post.  Click on any of the pictures and (if you're in Canada) you can shop through my store.  Don't forget that Sale-a-brations is in full swing and the Love & Happiness bundle ALONE with earn you a free SAB item!  Use my host code TDJUZQQ2 at the checkout and you'll receive a free PDF of eight amazing projects!

Now click on the names below to head to my friends' blog to see what they have come up with for you.

Have a stampy day!


Tam

For help on how to use Inlinkz please see the video tutorial https://youtu.be/k-OMq56_b5I Product List