Happy Wednesday!
Busy, busy, busy! Tying skates for the Grade 3'ers today … after my workout and walking Doggles …
My display board is coming along nicely! I have a few more additions to share with you :)
This one is a quick and easy monochromatic card …
Fun! I used the new Peaceful Petals stamp set in Bermuda Bay ink. I simply stamped it three times in a row, without reinking! I stamped the sentiment from "Four You" and made it into a banner with my paper snips. I made it wavy by using my bone folder. I scraped the side of the card stock along the side of the bone folder (using the corner of your desk works too!) I adhered it with snail just in the middle of the "Thinking" part of the banner … and added a large rhinestone.
LOVE!
Right … off and running! Until next time, have a stampy day!
Tam
Welcome to my Blog - a place where you can learn how to make quick, cute cards using Stampin' Up! products!
Wednesday, January 22, 2014
Tuesday, January 21, 2014
See Ya Later ….
Happy Tuesday!
A slightly slower day today … but I WILL have to spend time watching the clock so I don't miss the pre-sale ticket sales for the upcoming Katie Perry concert at 10:00 am!!! Myself and about 45,000 other Edmonton and area moms will be on-line trying to scoop tickets so they can get an entry into the Mom-of-the-Year award with their daughters!!! Fingers crossed!!
Today's card uses the new FREE SAB set "See Ya Later":
This is a great, versatile little set that can be used for quick and easy cards. I stamped the sentiment in Baked Brown Sugar then cut it out with my Oval Framelits and popped it up. I used some of the FREE SAB Sweet Sorbet DSP and my new Banner Framelits for an accident and then a strip of the Baked Brown Sugar ruffled trim along the bottom. Three rhinestones on the candles finish it off.
See? Just CRACKING off samples using all these new product. Love it!
Pop in again soon for more! Until then, have a stampy Tuesday!
Tam
A slightly slower day today … but I WILL have to spend time watching the clock so I don't miss the pre-sale ticket sales for the upcoming Katie Perry concert at 10:00 am!!! Myself and about 45,000 other Edmonton and area moms will be on-line trying to scoop tickets so they can get an entry into the Mom-of-the-Year award with their daughters!!! Fingers crossed!!
Today's card uses the new FREE SAB set "See Ya Later":
This is a great, versatile little set that can be used for quick and easy cards. I stamped the sentiment in Baked Brown Sugar then cut it out with my Oval Framelits and popped it up. I used some of the FREE SAB Sweet Sorbet DSP and my new Banner Framelits for an accident and then a strip of the Baked Brown Sugar ruffled trim along the bottom. Three rhinestones on the candles finish it off.
See? Just CRACKING off samples using all these new product. Love it!
Pop in again soon for more! Until then, have a stampy Tuesday!
Tam
Monday, January 20, 2014
Love You to the Moon!
Happy Monday!
Another busy day!! My Jillian Michaels DVD awaits … then it's dog walking, showering and tidying up before I head out to school to help out with yet another field trip! (… WE never had this many field trips when WE were in school, did we??!!) Today's volunteering isn't ideal as I still have a LOT I want to do before Friday night … and I'm volunteering again Wednesday … however .. the kids are my big rocks ... they fit into the jar first … the smaller rocks and sand will fill in around them :)
So let's get on with it, shall we? Today's card is a CASE from fellow U.S. demonstrator Dawn Tidd over at www.tiddbitsfromdawn.typepad.com I loved the clean, simple layout … I only changed the colour of the ink from red to Midnight Muse:
Quick, easy and ideal for a *guy* card (according to Craig). Minimal bling (I KNOW … guy cards aren't supposed to have ANY but …), no ruffles, just stamped and done! The card is Crumb Cake and the hearts are Whisper White and Midnight Muse. The heart is popped up and has a small rhinestone. The sentiment is from the new Love You to the Moon set. Oh! I rounded the corners of the top layer with my corner rounder punch and popped the layer up for a little dimensional interest.
That's it! Quick, easy, done! I made a second card using this set. Pop in again soon to see that one. Until then … have a stampy day!
Tam
Another busy day!! My Jillian Michaels DVD awaits … then it's dog walking, showering and tidying up before I head out to school to help out with yet another field trip! (… WE never had this many field trips when WE were in school, did we??!!) Today's volunteering isn't ideal as I still have a LOT I want to do before Friday night … and I'm volunteering again Wednesday … however .. the kids are my big rocks ... they fit into the jar first … the smaller rocks and sand will fill in around them :)
So let's get on with it, shall we? Today's card is a CASE from fellow U.S. demonstrator Dawn Tidd over at www.tiddbitsfromdawn.typepad.com I loved the clean, simple layout … I only changed the colour of the ink from red to Midnight Muse:
Quick, easy and ideal for a *guy* card (according to Craig). Minimal bling (I KNOW … guy cards aren't supposed to have ANY but …), no ruffles, just stamped and done! The card is Crumb Cake and the hearts are Whisper White and Midnight Muse. The heart is popped up and has a small rhinestone. The sentiment is from the new Love You to the Moon set. Oh! I rounded the corners of the top layer with my corner rounder punch and popped the layer up for a little dimensional interest.
That's it! Quick, easy, done! I made a second card using this set. Pop in again soon to see that one. Until then … have a stampy day!
Tam
Sunday, January 19, 2014
Vivid Vases!
Happy Sunday!
No lolly-gaggin' around here today … there's crafting' to be done!! I'm going hard and heavy on prepping samples using ALL my new toys from the new Occasions Catalogue and SAB 2014 brochure. It's easier than I thought! I'm about half way through the catalogues … my goal is to use EVERY stamp set, DSP, embellishment and kit I bought. THAT will get me to use it and not hoard it! I'm also having fun planning the display board. Really. Who has this much fun *working*??
Today I want to share my new favourite card. It better bask in the spotlight while it can …you know me … I'm sure to have a new favourite by the end of the day *lol*. Here it is:
LOVE it!!! I used three of my new toys on this card. Can you spot them? Yes, the stamp set is new - Vivid Vases. I just LOVE this image! When I first saw it it reminded me of he style of stamps that were out when I first started stamping … and I hd to have it! As you know I LOVE colouring so this was my obvious first swipe at using it … simple colouring the flowers with my blender pen and ink. I will play with it more when I'm not in a time crunch (yes, pressure is building as my Appreciation Night / Open House approaches …. but I promise not to get all crazy and stressed … still relaaaaaaxxxxxxed ….)
I stamped the vases with black Staz-on … a must when colouring. You don't want the outlined images to bleed … so Staz-on it is! I shaded the sides of the vases with my aqua painter dipped in Marina Mist ink.
The second new product is the Wonderful Watercolor DSP … and the third is the banner punch from the SAB brochure. This little bad boy is free with a minima $60 (Canadian) purchase starting Jan 28th. I just love the punch of Real Red in the banner and small heart (which is popped up on a dimensional). A little rhinestone on the banner and heart finish it off. LOVE IT!!!
That's it for now … like I said, the clock is ticking' … the craft room awaits!! Pop in again soon … I have LOTS of project to share in the coming days! Until then …. have a stampy Sunday!
Tam
No lolly-gaggin' around here today … there's crafting' to be done!! I'm going hard and heavy on prepping samples using ALL my new toys from the new Occasions Catalogue and SAB 2014 brochure. It's easier than I thought! I'm about half way through the catalogues … my goal is to use EVERY stamp set, DSP, embellishment and kit I bought. THAT will get me to use it and not hoard it! I'm also having fun planning the display board. Really. Who has this much fun *working*??
Today I want to share my new favourite card. It better bask in the spotlight while it can …you know me … I'm sure to have a new favourite by the end of the day *lol*. Here it is:
LOVE it!!! I used three of my new toys on this card. Can you spot them? Yes, the stamp set is new - Vivid Vases. I just LOVE this image! When I first saw it it reminded me of he style of stamps that were out when I first started stamping … and I hd to have it! As you know I LOVE colouring so this was my obvious first swipe at using it … simple colouring the flowers with my blender pen and ink. I will play with it more when I'm not in a time crunch (yes, pressure is building as my Appreciation Night / Open House approaches …. but I promise not to get all crazy and stressed … still relaaaaaaxxxxxxed ….)
I stamped the vases with black Staz-on … a must when colouring. You don't want the outlined images to bleed … so Staz-on it is! I shaded the sides of the vases with my aqua painter dipped in Marina Mist ink.
The second new product is the Wonderful Watercolor DSP … and the third is the banner punch from the SAB brochure. This little bad boy is free with a minima $60 (Canadian) purchase starting Jan 28th. I just love the punch of Real Red in the banner and small heart (which is popped up on a dimensional). A little rhinestone on the banner and heart finish it off. LOVE IT!!!
That's it for now … like I said, the clock is ticking' … the craft room awaits!! Pop in again soon … I have LOTS of project to share in the coming days! Until then …. have a stampy Sunday!
Tam
Friday, January 17, 2014
Valentine Fun!
Happy Friday!!
WOW is it a beautiful day out there today!!! +8 degrees!! That's unHEARD of in Edmonton, Canada in mid January!!! It makes for SUCH a nice change from the nasty cold we've had this winter. Oh sure, I almost break my neck walking the dog, but I suppose it's better than getting frostbite!!! Craig made the Best-Dad-Ever list with the girls today as we pulled them from school at 11:30 so he could take them skiing!!! Oh ya - Daddy Rules!!!
I'm home cleaning and catching up on some work before "Craft Night" tonight. My craft room is 90% tidied/organized (notice I didn't mention purged?! Having trouble actually PARTING with anything ... but managing to stack it really nicely *lol*)
Thought I'd throw out a few Valentine ideas as the next big crafting *event* is fast approaching! I had a lot of fun playing around with some of my new toys ... and some of the *stuff* I found kicking around my craft room shelves!
Fun! They're so stinkin' cute!! My girls went nuts for these little jars ... the teeny little corks made them laugh! I got 6 of them at the Dollarama (for $1). I originally wanted to make some sort of *love potion* treat and tag but *meh* ... seemed like too much work ... so I grabbed my stash of cinnamon hearts ('cause they never go bad!), filled the jars, and added a bit of Early Espresso Bakers Twine, simply tying it in a not at the neck of the jar. Then I needed a tag. I WANTED to use the new little banner punch ... but it was a bit too small for what I wanted ... so I grabbed this framelit:
... which is from I DON" KNOW WHAT??!! No - it's not from Bitty Banners - that one was too small ... Ack! If you know what it's from please let me know ... now it's going to drive me crazy!
I punched out the banner, folded it in half and taped it together, over the twine. I stamped the "sweet" from Fabulous Phrases (page 70) in Early Espresso and added a Real Red Heart made with the small heart punch. Ta da! Quick, easy and adorable!!
The size is very deceiving in these pictures ... so here it is to scale next to my phone! The jar is only the size of my pinky finger, 2" high!
Next up are some great little fabours ... they are chocolate/sprinkle covered pretzels!
You can buy these large, fat pretzels at the *M* store ... and they also sell the pretzel bags to put them in (who knew??!!) The pretzels are 8" long and almost 3/4" fat. I think they are Snyder's brand. I looked elsewhere for them but Michaels is the only place I found them $2.99 a bag ... but I got a discount because a lot of them were broken!) AAAAAAAANYway ... I bought some Candy Melts (also at Michaels) ... melted them in the microwave, slathered the chocolate on the pretzels then sprinkled sprinkles on them. The girls and I actually made these on Christmas Eve ... they were SO quick and easy to make (they HAD to be for me to be *baking* on Christmas Eve!! (No ... I'm not giving these to anyone 2 months later ... I just used them for the picture *lol*)
Once the pretzels are ready (put them in the fridge so the chocolate hardens again) then you make the tag. I used my Hearts framelits for the hearts (Real Red and Strawberry Slush) for the large hearts then made a banner with a 2 3/4" x 3/4" strip of whisper white cs. I stampes the "thanks" in Staz-on with one of the stamps from the photopolymer set Another Thank You. (LOVE that set!!!) a little small heart finished it off.
Again, quick, easy and cute ... and don't forget FLIPPIN' DELICIOUS!!! I resisted trying one of these for about 3 days ... just didn't interest me. One day I was strolling through the fridge looking for something to satisfy my sweet tooth and thought I'd try one of these (my Dad and MIL had them at Christmas and said they were good). Oh. My. God! DELICOUS!!! Have you ever tried the Rold Gold Chocolate covered pretzels? I have. I'm not allowed to buy them anymore. It's insane. I open the bag and then all hell breaks loose. Seriously! Children are instructed to keep their hands well away for fear of losing one in the feeding frenzy that is Mommy with her chocolate covered pretzels!!! These taste just as good!!! The only thing keeping me from eating these samples is that they were made a month ago and the pretzels have gone soft ... how do I know? Oh ... I dunno ... maaaaaayyyyybeeee there used to be 3 of them .... maaaaayyyybeeee ...
OK - now I'm hungry and have to go eat an orange pepper. Yep - still on Jenny Craig and working out. I'm down 20 pounds since I started 5 months ago. OK. I can't lie. I WAS down 20 pounds ... the day before Christmas. Then Christmas happened. Now I'm only down 16. But I'm going string and will be down the 20 again next week, I'm SURE ... if I can stay away from the stale, soggy pretzels *lol*
OK - gotta run - have an awesome, stampy weekend!
Tam
WOW is it a beautiful day out there today!!! +8 degrees!! That's unHEARD of in Edmonton, Canada in mid January!!! It makes for SUCH a nice change from the nasty cold we've had this winter. Oh sure, I almost break my neck walking the dog, but I suppose it's better than getting frostbite!!! Craig made the Best-Dad-Ever list with the girls today as we pulled them from school at 11:30 so he could take them skiing!!! Oh ya - Daddy Rules!!!
I'm home cleaning and catching up on some work before "Craft Night" tonight. My craft room is 90% tidied/organized (notice I didn't mention purged?! Having trouble actually PARTING with anything ... but managing to stack it really nicely *lol*)
Thought I'd throw out a few Valentine ideas as the next big crafting *event* is fast approaching! I had a lot of fun playing around with some of my new toys ... and some of the *stuff* I found kicking around my craft room shelves!
Fun! They're so stinkin' cute!! My girls went nuts for these little jars ... the teeny little corks made them laugh! I got 6 of them at the Dollarama (for $1). I originally wanted to make some sort of *love potion* treat and tag but *meh* ... seemed like too much work ... so I grabbed my stash of cinnamon hearts ('cause they never go bad!), filled the jars, and added a bit of Early Espresso Bakers Twine, simply tying it in a not at the neck of the jar. Then I needed a tag. I WANTED to use the new little banner punch ... but it was a bit too small for what I wanted ... so I grabbed this framelit:
... which is from I DON" KNOW WHAT??!! No - it's not from Bitty Banners - that one was too small ... Ack! If you know what it's from please let me know ... now it's going to drive me crazy!
I punched out the banner, folded it in half and taped it together, over the twine. I stamped the "sweet" from Fabulous Phrases (page 70) in Early Espresso and added a Real Red Heart made with the small heart punch. Ta da! Quick, easy and adorable!!
The size is very deceiving in these pictures ... so here it is to scale next to my phone! The jar is only the size of my pinky finger, 2" high!
Next up are some great little fabours ... they are chocolate/sprinkle covered pretzels!
You can buy these large, fat pretzels at the *M* store ... and they also sell the pretzel bags to put them in (who knew??!!) The pretzels are 8" long and almost 3/4" fat. I think they are Snyder's brand. I looked elsewhere for them but Michaels is the only place I found them $2.99 a bag ... but I got a discount because a lot of them were broken!) AAAAAAAANYway ... I bought some Candy Melts (also at Michaels) ... melted them in the microwave, slathered the chocolate on the pretzels then sprinkled sprinkles on them. The girls and I actually made these on Christmas Eve ... they were SO quick and easy to make (they HAD to be for me to be *baking* on Christmas Eve!! (No ... I'm not giving these to anyone 2 months later ... I just used them for the picture *lol*)
Once the pretzels are ready (put them in the fridge so the chocolate hardens again) then you make the tag. I used my Hearts framelits for the hearts (Real Red and Strawberry Slush) for the large hearts then made a banner with a 2 3/4" x 3/4" strip of whisper white cs. I stampes the "thanks" in Staz-on with one of the stamps from the photopolymer set Another Thank You. (LOVE that set!!!) a little small heart finished it off.
Again, quick, easy and cute ... and don't forget FLIPPIN' DELICIOUS!!! I resisted trying one of these for about 3 days ... just didn't interest me. One day I was strolling through the fridge looking for something to satisfy my sweet tooth and thought I'd try one of these (my Dad and MIL had them at Christmas and said they were good). Oh. My. God! DELICOUS!!! Have you ever tried the Rold Gold Chocolate covered pretzels? I have. I'm not allowed to buy them anymore. It's insane. I open the bag and then all hell breaks loose. Seriously! Children are instructed to keep their hands well away for fear of losing one in the feeding frenzy that is Mommy with her chocolate covered pretzels!!! These taste just as good!!! The only thing keeping me from eating these samples is that they were made a month ago and the pretzels have gone soft ... how do I know? Oh ... I dunno ... maaaaaayyyyybeeee there used to be 3 of them .... maaaaayyyybeeee ...
OK - now I'm hungry and have to go eat an orange pepper. Yep - still on Jenny Craig and working out. I'm down 20 pounds since I started 5 months ago. OK. I can't lie. I WAS down 20 pounds ... the day before Christmas. Then Christmas happened. Now I'm only down 16. But I'm going string and will be down the 20 again next week, I'm SURE ... if I can stay away from the stale, soggy pretzels *lol*
OK - gotta run - have an awesome, stampy weekend!
Tam
Thursday, January 16, 2014
Happy Watercolor Birthday
Happy Thursday!!
Thursday. That means half day for the kids. That means run around like a chicken with your head cut off for the Mom. It's 10:00 ... got coffee in, breakfast in, workout in (hate you Jillian Michaels!), now blog post ... then dog walk ... then tidy kitchen, super quick shower then off to the get the short people. Better crack on!
Today's card had me squealing with excitement! You can always tell how much of a card is *my own* by the level of excitement and decible (?) of squeal. This one was pretty high on both counts. I drew my inspiration from this card by Lyssa Griffin Zwolanek ...
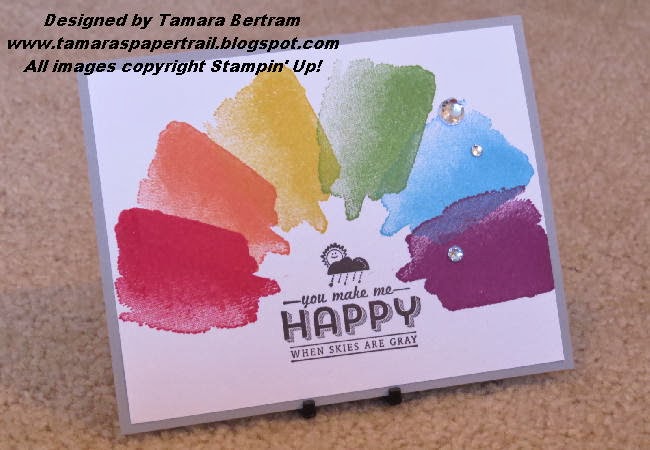
Nice ... but now I wanted to see what else I could do with the colors. Alicia (my official "opinionator") liked them so they MUST be awesome ... I thought I'd try the colors in a rainbow pattern ... and then it ALLLLL came together ... and I squealed ....
LOOOOOOOOOOOOOOOOOOOOOOVE it!!!! I made the rainbow with Real Red, Tangerine Tango, CRUSHED CURRY, (much brighter!), Gumball Green, Tempting Turgoise and Rich Razzleberry. I LOVED the look of the rainbow ... of course then I had the Rainbow song going through my head ... you know ... red, orange yellowwwwwww, green, blue purpllllllllle .... *lol* Next up I searched for a sentiment. I was going to go with the You Make Me Happy again ... and then I saw it ... and SQUEALED!!! The new See Ya Later set from the SAB brochure ... this one was PERFECT ... AND IT FIT RIGHT IN THE MIDDLE WITHOUT EVEN TRYING!!!!!!!!!!!!!!!! pant, pant, pant ... ok ... see how crazy I get over these little things????? Breaaaaathe ... ok .... I stamped the sentiment in Early Espresso. For unknown reasons I added 3 rhinestones. These confused Craig. He didn't *get it*. I do't get it either ... but they're pretty, so they're staying. Ha!
Of course after I made the card the rainbow song left my head and was replaced by *Let the Sunshine In* sung by none other than Pebbles Flintstone ... which I leave you with now so it can be stuck in your head too ... a little flashback for those of you who are my age :) Until next time, have a sunshiny day!!
Tam
Thursday. That means half day for the kids. That means run around like a chicken with your head cut off for the Mom. It's 10:00 ... got coffee in, breakfast in, workout in (hate you Jillian Michaels!), now blog post ... then dog walk ... then tidy kitchen, super quick shower then off to the get the short people. Better crack on!
Today's card had me squealing with excitement! You can always tell how much of a card is *my own* by the level of excitement and decible (?) of squeal. This one was pretty high on both counts. I drew my inspiration from this card by Lyssa Griffin Zwolanek ...
I loved the colors! As usual I set out to copy it exactly ... but I wan't in a butterfly kind-of mood. So I started playing around. Here is the first card I made:
Beore I had any images on it Alicia gasped ... "Moooooooom ... that's beauuuuuuuuutiful ... can I HAVE it?" Ya no. Hands off kid. I promised to make her another one *lol*. The watercolor swipes are made iwth the Happy Watercolor stamp from the Occasions Mini. I sued (I think!) Temptinting Turquoise, Old Olive, Daffodil Delight, Tangerine Tango and Melon Mambo. Yes. That was it. The yellow isn's as bright as I'd like ... maybe I need to reink the pad! I stamped the sentiment (from the same set ... LOVE when THAT happens!) with black Staz-on. I almost left it like that. The swipes were pretty enough on their own ... but I kept playing. I stamped the flower (from the same set) with black Stazon ... hmmm ... needed something. I grabbed my Illuminate ink pad and a QTip and colored the flowers. Shimmery! I DID add one rhinestone ... but I don't really like that part ... think I'll take it off. I added some Old Olive card stock behind the top layer of whisper white.Nice ... but now I wanted to see what else I could do with the colors. Alicia (my official "opinionator") liked them so they MUST be awesome ... I thought I'd try the colors in a rainbow pattern ... and then it ALLLLL came together ... and I squealed ....
LOOOOOOOOOOOOOOOOOOOOOOVE it!!!! I made the rainbow with Real Red, Tangerine Tango, CRUSHED CURRY, (much brighter!), Gumball Green, Tempting Turgoise and Rich Razzleberry. I LOVED the look of the rainbow ... of course then I had the Rainbow song going through my head ... you know ... red, orange yellowwwwwww, green, blue purpllllllllle .... *lol* Next up I searched for a sentiment. I was going to go with the You Make Me Happy again ... and then I saw it ... and SQUEALED!!! The new See Ya Later set from the SAB brochure ... this one was PERFECT ... AND IT FIT RIGHT IN THE MIDDLE WITHOUT EVEN TRYING!!!!!!!!!!!!!!!! pant, pant, pant ... ok ... see how crazy I get over these little things????? Breaaaaathe ... ok .... I stamped the sentiment in Early Espresso. For unknown reasons I added 3 rhinestones. These confused Craig. He didn't *get it*. I do't get it either ... but they're pretty, so they're staying. Ha!
Of course after I made the card the rainbow song left my head and was replaced by *Let the Sunshine In* sung by none other than Pebbles Flintstone ... which I leave you with now so it can be stuck in your head too ... a little flashback for those of you who are my age :) Until next time, have a sunshiny day!!
Tam
Wednesday, January 15, 2014
Sweet Sorbet Sale-a-bration Treats
Happy Wednesday … again!
Well TODAY was an epic waste of time!! One of those days where you just spin your wheels all day. Oh sure, you're BUSY all day (doing Lord knows what!) but you don't actually ACCOMPLISH anything. Ugh! HATE days like those! I picked up a little steam after dinner and started to craft … but then there was a homework *emergency* ("Mom … can you come show me how to add a new page on my Word Document?" …Really? The kids can reprogram my iPhone but don't know to hit the return key until you are on a new page?? Mmm hmm … I'm thinking' someone just did't want to be alone!) Oh well … it gave me a bit of time to hit the lap top to do this post! All good :)
So! I promised to share with some little treats I cracked off in NO TIME using the Sweet Sorbet DSP (that is FREE with a $60 purchase starting January 28th!!) and my new Tag Topper punch from the Occasions 2014 Catalogue.
Here they are:
I cut strips of the DSP 6" long by 2" wide so they would fit inside the punch (see the video I posted a few days ago for a visual). I simply punched each end of the strip and then scored them at 2 3/4" and 3" using my Stampin' Trimmer (LOVE that thing!!) No … the score lines aren't EXACTLY in the middle of the tag but close enough. Remember "don't let the perfect be the enemy of the good"! These were supposed to be quick and easy so I threw exact measuring to the wind … and you know what?? They look fine, nobody died and nobody lost a limb!!!
I stamped the Thank You So Much from the Lots of Thanks Set in Soft Suede ... and punched it out with the Artisan Punch. That got popped up on dimensionals after attaching two of the adorable little banners made with yet another SAB free item.
I taped a Swiss Delice chocolate inside the tag (Costco $12.99 for a bog of a LOT … over 250, I think) and then tied them shut with a 4" snippet of twine that is also one of the free SAB offerings.
That's it! I cracked off 30 in about an hour. An easy little treat to pop in with an order or hand to the cashier who made you smile :)
Pop in again tomorrow when I'll share my new favourite card with you!!! Yes, it made me squeal!! Until then … have a stampy night!
Tam
Well TODAY was an epic waste of time!! One of those days where you just spin your wheels all day. Oh sure, you're BUSY all day (doing Lord knows what!) but you don't actually ACCOMPLISH anything. Ugh! HATE days like those! I picked up a little steam after dinner and started to craft … but then there was a homework *emergency* ("Mom … can you come show me how to add a new page on my Word Document?" …Really? The kids can reprogram my iPhone but don't know to hit the return key until you are on a new page?? Mmm hmm … I'm thinking' someone just did't want to be alone!) Oh well … it gave me a bit of time to hit the lap top to do this post! All good :)
So! I promised to share with some little treats I cracked off in NO TIME using the Sweet Sorbet DSP (that is FREE with a $60 purchase starting January 28th!!) and my new Tag Topper punch from the Occasions 2014 Catalogue.
Here they are:
I cut strips of the DSP 6" long by 2" wide so they would fit inside the punch (see the video I posted a few days ago for a visual). I simply punched each end of the strip and then scored them at 2 3/4" and 3" using my Stampin' Trimmer (LOVE that thing!!) No … the score lines aren't EXACTLY in the middle of the tag but close enough. Remember "don't let the perfect be the enemy of the good"! These were supposed to be quick and easy so I threw exact measuring to the wind … and you know what?? They look fine, nobody died and nobody lost a limb!!!
I stamped the Thank You So Much from the Lots of Thanks Set in Soft Suede ... and punched it out with the Artisan Punch. That got popped up on dimensionals after attaching two of the adorable little banners made with yet another SAB free item.
I taped a Swiss Delice chocolate inside the tag (Costco $12.99 for a bog of a LOT … over 250, I think) and then tied them shut with a 4" snippet of twine that is also one of the free SAB offerings.
That's it! I cracked off 30 in about an hour. An easy little treat to pop in with an order or hand to the cashier who made you smile :)
Pop in again tomorrow when I'll share my new favourite card with you!!! Yes, it made me squeal!! Until then … have a stampy night!
Tam
Perfect Pennants and Banners Framelits Dies Bundle by Stampin' Up!
Happy Wednesday!
Just sitting here at 5:23 am ... not sleeping ... *sigh*. Woke up around 3:20 am with a CRACKING headache and the sound of the CRAZY gusting winds has kept me awake ever since. I suppose I SHOULD take this opportunity to exercise, since I'm scheduled to help 49 Grade 3 students lace up their skates at the rink today (LORD give me strength!!!) ... But Jillian Michaels has been very mean to me this week and after 2 days of her "30 Day shred" video I literally have to fall into chairs because I can't squat low enough to sit like a normal human being! ... the thought of adding to the pain (and of sweating at this time of day) doesn't really appeal to me *lol*!
I had time to play in my craft room last night and came up with 4 fun cards to share ... but not now. You know my photography skills aren't great at the BEST of times ... taking pictures while it's still dark outside would lead to an epic fail ... so you have to wait :)
I love the Perfect Pennants set and framelits! I used them last night and know they will be "keepers". I too love the "Life doesn't have to be perfect to be wonderful" sentiment. It fits right in with my 2014 mind set!
Pop in again to see the treats I promised to share with you ... And all the cards I've come up with. Until then ... Have a stampy Wednesday!!
Tam
Tuesday, January 14, 2014
Framelit Frames
Happy Tuesday!
Another relaxing, slow and steady day around here today. It's 1:14 pm and all I have accomplished is walking the dog, excercising and eating lunch ... meh ... it's all good ... I'm really diggin' this relaxed pace ... but ya, I know, it's likely just a matter of time before all this relaxing bites me in the ass and I'm all stressed out about next weeks Customer Appreciation Night! I really SHOULD get cracking on making samples of projects with all my new toys ... but ... not enough pressure yet, I guess. Every time I hit the craft room lately I end up organizing instead of crafting. (Organizing is my second favorite thing to do ... after crafting / mess making). I generally only get into this mode every December/January. I can't MOVE for the *stuff* and the organizing begins. Of course you know how I am ... once I start a project I pretty much do nothing else until it's done. I figure another 2 days should just about do it. THEN I'll work on those projects. Of course I'm also telling myself it isn't something that HAS to be done! Right? I mean REALLY ... sure it would be NICE to have samples but if I don't does anyone die or lose a limb? No. I'll do what I can when I can ... in the mean time, the organizing continues!
Wanna see how I organized my Framelits?? Of COURSE you do!!! I LOVE this project - I had it done in NO TIME ... and felt really good about using up products I had kicking around in my craft room (I KNEW it would all come in handy one day! *lol*) So here is what I made:
YAY me! Here are a few more shots closer up ...
This project may seem familiar. Yes, last year around this time I had struck on *the answer* to framelit storage ... remember this?
I had simply used magnet sheets purchased from the *M* store, stuck them to the wall and was good to go. Fast forward a year and I realized I now had SO MANY more framelits that I had more in a box on my shelf than I did stuck to the wall. So I needed something else. Over the last month or two I've seen a few other people using the magnetic TAPE to hold their framelits. That worked nicely but I wanted something a little prettier to look at. I was sitting in my craft room looking at the stack of 12" x 12" metal boards I have had sitting around for about a year and figured it was time to use them! (What?? YOU don't have a stack of metal boards stashed away somewhere?? What if you had a crafting/storage emergency like this?? What would you do?! Seriously. You need to plan your hoarding a little more thoughtfully Sister!)
These metal boards I had aren't available for purchase - they were custom made a few years ago thanks to the genius that is Tamye Dunbar. She had these frames made that are able to hang on a wall after being decorated - generally to be used as bulletin boards or nice, framed pieces of art showcasing family pictures etc. ANYWAY ... you can't buy
THESE anywhere but you can always use a dry erase board, a picture frame, plywood, cork board, that stuff with holes that your husband hangs in the garage to hand his tools on (ys, I know it has a name ... can't think of it *lol*) ... ANYthing would work. You simply cover your board/frame/wall with some pretty DSP (that I KNOW you are hoarding for just such projects!!!) and attache the magnetic tape to it in any way you like! The magnetic tape I used was bought from *that place* for $4.99 ...
You simply pull off the protective backing and it sticks to your project. It seriously doesn't get any easier than THAT! It actually took me longer to get my husband to HANG the boards than it did to MAKE the boards!! It won't be long before I run out of room again ... but luckily I have 3 boards left!! Oh, and you can see here ...
... on the far right of the picture ... I used just a strip of the tape to hold my envelope liner and circle framelit cutter/scorer thingy (I seem to be struggling for words today ... so unlike me!!!) This took up a lot less space than placing them on an actual board. (Although I know Craig isn't thrilled that if/when I ever have to peel it off it's going to take the paint off the wall! Oh well ... I can get around him :) )
K. I really SHOULD be doing something more productive so I'll run ... pop in again soon to see the cute little treats I made using the new FREE Sale-a-brations designer paper (available Jan 28th!!!). Until then - have a stampy day!!
Tam
Another relaxing, slow and steady day around here today. It's 1:14 pm and all I have accomplished is walking the dog, excercising and eating lunch ... meh ... it's all good ... I'm really diggin' this relaxed pace ... but ya, I know, it's likely just a matter of time before all this relaxing bites me in the ass and I'm all stressed out about next weeks Customer Appreciation Night! I really SHOULD get cracking on making samples of projects with all my new toys ... but ... not enough pressure yet, I guess. Every time I hit the craft room lately I end up organizing instead of crafting. (Organizing is my second favorite thing to do ... after crafting / mess making). I generally only get into this mode every December/January. I can't MOVE for the *stuff* and the organizing begins. Of course you know how I am ... once I start a project I pretty much do nothing else until it's done. I figure another 2 days should just about do it. THEN I'll work on those projects. Of course I'm also telling myself it isn't something that HAS to be done! Right? I mean REALLY ... sure it would be NICE to have samples but if I don't does anyone die or lose a limb? No. I'll do what I can when I can ... in the mean time, the organizing continues!
Wanna see how I organized my Framelits?? Of COURSE you do!!! I LOVE this project - I had it done in NO TIME ... and felt really good about using up products I had kicking around in my craft room (I KNEW it would all come in handy one day! *lol*) So here is what I made:
YAY me! Here are a few more shots closer up ...
This project may seem familiar. Yes, last year around this time I had struck on *the answer* to framelit storage ... remember this?
I had simply used magnet sheets purchased from the *M* store, stuck them to the wall and was good to go. Fast forward a year and I realized I now had SO MANY more framelits that I had more in a box on my shelf than I did stuck to the wall. So I needed something else. Over the last month or two I've seen a few other people using the magnetic TAPE to hold their framelits. That worked nicely but I wanted something a little prettier to look at. I was sitting in my craft room looking at the stack of 12" x 12" metal boards I have had sitting around for about a year and figured it was time to use them! (What?? YOU don't have a stack of metal boards stashed away somewhere?? What if you had a crafting/storage emergency like this?? What would you do?! Seriously. You need to plan your hoarding a little more thoughtfully Sister!)
These metal boards I had aren't available for purchase - they were custom made a few years ago thanks to the genius that is Tamye Dunbar. She had these frames made that are able to hang on a wall after being decorated - generally to be used as bulletin boards or nice, framed pieces of art showcasing family pictures etc. ANYWAY ... you can't buy
THESE anywhere but you can always use a dry erase board, a picture frame, plywood, cork board, that stuff with holes that your husband hangs in the garage to hand his tools on (ys, I know it has a name ... can't think of it *lol*) ... ANYthing would work. You simply cover your board/frame/wall with some pretty DSP (that I KNOW you are hoarding for just such projects!!!) and attache the magnetic tape to it in any way you like! The magnetic tape I used was bought from *that place* for $4.99 ...
You simply pull off the protective backing and it sticks to your project. It seriously doesn't get any easier than THAT! It actually took me longer to get my husband to HANG the boards than it did to MAKE the boards!! It won't be long before I run out of room again ... but luckily I have 3 boards left!! Oh, and you can see here ...
... on the far right of the picture ... I used just a strip of the tape to hold my envelope liner and circle framelit cutter/scorer thingy (I seem to be struggling for words today ... so unlike me!!!) This took up a lot less space than placing them on an actual board. (Although I know Craig isn't thrilled that if/when I ever have to peel it off it's going to take the paint off the wall! Oh well ... I can get around him :) )
K. I really SHOULD be doing something more productive so I'll run ... pop in again soon to see the cute little treats I made using the new FREE Sale-a-brations designer paper (available Jan 28th!!!). Until then - have a stampy day!!
Tam
Sunday, January 12, 2014
Spiral Flower Originals Die by Stampin' Up!
Happy Sunday!!! I can't begin to tell you what a great mood I'm in today! I SHOULD be tired and cranky due to another night of not-so great sleep but I'm just feeling so GOOD lately! Why? I think I really have the hang of this "relax" gig! I have had a GREAT week of just "going with the flow" and doing what I WANT to do not what I feel I HAVE to do ... and of course 95% of the time what I feel I HAVE to do is totally self-imposed and nobody really gives a rats patootie if I did "it" or not!! I have been organizing and purging almost every room, closet and drawer in the house ... and it feels great! I have been so much calmer, patient and loving towards Craig and the girls this week it's actually weirding me out a little *lol*. Pre-Christmas I was always agitated and "put out" if anyone asked anything of me. Really? You can't put Barbies's hair in a ponytail yourself? Really? You can't find your mitts yourself? Really? You're hungry again?? I just fed you 6 hours ago! Really? You can't drive yourSELF to school? Yep ... I was one wound up, stressed out Mom ... and hated it. I hated the tone of voice I used, I hated the lack of patience I had ... I hated it all. This week has been TOTALLY different. The kids seem shocked when they ask me to do something for them or play with them now and I say YES! I have been more fun so THEY have been more fun. We have gone places and done things together and it has been fabulous. I have two beautiful, awesome little people in my life and I really am blessed to be their mom. I am making the time to BE with the. ... and relax. It's been so great!
Ok, wow, didn't sit down and plan to gush all THAT out this morning!!! (Must be the lack of sleep!!). The plan was to just say hi and share the above video with you. Oh well ... You secretly love my reflective ramblings, don't you? *lol*. The flower die they show is one of my new toys that I hope to play with today while "relaxing" ... But we'll see how the day goes!
Pop in again soon to see what I put together Friday night. I had PLANNED to make cards with my guests at my Technique class ... But I got sidetracked (SQUIRREL!) and ended up making some Framelit Storage boards instead (as you do!) Craig is going to hang them today so I'll take pictures and post them soon. Until then, have a stampy, relaxing day!!!
Subscribe to:
Posts (Atom)