Sunday, January 10, 2016

Sky is the Limit CASE

Happy Sunday!

Wow, what a great weekend so far!  I am thoroughly enjoying myself, felling relaxed, motivated and happy :)  Why?  Well, nothing out of the ordinary, really.   I've just spent a lot of time with people I love! 

Friday night was my Open House.  Yes, it was a FULL week as I made card samples with all my new toys (MAN I love my job!  Who doesn't like making money by crafting???), Yes, I was going hard from the time my hit the floor until I fell into bed.  Yes, I was still prepping cards 2 hours before people showed up.  Yes, I was ready to drop half an hour before people arrived.  Yes, my back packed it in as I was cleaning up.  Yes …... I LOVED it!  (PS - back pills and sleeping on my heating pad saved my back and I was good as new Saturday morning.)

For those of you who came - THANK YOU!  You have no idea how much your friendships, encouragement and business mean to me.  That you took the time out of your busy schedules to hang with ME and my crazy, makes me all squishy inside.  I also appreciate that you humour me by nodding and smiling at all the appropriate times during my "squirrel" moments and "schpeel"s.  Thanks Friends.  You make my heart smile :)

Saturday was just as fun and fulfilling.  Although I felt like I'd been hit by the UPS truck when my alarm went off at 8:15 am, I chugged two coffees and headed to Tamye Dunbar's house (yes, "THE Tamy Dunbar) for "Diva Day" and I got to spend 3 hours with other great friends and fellow demonstrators making some fab cards (that I didn't have to prep!)   Came home, hung with my peeps for a while then spent a few hours doing paperwork from Friday night.  Rebecca slept over at Mom's so Craig, Alicia and I spent the evening together playing games and watching movies.

Today?  Well … at SOME point I'll put some pants on and take Alicia to the mall to spend her birthday gift certificate from Auntie.  Perhaps a little afternoon kip before Craig treats us to dinner (yes, he cooks too!) then an evening of pre-Monday morning prep (homework, hair, lunches)

See?  It's great being me!  Any wonder why I'm having such a great weekend?  Hope yours is going well too!  If not … escape to your craft cave, get the creative juices flowing and enjoy!

Today I'm sharing one of the many cards I made to show off Friday night.  I can't take credit for it - I CASEd it from the Sale-a-brations Catalogue (CASE stands for Copy And Share Everything in stamping-lingo).  I needed quick, easy and awesome so to the catalogue I headed.  In fact, most of the samples I made were direct CASEs from our catalogues.  They are an AWESOME resource!  Next time you feel like making a card but can't get your mojo going just open the catty and copy!  I guarantee it will start something great.  Often I will START by copying but then I end up on a tangent and come up with something original that looks nothing like what I was copying.  The catalogue is always a great jumping off place, regardless of the final design!

Right!  Enough rambling …. here's the darned card!
Wa-low!  Awesome, yes?  This is one of the cards we are making in class this week.  It uses ONLY the new Sale-a-bration (SAB) set Sky is the Limit.  I wanted to use this set in my January class because it is only available for 6 weeks!  Middle of February it's GONE … forever … so get it while you can!  A minimum order of $60 will get this into your collection.  I love it.  It's great for masculine cards, graduation cards, encouragement … so many options!

So!  I started with a Whisper White base then added a layer of Basic Black measuring 5 1/4" x 4" than a Crumb Cake layer of 5" x 3 3/4".  I first stamped the sentiment (Archival Black, of course!) and the heart.  I then stamped the plane on a scrap piece of Whisper White and cut it out old-school … with my paper snips.  I popped it up with dimensionals for added texture and depth.  Oh!  Before I added it to the card I made a propellor.  Any guesses about what I used for that?  The catalogue sample used a flower punch.  Not me!  I used the "X" that is on the Festive Flower Punch!  I love when I can find alternate uses for my punches.  This one worked perfectly!  I punched two "x" s out of vellum paper and attached it to the plane with a 1/8" mini brad (haven't used THOSE in a while!!)

For the clouds I grabbed my Tree Builder Punch.  I punched 1 from Vellum, 1 from Whisper White and 1 from the DELICIOUS Perfectly Artistic DSP.   That is another SAB item … and another item that is only available for a limited time.  Yes, like the Sky is the Limit set, mid Feb the paper will be gone.  Two new items WILL be added to the SAB offerings but those two will be done :(

For the finishing touch I added some Basic Black Baker's Twine and I was done.  BAM!  Took about 6 minutes from start to finish!  Oh!  Forgot - I rounded the corners of the top two layers with my Project Life Corner Rounder Punch.

BAM!  NOW I'm done *lol*

So that's my long winded post from today (it's not my fault - I spent all weekend yacking with friends - hard to stop once I get going!!  you're used to it though, right?  Part of my charm, no?  *lol*  OK ok - enough blathering on.  I'm off to start the day.  Whatever you get up to I hope you get some "you" time in … and have a stampy day :)

xoxox


Tam

Friday, January 8, 2016

Wink of Stella Glitter Brush by Stampin' Up!

Happy Friday!

Another video today as I continue to set up for tonight.

This is the new product Wink of Stella.  It's a glitter pen - the one I used on my A NIce Cuppa card from a few days ago. It's SO sparkly!  It's adds a GREAT pop of glitz to any card - but we careful - as Donna tells us, if you use it over inked images it can bleed so use it sparingly!  I have used it over our Archival Black ink and it doesn't bleed.

Right!  Gotta go prep some snacks.  See you later!


Tam

Thursday, January 7, 2016

Playful Pals Bundle by Stampin' Up!

Happy Thursday!

LOTS to do today as I get ready for my Open House tomorrow night but I also have LOTS to share …. so here is a quick video showing you the ADORABLE Playful Pals and Pyramid Pals Thinlits dies.  We will be making a polar bear with these tomorrow so make sure you pop by if you are in the area!

This bundle of products is 15% off AND gets you a FREE Sale-a-brations item!  How about that cute little bird from Honeycomb Happiness from my post a few days ago?  Order this bundle and it's yours! Email me!

In the meantime, enjoy the video and have a stampy Thursday!


Tam

Wednesday, January 6, 2016

A Nice Cuppa Rainbow Technique

Happy Wednesday!

Busy busy BUSY today.  Been going flat out since 5:30 am!  So let's get right to it, shall we??

First up I wanted to let my Canadian Peeps know about a Designer Series Paper Share I'm offering.  a BIG thanks to my Ontario Demo Friend Cynthia Millan (www.stampwithcynthia.blogspot.com) for allowing me to follow her lead on this one.  Even WITH her guidance and help it still took me 2 hours to crunch the numbers and put the offering together.  

What is a Designer Series Paper Share?  It's en economical way to get at least one sheet of EACH of the beautiful DSP papers in the all new 2016 Occasions Catalogue!  If you haven't seen the catty yet click on the picture over to the right and take a peek!

Here is what I'm offering for the shares.  Two Options ...

"Single" Designer Paper Share = $30
 Short Description:
·      get (1) 6" x 6" piece of every single Designer Paper in the Occasions Catalogue
·      that's 67 pieces of 6x6 Designer Paper!!

"Double" Designer Paper Share = $54 (SAVE 10%!)
Short Description:
·      get (2) 6" x 6" pieces of every single Designer Paper in the Occasions Catalogue
·      ** note - if the original DSP is 12" x 12" you will get a 6" x 12" piece rather than two 6" x 6" pieces
·      that's 134 pieces of 6x6 Designer Paper!
·      ****  BONUS - you will ALSO get 6 Different Double Sided pieces of the SAB  paper "Wildflower Fields" FREE!

SINGLE SHARE LONG DESCRIPTION:
*   It's My Party Paper Stack - 12 Different Double Sided Pieces
*   Love Blossoms Paper Stack - 12 Different Double Sided Pieces
*   Have a Cuppa Paper Stack - 12 Different Double Sided Pieces
*   Going Places Paper Stack - 12 Different Double Sided Pieces
*   Birthday Bouquet - 6 Different Double Sided Pieces
*   Botanical Gardens - 6 Different Double Sided Pieces
*   Shine On Specialty Paper - 6 Different Double Sided Pieces
*   Blushing Bride Glimmer Paper - 1 6x6 Piece
*** Club Members get 8 Different Double Sided Pieces of Botanical Gardens SAB DSP free

DOUBLE SHARE LONG DESCRIPTION:
Get DOUBLE the amount of paper PLUS get a BONUS - receive 8 sheets (1 of each pattern) of the Wildflower Fields (SAB) for FREE!
*   Get 6x12 cuts of the Birthday Bouquet, Botanical Gardens, Shine On and Blushing Bride Glimmer Papers
*   Get double sheets of 6x6 cuts for each of the Paper Stacks --> It's My Party, Love Blossoms, Have a Cuppa and Going Places
*** Club Members ALSO get 8 different 6X6 sheets of printed vellum AND (6) 6" x 6" sheets of the SAB Perfectly Artistic DSP for FREE!

If you are interested in either of the shares please email me.  If you aren't in Edmonton I can mail your share to you for an additional $2.50 charge.

Right!!  On to a project!  Here is another card made using the fabulous new A Nice Cuppa set ...
This is NOT my usual style of card but I kinda like it!  Of course the teach cups are/were my focus … I may tweak the twine … nonetheless …

I used Bermuda Bay card stock for the base and ran it through the Lacy something-or-other embossing folder (dunno the name but it is current … cause I checked before I used it … cause I'm awesome like that!).  I obviously added a doily to the card stock.  For the tea cups ….

I stamped the image on whisper white card stock with Versamark ink, added black embossing powder and heat set it.  To get the cool colours for the writing I simply grabbed my markers.  Whisteria Wonder, Crushed Curry, Melon Mambo and Bermuda Bay.  I coloured over the words (which were white when I started) then I wiped off the entire cup ensemble with a dry baby wipe to remove any extra marker from the black embossed area.  Actually - I lie.  I DIDN" wipe it … but I should have!  BECAUSE I didn't wipe it I ended up with smudged ink on my white card stock that I hadn't embossed.  THAT meant I had to take my scissors and cut out the tea cups the old-school way!  Not what I intended to do but I like the result!

I added some Crushed Curry Bakers Twine and then my clear Wink of Stella glitter pen.  Ooooooo wait tip you get your hands on this stuff.  Deliciously sparkly!!!!  I just applied it to the raised parts of the embossed image.  It added a much needed POP to the final project.

Kinda love this set.  Just sayin'

Right!  I'm off to tidy up - new couch is being delivered shortly.

Pop in again soon.  Until then, have a stampy day!


Tam

Tuesday, January 5, 2016

A Nice Cuppa!

Happy Tuesday!

Not a lot to report today.  I spent yesterday thoroughly enjoying the peace and quiet of "back to business as usual" around here!  The morning was working out, walking Doodles and tidying up before running a few errands, dinner and homework with the kids.  I expect today will be much the same as I play "catch up" on house cleaning and grocery shopping (with HEALTHY food!)

I spent all weekend in my Craft Cave (well, back-permitting - lots of breaks!)  Sunday I was playing around with a set I fell in love with from the new 2016 Occasions Catalogue (which goes live tomorrow btw!)

It's Called A Nice Cuppa ($21 - page 35 of the 2106 Occasions catalogue).  Check.  It.  Out!
ARGH - I just LOVE the pop of white in those funky hearts!!!

This card actually took about 2 hours to come together.  It It started off VERY differently and ended up morphing into this.  Freaking LOVE it!

I used my long-ignored favourite purple Elegant Eggplant as a mat.  It measures 3 1/4" x 4 1/2".
The delicious Whisteria Wonder patterned paper is the new "Have a Cuppa" Designer Series Paper Stack (page 35, $10) and measures 3" x 4 1/2"

The cup was then punched out of Elegant Eggplant card stock with the new Cups and Kettle Framelits ($36)

If you buy the stamp set and framelits you get 15% off - so the bundle is $48.25.  Worth every penny, if you ask me!

The white waves are punched out with one of the framelits.  The little tea bag was stamped and cut out with scissors.  Yes, there is a framelit for it but really?  Scissors were probably faster for this little guy!

The hearts … ahhhh the hearts.  Freaking love the hearts.  They are stamped and then cut out (with scissors - there is a similar framelit but not an exact fit for this heart so I used scissors 'cause I'm crazy like that!!)

Oh … and the little white part that is in the handle of the tea cup … that was punched out as well (otherwise you would see the Whisteria DSP behind it, not the punch of white that I love)

I attached the "waves" with my fine tip glue pen.  I attached a piece of white bakers twine to the tea bag with some Tear n Tape.  I attached the hearts with dimensionals and added a few rhinestones.

It's rare that I don't have a sentiment on the front of my cards … but this one just didn't need it.  You can use it for a Get Well, Thinking of You, Thank You, Birthday - almost ANYthing.

My kind of card!  I feel a mass production coming on *lol* … well … maybe one day … I still have too many new toys to play with before focusing on one card for more than 10 minutes!  Speaking of …. I loved this set so much I needed to try another card using it.  Mission accomplished!  Pop in again soon to see how THAT one turned out!  Until then - have a stampy day!


Tam

Sunday, January 3, 2016

Honeycomb Happiness for A Little Bird

Happy Sunday!

Wow.  Last day of Christmas break.  Am I excited?  Yes and no.  Yes I'm very much loping forward to getting backing into some sort of a routine but no, NOT looking forward to lunches, homework and early mornings.  Alas … all good things must come to an end :(

ONE really bright light for this coming week is the start of the Occasions Catalogue and Sale-a-brations promotion!!!  Yes, we are just days away from packing up the Christmas stamps and getting a whole new batch of Spring and birthday stamps.  Of COURSE I have half of them all ready (thank you pre-order for demonstrators!) and of COURSE I love them all!  I have only just begun to play with them but let me tell ya … I cracked off 9 cards in the last 24 hours. They were quick, easy and FABULOUS!  Wanna see my favourite one so far?  Of COURSE you do!

Drum roll please …..

Ska-WHEEEEEEELLLL! I can't even STAND how stinkin' adorable this little bird is!!!!  It comes fro one of the FREE Sale-a-brations sets "Honeycomb Happiness".  Yes, you can pick this set for free with a $60 order (press s/h/gst).  I wasn't sure what I would do with this little guy but HAD to have the set … and now I'm SO glad I do!  Just LOOK at that little face!  I think this is an ADORABLE baby card!  Yes, it can be used "just because" but you better believe I'm going make a bunch for babies!

So!  How did I create it?  Well … first I grabbed my SAB brochure and started off copying the sample created by Stampin' Up!  The basics are the same - I used two banners -a 2" banner and a 1 1/2 banner (whisper white and Mint Macaron).  The Mint flag was run through the "Arrows" embossing folder for some texture.  I stamped the bird in Archival Black ink then used my aqua painter to colour him Mint Macaron.  No, the aqua painter isn't ideal to use on whisper white card stock.  The paper did buckle a bit when it dried … but I prefer the whiteness odour whisper white to the more vanilla colour of our water-colour paper … so I'm just dealing with the warped paper lol.

You can't from the picture but the beak and feet of our little friend was coloured with another new product "Wink of Stella".  I had never heard of this stuff before but apparently is is available other places.  It's essentially glitter ink in a pen.  Ohhhhhh is it nice!  I used the gold here but there is also a clear that I used on another card(I'll post that one in another post) and it is DELICIOUS!

The sentiment on my bird card is from the same set, Honeycomb Happiness, again stamped in Archival Black.

See the gold thread behind the banners?  Ya - THAT'S new!  Well … new to ME, anyway.  Although he annual catalogue has been in effect since June of 2015 I only just noticed this gold (and there is also a silver) thread.  Well!  Ordered myself up some of THAT little bit of lovely and now I'm addicted to it.  I used it on 3 of my cards yesterday!  To attach the thread I just put a strip of snail adhesive to the back of the banner, cut some thread then stuck it, in circles, to the tape.  To secure the thread I sandwiched it to the card with a piece of Tear n Tape. I popped the banner up on dimensionals and Wa-low!  A key-ute card!  But wait!  What about his little belly???  Ah yes … the belly is another new toy … "honeycomb embellishments".  These are also in the new Occasions Catalogue and are SO fun!  You'll find them on Page 9 of the catalogue.  $6.25 (Canadian) for 12 little honeycomb circles (4 each of three colours).   You get Blushing Bride, Mint Macaron and White.  You can spritz the white one any colour you want with your colour spritzer, making it a mud-have embellishment!

The honeycomb piece DOES make this a hard-to-mail card.  My solution, if mailing, is NOT to actually open up the little ball - mail it with the "ball" closed … the recipient can open it, peel the protective backing off and stick it down.

So …that's it for today.  I plan to spend most of the day in my cave again … LOTS to do before my Open House Friday!  As I mentioned, I have LOTS of projects to share in the coming days so pop in again soon.  In the meantime … have a stampy Sunday!


Tam

Saturday, January 2, 2016

Pyramid Pals + Playful Pals

Happy Saturday!

Yay me!  I FINALLY set aside the "should" tasks and hit my Craft Cave for some much needed playing!  I can't tell you how good it felt to just create without any particular goal, timeline or mission.  I grabbed a stamp set and went to it.

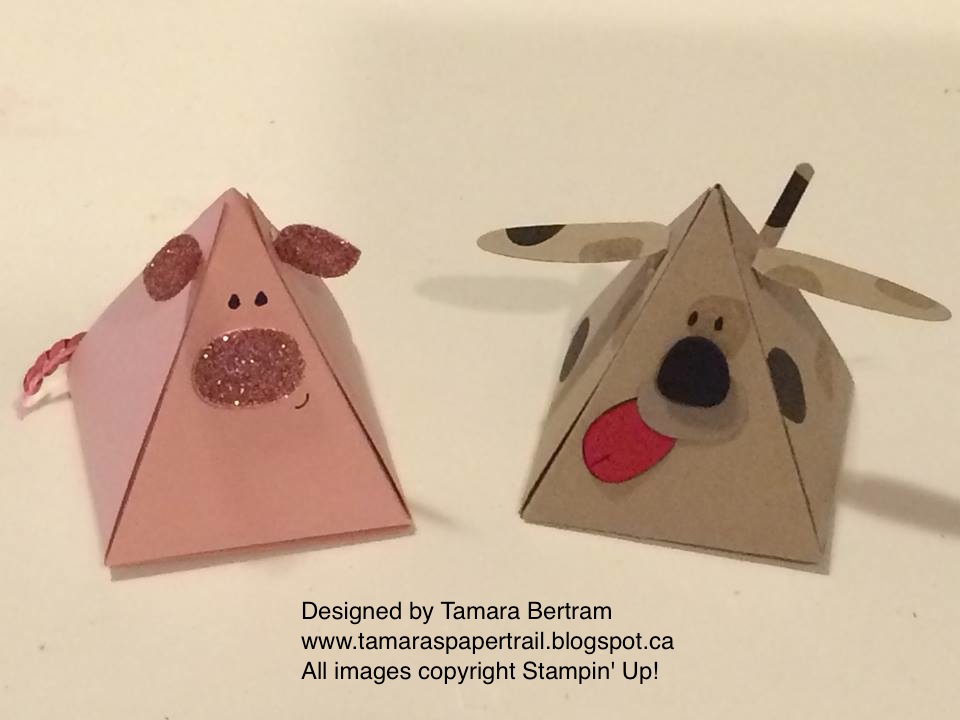
I now have a new addiction.  I introduce you to …Pyramid Pals …


Freaking LOVE them!!!  Seriously!  I needed to put the set away or I'd STILL be making them *lol*.  They are made using an all new set and framelit bundle (released Jan 5th) called Pyramid Pals. (the stamp set is called Playful Pals).  I wasn't sure I'd get this set originally as it does carry a "make sure you love it" price-point.  The bundle comes in at $73 Canadian, pre s/h/gst.  Once I saw the cute samples, however, I was 75% convinced … and THEN, when I realized I would earn a free Sale-a-bration item with it … well … it was a done deal.  Am I glad I got it?  Ummmm … guess!

These little pyramid boxes are just that - little boxes which you can put little treats in.  They are quite tiny … fitting in the palm of your hand and measuring just 2 1/4" x 2 1/4" x 2 1/2".  They could hold one or two mini chocolate bars, some Hersheys Kisses, one or two tea bags … just a little something.

For adhesive I would recommend Fast Fuse or Tear n Tape.  Snail doesn't hold for long and your box will pop open after a few hours.  I also loved using my multipurpose and/or fine tip glue pens for the ears and tails.

Seriously,  Once you make one you just can't stop!

Which is your favourite??  I honestly can't decide!  Love them ALL!  SUPER love them all for different reasons!  The polar bear is the quickest.  The pig has glitter.  The dog has character.  The zebra … well … he was my most original critter as I realized I could use the awesome "Go Wild" designer series paper stack.  I still want to make a leopard, tiger and giraffe using that same paper … but I had to "step away" from these little cuties to stretch my back!

Do I love these?  Yes I do.  Do you "need" the bundle?  Perhaps not.  Do you want it?  YES!  Will you be glad you got it?  ABSOLUTELY!

If you are in the Edmonton area and free this Friday night pop over for my Open House and New Catalogue Launch.  You can see my critters up close … and "maybe" we will even be making one!

I encourage you to "Like", "Follow" and "Get Notifications" on my business Facebook page "Tamara's Paper Trail" to stay in the loop.  I always post projects, promotions and classes there before I do here.

Pop in again soon … I made more than just critters last night and will post those projects shortly.  Until then - have a stampy day!


Tam

Wednesday, December 30, 2015

Stunning Ornaments with the Festive Flower Punch

Happy Wednesday!!

Long-time-no-post!  I can't believe it's been 2 full weeks since I posted … or that I've only posted twice this month! … then again yes, I CAN believe it as December always seems to be a gong show around here!  In the buzz and whirl that is the run up to Christmas I seem to be in survival mode … just barely keeping my head above water.  Naturally making sure the kids have a lunch in their backpack takes priority over blogging … and once school is done wrapping presents, baking and trying to RELAX takes precedence.  Now that "the big day" has come and gone I'm trying to GENTLY ease back into a mini-routine and a *little* work.  Of course "*real* pants" are still optional and "pants are optional" is still my mantra for the week … so I bring you this post from the comfort of my leggings and stretched out *sick* sweater (you know what I'm talkin' about - that sweater we all have that we wear when we are sick … it is over sized, stretched out, faded, likely has one or more holes, is COMPLETELY the wrong colour for your complexion and likely smells like a wet hamster but is sooooooo comfy and cosy.  Ya - THAT sweater!)

So!  Here I am (now that you have that great visual of what I look like this morning!) ready to share a few of my favourite gifts and ornaments for 2015.

I HAVE to start with this years ornament.  If you've been following my blog for a while you'll know that I love traditions at Christmas and perhaps my favourite one is that each year I make a tree ornament for my girls.  The idea started when Rebecca was born.  I had discovered "quilling" (rolling thin strips of paper) and made a few paper snowflakes on her first Christmas.  I thought it would be nice to make one every year so that, when she was grown and moved out, she would have a box full of lovingly made ornaments for her tree.  I made quilled ornaments for the first two Christmases but by the third year I was tired of them,  a) they are very time consuming b) by the third Christmas we were living at my moms and  I didn't have my crafting supplies c) I wanted to try something new.  Yesterday the girls and I dug out their special ornament boxes and went through them.  It really made my heart smile to see how many they have!  I have made at LEAST one every year (except 2004 … ??!!) … and aside from the ornaments that were made by ME there are dozens of hand-carved wooden ornaments made by my dad (given to them each year) as well as ornaments that either the GIRLS made or that we made together.  I absolutely LOVE that their trees can be FULL or ornaments when they are older .. and that they are all hand made.  LOVE!

So!  As always, I spent about 100 hours surfing through Pinterest for ideas and settled on these stunning pieces of loveliness …
I can't even BEGIN to describe how beautiful these are "in person"!  They are SO striking and sparkly.  Absolutely LOVE them!  Pictures truly don't do them justice.  Picture them with the glow of the Christmas lights bouncing off them in the dark.  Fabulous!!!
 Hmmm- the lighting on these isn't very "true" …

Red Glimmer paper ...
 Silver Glimmer paper ...
 Dazzling Diamonds Glimmer paper …
 Champagne Glimmer paper ...
My absolute favourite is the Dazzling Diamonds flower … then the red and Champagne (tied), then the silver.  The silver is pretty but it kinda hurts my eyes it so blingy! lol

I have to admit, it wasn't until one of my friends bought the Festive Flower Punch that I really considered buying it.  I'm not a fan of "fussy" and time consuming … but I also can't live with someone owning a product I don't have so, when it went on the Weekly Deal at 25% off I bought one.  It sat on my shelf until I decided to try making a flower.  Naturally I had no idea what to do so I headed to Youtube to watch a video on it.  Here is the Stampin' Up! video I watched ...
I still down have the stamp set (I can't imagine I'd ever use the set …)but I am SOOOOO glad I own the punch!

For my flowers I used a hot glue gun to speed things up.  That is a MUST, in my opinion!  The glue used in the video would simply take too long for this impatient crafter!  I also used my silicone mat to make sure I didn't have any glue "incidents" on my craft desk.

Once I punched out all my pieces (8 large petals, 4 small, two "centres" and two 1" circles I folded the petals in half (like in the video).  I would fold 1 flower, then glue it as the rough glimmer paper did feel like sandpaper against my fingers after a while so I had to split the steps up to save my skin!  The assembly process took 10 minutes per flower … so I made 6 per hour.

I made 6 of each flower, for a total of 24.  I gave my mom 12 (3 of each colour) and kept 12 myself … and putting 2 in the girls' keepsake boxes.

Oh .. I also attached some cord to the back of each ornament.  I simply attached it with the (retired) Sticky Strip.

Mom loved them.  So do I!

Wanna see two more of my favourite gifts/decorations from this year?  Ok!  They come from y eldest, Rebecca (12 years old).  She insisted on making everyones' gifts … and they couldn't be MY idea …or come from Pinterest.  I freaking LOVE what came out of her imagination (and my crafting stash).  Check them out …

Love love love!  The snowman (her gift to me) is one of my dad's socks (new, never work *lol).  The had is one of Rebecca's old socks (VERY worn *lol) and she glued the buttons and pipe cleaners on with my glue gun.  Not gunna lie - makes me a LITTLE twitchy that she's using my glue gun unsupervised!

The bottom picture is what she made for Craig.  She just made figures out of pompoms and cotton balls.  You can't see it very well but the black blob in the background is a reindeer.  LOVE it!

Right!  Doodles is giving me stink-eye which means it's time for his walk.

Pop in again soon to see more projects.  In the meantime, enjoy the rest of the holidays and have a stampy day!


Tam

Monday, December 14, 2015

Christmas Crafting Crazy

Happy Monday!

… I think … not too sure.  Been awake since 3:00 again - never a great start to the day.

Too.  Much.  Going.  On.

Last week everything was great.  I was on top of it all.  I was calm.  I was collected.  I was rested.   I was "normal".

As of yesterday I am bat shit CRAZY and have a to-do list that is 30 bullet points long! … and some of those bullet points have SUB-bullet points.  WTH???  I'm drowning, primarily, in school work!  With the last 4 days of school the kids have a TONNE of exams, assignments and "fun" things to do.  Translation - I'm juggling helping make a to-scale zoo (complete with fences, animals and dimensions), memorize useless facts about mercantilism and The Hudson Bay from back when the earth was still cooling, writing cue cards on the 6 form of precipitation … and 4 types of clouds … and how they are formed … meanwhile trying to figure out what everyone is going to wear to the 15 minute Christmas Concert Thursday night … oh, and whip up a potluck snack for the kids … and MAKE an ugly Christmas sweater … did I mention our fridge died last week?  Ya - so we're living out of a bar fridge and a box of condiments in the garage … did I mention Alicia has a RAGING cold?  Ya - 3 time she's been sick in 3 weeks …. AND I have my period … AGAIN!  %(@#%*!#(

*insert calm breathing here ….

OK … better ….

Shall we proceed … calmly?   Right ….

So that's why I've been MIA for the last week or so.  I say again … bat shit crazy …

In and amongst all the "fun" noted above I HAVE been crafting.  Yup - the last two Fridays I was at the school crafting with Alicia's class (ironically one of those classes I was in her classroom while she was sick at home on my couch!)  Naturally my samples got lost in the 27 kid chaos .. but here is an idea of what they made ...
We used the Fry Box Die to make Santa boxes.  They also made a white version with 3 punched out black circles for a snowman box.  IT was actually a fairly painless afternoon *lol*

Last week I went in and the kids made two cards and envelopes … not quite as painless but fu all the same ….

The reindeer card was quick and easy.  They simply stamped the antlers from the Wonderland set (2015 Holiday Catalogue that is retiring VERY soon!) … and the sentiment from Oh What Fun (In Chocolate Chip ink).  A 1/2" red glimmer paper circle was attached with a dimensional and they drew eyes on with a Sharpie.  I thought the card would be too quick so I made up a second one.  In hind sight the one would have been enough,  Alas! …

The second card was made with different lengths of 2", 1 1/2" and 1" strips (Cherry Cobbler, Pear pizzazz and Whisper White), punched with the banner punch.  The snowflake is a retired one I found in my stash of "single" stamps that we could buy a few years back.  We used a retired flower punch to punch it out and attach it.  The snowflake is in Early Espresso.  The 3 snowflake are in Pear Pizzazz from another retired set Christmas Punch (one of the very first sets I ever purchased!)
The sentiment is from the November Paper Pumpkin kit.  We added some rhinestones for some bling … they stamped and punched out the santa postage stamp for the envelope and they were done.

Last week the girls and I cracked of 16 Key-UTE little candy sleighs.  I've seen them all over Pinterest but it wasn't until my friend Barb posted pics of hers on Facebook that I knew I had to make them.  It took about an hour to do all 16!

 Walmart for the Candy Canes and Costco for the Gum, Chocolate Bars and ribbon.  I made tags using the Oh What Fn se (Black ink) and ornaments from a retired set from last year in Cucumber Crush - punched the top with the topper punch, added some Baker's Twine and DONE!

Thursday night Rebecca asked if I would make a card for her student teacher as it was her last day Friday.  Oh kayyyyyyy.  I've made this card before but this one had to be bigger so all 21 kids could sign it.  Mission accomplished.  I used a 12" x 12" piece of paper (and no envelope) to make one large enough.

 Done!

Last night I worked on my angels from 2 years ago …
I had given all mine to my mom back in 2013.  I had punched out all the pieces, planning to put them together but apparently that takes 2 years … and a 30 Bullet-point to-do list to get 'er done!

Lord ply knows what I'll be creating THIS week … but rest assured there will be SOME crafting happening.  Well … if I survive the next 3 days, that is!  Pop in again next week to see if I made it!

Thanks for listening to my rant!  Now out's 6:30 and time to get the kids moving.  Wish me luck … and have a stampy day!


Tam


Thursday, December 10, 2015

Year End Sale

Happy Thursday!

I know, I know … it's been over a week since I posted a project.  Hang in there - some are coming!  To be honest I didn't DO much crafting last week - too busy being exhausted and dealing with sick children.  This week has been a little better as we have started making gifts and ornaments for family and friends.  Stay tuned!
Today I just wanted to mention that some of the current products (in the 2015 Holiday Catalogue) are on sale!  See over on the Right Hand Side?  The picture that says "Order 24/7"?  Click on that to go to my on-line store and order away!  Items are While Supplies Last.  If your order is under $200 make sure you enter Hostess Code 4BH4VYKH to be entered into my draw for free product!

Thanks for popping in - I hope your holiday prep is going strong!  I'll post a project very soon.

Have a stampy day!


Tam