Happy Blog Hop Day! Each month talented Stampin' Up! Demonstrators from around the globe bring your projects they have created around a common theme, and using only current Stampin' Up! products. We hope they bring you inspiration! This month the theme was "Sketch" ... so many options!
Sketches are a GREAT way to get your Mojo going. I very rarely stick exactly TO the sketch, it's more of a jumping off spot for me.
The sketch I worked with came from Mary Fish at stampinpretty.com. Here is her sketch ...
... and here is my interpretation of it ...Sooooooo pretty! Last night I did my live "Check It Out Tuesday" Facebook Event and I was trying out the new hot technique "alcohol painting". Not sure if that's what it's CALLED but that's what I'M calling it! lol. There was a lot of trial and error but in the end I came up with something I really liked, so I decided to use it for my sketch.
How do you make the pretty background? In a nutshell, you colour on Vellum card stock with your Blends Alcohol Markers and then you "paint" over it with 99% Rubbing Alcohol. Since the BLENDS are Alcohol and the ALCOHOL is Alcohol, the colours bleed together and, when they dry, give you some amazing patterns! For a video "how to" you can check out my replay from last night on my YouTube Channel "Tamara's Paper Trail". Here is a brief picture tutorial:
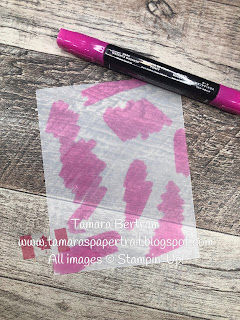
Start by randomly scribbling on a 5 1/2" x 4 1/4" pice of Vellum card stock. Bright, dark Blends work best. I used Dark Magenta Madness and Dark Night of Navy.
Using a wide paint brush or our wide Aqua Painter, "pounce" or "dab" alcohol all over the image. If you rub, rather than pounce, the colours will muddy and not give you a nice colour contrast.
Allow the alcohol to dry/evaporate. You can speed up the process using your heat tool, if you like. You can also get some neat patterns by blowing the alcohol and the colour around!
When it dries, the colours are much more muted:
I then grabbed my Fine Tip Glue Pen and added thin lines here and there, to look like veins in marble. I added our Gilded Leafing while the glue was still wet:You can also use Heat & Stick powder to apply the Gilded Leafing. If you don't have that product, you can also use Versamark and Gold Embossing Power, for a similar effect.
Once you brush the excess away this is what you get:

SUCH a fun card to make ... and OHHHH so pretty!I hope my project has inspired you to try Alcohol Painting yourself. I'd love to see what you come up with!
Now hop along to see what my friends have to share with you ... and have a stampy day!
Product List Now hop along to see what my friends have to share with you ... and have a stampy day!


Wow! What an incredible card! I can't wait to try this technique!
ReplyDeleteLove it thanks for sharing the technique I’m looking forward to having a go at it!
ReplyDeleteI love your card Tamara! I'm going to the store to buy some rubbing alcohol. Thanks for the inspiration.
ReplyDeleteThanks Jackie! Make sure it's 90% or more. Trust me!
Delete