Happy ... yawn ... Friday ...
I don't know why I'm blogging instead of napping ... sometimes I'm my own worst enemy!
Yesterday started OFF as a very productive day creation wise ... after my post ... and taking the kids to my mom's all creativity left me. I spent 3 HOURS trying to come up with my "Man Card" for Sunday's birthday stamp-a-stack. 3 HOURS! I have quite a pile or rejects (which I may post another day just for a good laugh!) After 3 hours I had a quick bite to eat ... then another hour of nothingness trying again ... then yoga with Rebecca (where I hurt my back!) ... then 2 1/2 MORE hours of nothingness. I finally crawled into bed around 11:30 pm (which is WAAAAAAY past my bedtime!)
I woke up at 4:15 am. Great. Of course my mind went to cards ... NOT what I want my mind to be DOING at 4:15 am. I tried to go back to sleep but by 5:15 am I figured "why fight it" ... just go down to the craft room and try again. 20 minutes later I had it. Yep ... apparently if I am extremely sleep deprived and in vast amounts of pain from twisting into non-natural pretzel shapes on a hard floor I am more creative ... (or maybe I just didn't give a damn anymore *lol*). But seriously - I really LIKE what I came up with. Lookie:
Ta Da! Love it! (Good thing or I think I would have torched my craft room!!) I used Soft Suede and Sahara Sand. The stamp sets are Clockworks and Whacky Wishes. The only explanation needed is with the watch ... I stamped the watch outline .. then on a scrap piece of paper stamped the face of it and punched it out with the 1 1/4" circle punch (so it didn't have the splotch design over it ... plus when I stamp the watch I get a big glob of ink in the centre from the rubber touching the ink pad where it shouldn't ... I usually cut the centres of circles out with an exacto knife but didn't think that wise at 5:30 in the morning!!) I put a brad in the centre for fun.
I have LOTS more projects to share ... but I'm slowly losing the will to live so I must either a) walk the dog or b) take a nap ... I have to do both I just have to decide in what order!
Hope your having a perkier day than I am ... either way ... make it a stampy day!
Tam
Welcome to my Blog - a place where you can learn how to make quick, cute cards using Stampin' Up! products!
Friday, October 19, 2012
Thursday, October 18, 2012
Trust God and Affection Collection
Happy Thursday!
Woo Hoo! I've the creative juices flowing today ... and the house to myself for the next 5 hours (insert happy dance here!). Thank goodness for Grandma's! ... the girls have gone to my mom's for the afternoon and dinner ... I will then pick up Rebecca and head to yoga with her while Alicia stays until yoga is over, when I'll pick her up. I've already managed to chip away at my projects for this weekend.
On Friday I have a class for Noella and a group of Youth Group Leaders from her church. They want to make birthday cards for all the youth they work with so I came up with (2) cards for the girls and (1) for the boys. The Need for Speed card I posted yesterday is the "boy" card. I thought I would give them an option for that card, using the same supplies ... so here is the alternative ...
Same supplies and sentiment - I just changed the Need for Speed image for the retired "Extreme Guitar". Noella said there were a few artists in the group so this may be a good card for them.
Here is another one I made - this time for the girls:
Again ... my camera stinks! I stamped the "burst" from Affection Collection (from the mini - poage 35 - $26.95 clear; $36.95 wood) in Crumb Cake and then the winged heart in Raspberry Ripple. I then ran it through the Designer Frames Folder to frame it. This process took a little while ... when I ran it through the first time the picture frame was so deeply embossed that it cut the paper. I learned a little trick from another demonstrator's You Tube video (sorry - I can't remember who!) to stop this from happening. I taped a small piece of Vellum Card Stock to the inside of the folder. This creates a slight buffer for the image and should keep the paper from cracking or cutting. While I've tried this successfully using my Woodgrain Folder my picture frame still cracked. OK. Try again ... I put a second piece of vellum on the OTHER inside side if the folder. Nope. Still cut it. Hmmmm ... I grabbed my sanding tools (files, actually) ... and sanded down the plastic folder so that it wasn't so thick. 3rd and 4th trials still cracked the paper so I kept filing. 5th time is the charm! I filed enough of the folder down so that it no longer cuts or cracks the paper when I use it. Hee hee - dad would be proud :)
I stamped the sentiment from "Trust God" (page 136 of the main catty - $17.95 clear; $24.95 wood) in Raspberry Ripple, the little swirl from "Tiny Tags" (page 124 of the main catty $20.95 clear; $27.95 wood) in Crumb Cake and added some rhinestones. You can't see it here but I also used my 2-way glue pen and some Dazzling Diamonds on the winged heart image. Oh! And I stamped a second heart, punched it out with the Small Heart punch and popped it up on a dimensional.
Third up (and my personal favorite!) also uses the Trust God set:
Last year these little presents were very popular ... they used the retired Triple Flower Punch to make really cute bow toppers. Since that is now retired I had to find another punch ... I used one of the flowers from the Boho Blossoms punch (page 185 of the main catty - $22.95). The sentiment is stamped in Night of Navy. The present "mat" and bows are also Night of Navy. The DSP is Polka Dot Parade (page 164 of the catty - $13.50). I LOVE this DSP - it's one of the few DSPs that has WHITE as the accent, not Very Vanilla. I added some rhinestones and Wa-low!
So that's what I have so far today. I now need to head downstairs to figure out which of my already designed cards to use for Saturday's class and come up with (5) designs for my Birthday Stamp-a-Stack on Sunday.
Hope you're having as much fun as I am! Have a stampy day!
Tam
Woo Hoo! I've the creative juices flowing today ... and the house to myself for the next 5 hours (insert happy dance here!). Thank goodness for Grandma's! ... the girls have gone to my mom's for the afternoon and dinner ... I will then pick up Rebecca and head to yoga with her while Alicia stays until yoga is over, when I'll pick her up. I've already managed to chip away at my projects for this weekend.
On Friday I have a class for Noella and a group of Youth Group Leaders from her church. They want to make birthday cards for all the youth they work with so I came up with (2) cards for the girls and (1) for the boys. The Need for Speed card I posted yesterday is the "boy" card. I thought I would give them an option for that card, using the same supplies ... so here is the alternative ...
Same supplies and sentiment - I just changed the Need for Speed image for the retired "Extreme Guitar". Noella said there were a few artists in the group so this may be a good card for them.
Here is another one I made - this time for the girls:
Again ... my camera stinks! I stamped the "burst" from Affection Collection (from the mini - poage 35 - $26.95 clear; $36.95 wood) in Crumb Cake and then the winged heart in Raspberry Ripple. I then ran it through the Designer Frames Folder to frame it. This process took a little while ... when I ran it through the first time the picture frame was so deeply embossed that it cut the paper. I learned a little trick from another demonstrator's You Tube video (sorry - I can't remember who!) to stop this from happening. I taped a small piece of Vellum Card Stock to the inside of the folder. This creates a slight buffer for the image and should keep the paper from cracking or cutting. While I've tried this successfully using my Woodgrain Folder my picture frame still cracked. OK. Try again ... I put a second piece of vellum on the OTHER inside side if the folder. Nope. Still cut it. Hmmmm ... I grabbed my sanding tools (files, actually) ... and sanded down the plastic folder so that it wasn't so thick. 3rd and 4th trials still cracked the paper so I kept filing. 5th time is the charm! I filed enough of the folder down so that it no longer cuts or cracks the paper when I use it. Hee hee - dad would be proud :)
I stamped the sentiment from "Trust God" (page 136 of the main catty - $17.95 clear; $24.95 wood) in Raspberry Ripple, the little swirl from "Tiny Tags" (page 124 of the main catty $20.95 clear; $27.95 wood) in Crumb Cake and added some rhinestones. You can't see it here but I also used my 2-way glue pen and some Dazzling Diamonds on the winged heart image. Oh! And I stamped a second heart, punched it out with the Small Heart punch and popped it up on a dimensional.
Third up (and my personal favorite!) also uses the Trust God set:
Last year these little presents were very popular ... they used the retired Triple Flower Punch to make really cute bow toppers. Since that is now retired I had to find another punch ... I used one of the flowers from the Boho Blossoms punch (page 185 of the main catty - $22.95). The sentiment is stamped in Night of Navy. The present "mat" and bows are also Night of Navy. The DSP is Polka Dot Parade (page 164 of the catty - $13.50). I LOVE this DSP - it's one of the few DSPs that has WHITE as the accent, not Very Vanilla. I added some rhinestones and Wa-low!
So that's what I have so far today. I now need to head downstairs to figure out which of my already designed cards to use for Saturday's class and come up with (5) designs for my Birthday Stamp-a-Stack on Sunday.
Hope you're having as much fun as I am! Have a stampy day!
Tam
Wednesday, October 17, 2012
Need for Speed
Happy Wednesday ... or is that WINDsday?? Holy Smokes is it windy out there today! Remember to carry a heavy purse today or you'll fly away!
So! Here I am ... at LAST! "Need for Speed" is right! I'm so far behind this week I'm first!! Just how rushed am I today?? This morning has already been the ultimate in multi-tasking ... I was eating my breakfast while taking a shower! (luckily I opted for cut up apples instead of cereal *lol*)
Yes ... my plan was to post this yesterday but my orders took me until 10:15 pm ... and then Icompletely forgot (which was ok since my camera flash doesn't work anyway ... I can only take pictures in the day time!)
I promised you a quick and easy "male" card two days ago ... at long last here it is:
Ta Da! Love it! As happens every now and again this card only took me about 3 minutes to design and put together. Not knowing where to start with this set I figured I'd just stamp the car from Need for Speed (page 68 of the catty - $17.95 clear; $24.95 wood) in Black Staz-on (I sure hope SU sorts out their smudging black Classic Ink problem soon!). I then grabbed a scrap of Basic Grey card stock I had sitting around and had an instant mat. It need just a little something more .. and according to my husband "guy" cards aren't allowed to have buttons, ribbon, bows or bling ... so DSP it was. I headed to my Neutrals Collection Designer Series Paper Pack and pulled out a piece of black stripes. Yep - that's all it needed ... of course I'm DYING to put a black button on it but Craig says no ... maybe when he's not looking *lol* ... The sentiment is in Staz-on from the hostess set Wacky Wishes. The card is matted with Basic Black cs.
That's it! Told you it was quick and easy! The beuaty of this card is that it works with any of the four images in the Need for Speed stamp set ... as well as some of the retired images like the Extreme Guitar, Extremem Snowboaring, Skateboarding and so on. It's a keeper!
Next up I need to design a card for tonights Trail Blazers Meeting ... and the agenda ... then 3 cards for Friday nights class ... and 1 for Saturday's class ... and 5 for Sundays Birthday Stamp-a-Stack. Sheesh! HOW do you working moms DO IT?? I need 3 more hands and 7 more hours in the day just to get caught up this week! I take my hat off to you all!!
Bundle up ... and have a stampy day :)
Tam
So! Here I am ... at LAST! "Need for Speed" is right! I'm so far behind this week I'm first!! Just how rushed am I today?? This morning has already been the ultimate in multi-tasking ... I was eating my breakfast while taking a shower! (luckily I opted for cut up apples instead of cereal *lol*)
Yes ... my plan was to post this yesterday but my orders took me until 10:15 pm ... and then Icompletely forgot (which was ok since my camera flash doesn't work anyway ... I can only take pictures in the day time!)
I promised you a quick and easy "male" card two days ago ... at long last here it is:
Ta Da! Love it! As happens every now and again this card only took me about 3 minutes to design and put together. Not knowing where to start with this set I figured I'd just stamp the car from Need for Speed (page 68 of the catty - $17.95 clear; $24.95 wood) in Black Staz-on (I sure hope SU sorts out their smudging black Classic Ink problem soon!). I then grabbed a scrap of Basic Grey card stock I had sitting around and had an instant mat. It need just a little something more .. and according to my husband "guy" cards aren't allowed to have buttons, ribbon, bows or bling ... so DSP it was. I headed to my Neutrals Collection Designer Series Paper Pack and pulled out a piece of black stripes. Yep - that's all it needed ... of course I'm DYING to put a black button on it but Craig says no ... maybe when he's not looking *lol* ... The sentiment is in Staz-on from the hostess set Wacky Wishes. The card is matted with Basic Black cs.
That's it! Told you it was quick and easy! The beuaty of this card is that it works with any of the four images in the Need for Speed stamp set ... as well as some of the retired images like the Extreme Guitar, Extremem Snowboaring, Skateboarding and so on. It's a keeper!
Next up I need to design a card for tonights Trail Blazers Meeting ... and the agenda ... then 3 cards for Friday nights class ... and 1 for Saturday's class ... and 5 for Sundays Birthday Stamp-a-Stack. Sheesh! HOW do you working moms DO IT?? I need 3 more hands and 7 more hours in the day just to get caught up this week! I take my hat off to you all!!
Bundle up ... and have a stampy day :)
Tam
Monday, October 15, 2012
!!!
Ack! Monday night ... 9:18 pm ... not gunna happen tonight ... tune in tomorrow for a super quick, super easy "boy" card!
Friday, October 12, 2012
Watercolor Winter and Autumn Accents
Happy Friday!!
Question: How do you know when Tamara is fairly relaxed?
Answer: She posts more projects!!
Yep - Since I managed to chip away at a lot of those niggling little "things-to-do" this week I'm able to head to my craft room more often ... and stamp without crushing pressure! A MUCH better way to roll :)) ... mind you the project I have to show today aren't my own. They are both "cased" - C.A.S.E. - Copy And Share Evereything. With Stampin' Up! we are all about "borrowing" others' ideas. There really is no need to re-invent the wheel - a fabulous card is a fabulous card and as long as we all give credit where credit is due it is a huge compliment to have your creations cased.
I spend about half an hour every morning scrolling through Pinterest as I enjoy my quiet cup of coffee (before the kids wake up and all hell breaks loose in the rush to get out the door for school). These two cards were on my "must-make" list. They are clean, simple and just plain great.
First up is a card created by Lee Conrey (www.stampingleeyours.blogspot.com). Here is her original card:
Isn't it great? I was about to case it exactly as she had it but I ended up making it one step simpler as I'm using it for a class on Saturday night. I simply excluded the button and twine. Here is my version:
Almost identical. I ran the vanilla card stock through the woodgrain folder. I used the new Autumn Accents Bigz die (page 33 of the holiday mini - $26.95) with Cajun Craze and More Mustard for the leaves and ran them through the folder as well. The acorn is Crumb Cake and the top is a little piece of Champagne Glimmer Paper, also run through the Accents die. The banner sentiment is from Curly Cute (page 138 of the main catty - $17.95 clear; $24.95 wood ... have you BOUGHT this sentiment set yet?? If not WHY NOT? Have I not convinced you of it's greatness yet?? I used it ALL the time!) ... but I digress ... I used Espresso ink for the sentiment and I used it to sponge the wood grain "bumps" as well as the edges of the banner. Great card!
Next up is a very simple card designed by Becky Jensen (www.stampthat.com). I used different ribbon .. and I didn't use the two-step stamping technique on it but the rest is the same. Here is Becky's card:
... and here is my version:
Sigh ... yep this camera is dying a slow, painful death ... now the focus is going. Hurry up Christmas!!!
The sentiment (Greetings of the Season - page 8 of the mini - $14.95 clear; $19.95 wood ... another must have!) is embossed in gold - the image is from Watercolor Winter (yep ... ANOTHER must have!! - page 14 of the mini - $22.95 clear; $31.95 wood) is stamped in Black Staz-On then colored with Artichoke and Cobbler markers and blemder pen. You can't see it here but I also added a dash of pizzazz along each leaf with the noew Dazzle MArker (gold) - on the vanilla card stock it actually looks green-ish. I used Always Artichoke seam binding ... although Alicia said she preferred it with Cherry Cobbler Seam Binding (I use her as my main "opinionator" - she VERY quickly decides "which looks best" and she's usually right!)
That's it for now ... back to the craft room for some more fun! Happy Friday to All ... have a stampy weekend!
Tam
Question: How do you know when Tamara is fairly relaxed?
Answer: She posts more projects!!
Yep - Since I managed to chip away at a lot of those niggling little "things-to-do" this week I'm able to head to my craft room more often ... and stamp without crushing pressure! A MUCH better way to roll :)) ... mind you the project I have to show today aren't my own. They are both "cased" - C.A.S.E. - Copy And Share Evereything. With Stampin' Up! we are all about "borrowing" others' ideas. There really is no need to re-invent the wheel - a fabulous card is a fabulous card and as long as we all give credit where credit is due it is a huge compliment to have your creations cased.
I spend about half an hour every morning scrolling through Pinterest as I enjoy my quiet cup of coffee (before the kids wake up and all hell breaks loose in the rush to get out the door for school). These two cards were on my "must-make" list. They are clean, simple and just plain great.
First up is a card created by Lee Conrey (www.stampingleeyours.blogspot.com). Here is her original card:
Isn't it great? I was about to case it exactly as she had it but I ended up making it one step simpler as I'm using it for a class on Saturday night. I simply excluded the button and twine. Here is my version:
Almost identical. I ran the vanilla card stock through the woodgrain folder. I used the new Autumn Accents Bigz die (page 33 of the holiday mini - $26.95) with Cajun Craze and More Mustard for the leaves and ran them through the folder as well. The acorn is Crumb Cake and the top is a little piece of Champagne Glimmer Paper, also run through the Accents die. The banner sentiment is from Curly Cute (page 138 of the main catty - $17.95 clear; $24.95 wood ... have you BOUGHT this sentiment set yet?? If not WHY NOT? Have I not convinced you of it's greatness yet?? I used it ALL the time!) ... but I digress ... I used Espresso ink for the sentiment and I used it to sponge the wood grain "bumps" as well as the edges of the banner. Great card!
Next up is a very simple card designed by Becky Jensen (www.stampthat.com). I used different ribbon .. and I didn't use the two-step stamping technique on it but the rest is the same. Here is Becky's card:
Sigh ... yep this camera is dying a slow, painful death ... now the focus is going. Hurry up Christmas!!!
The sentiment (Greetings of the Season - page 8 of the mini - $14.95 clear; $19.95 wood ... another must have!) is embossed in gold - the image is from Watercolor Winter (yep ... ANOTHER must have!! - page 14 of the mini - $22.95 clear; $31.95 wood) is stamped in Black Staz-On then colored with Artichoke and Cobbler markers and blemder pen. You can't see it here but I also added a dash of pizzazz along each leaf with the noew Dazzle MArker (gold) - on the vanilla card stock it actually looks green-ish. I used Always Artichoke seam binding ... although Alicia said she preferred it with Cherry Cobbler Seam Binding (I use her as my main "opinionator" - she VERY quickly decides "which looks best" and she's usually right!)
That's it for now ... back to the craft room for some more fun! Happy Friday to All ... have a stampy weekend!
Tam
Thursday, October 11, 2012
Little Leaves Christmas
Happy Thursday!
I just LOVE it when I have a productive day! That was yesterday. It was one of only two days this MONTH that I had nothing written on the calendar ... and I made the most of it! I was in my "comfort wear" all day and got SO much done! I stepped away from my work and focused on the house. I cleaned top to bottom ... cleaned out the front hall closet (my husband was THRILLED!), cleaned out the "junk drawer", organized the pantry and the Tupperware cupboard, did three loads of laundry, paid bills, cleaned off the fridge from all those random bills, permission slips and lottery tickets, made a batch of and organized paperwork. It was pure bliss! I picked up the kids from school and then my brother came over to pick them up to take them to Grandma's house for a sleepover. Heaven! I SO needed a day of organizing, peace and quiet! In the end Alicia decided she wanted to come home so I picked her up and we headed to Dollarama to finish off the loot bag shopping for her party this weekend (there will be 9 little girls crazy high on sugar come this Sunday *lol*)
I'm slowly chipping away at a few more loose ends while playing "school" with Alicia (the kids are off for PD days today and tomorrow) ... at the moment I'm the teacher who is suppose to be marking their work *lol*.
I better get on with it before she "busts" me :)
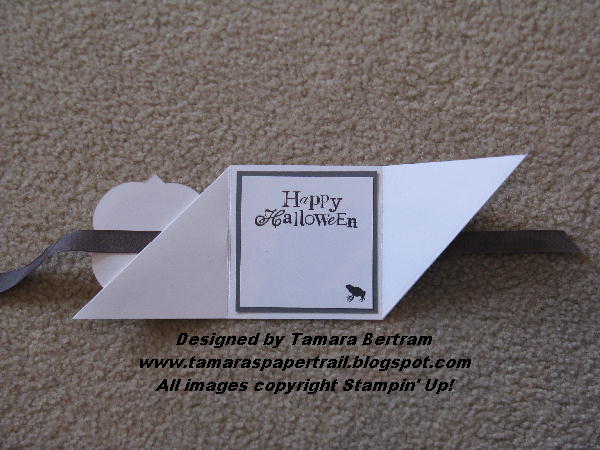
Here is the 4th project we made at class on Tuesday - it's a "Fun Fold" little card. I gotta say - I'm loving the Toxic Treats stamp set. I'm really glad I got it!
(yes, a new camera is on my Christmas Wish List!!)
Here it is open:
Here is how you make it:
Start with a 10 1/2" x 3 1/2" piece of card stock - score at 3 1/2" and 7" then fold the two end sqaues on the diagonal. Here is a picture that shows it a little better:
The rest is pretty straight forward. I added a 3 1/4" x 3 1/4" piece of Howlstooth & Scaringbone DSP to the front (cut on the diagonal. The inside pieces are 3 1/4" x 3 1/4" (grey) and 3" x 3" (white). The sentiments is from Wacky Wishes (hostess set) and the image on the front and the little frog are from Toxic Treats. I punched out the graveyard and layer with the new Window Frames Collection Framelits (page 30 of the mini $32.95) I added some Satin Striped ribbon (page 26 of the mini $10.95) to tie it closed. Wa-low!
Wanna see another one? OK ...
On Tuesday night I was playing around with the Heat & Stick powder some more and came up with this one:
Oooo - sparkly! I used the 2 1/2" circle punch as a frame then ran the Little Leaves Sizzlet through the Big Shot. Punched out some Red Glimmer Paper with the owl punch (the eyes) and attached them with glue dots. I stamped the Greetings of the Season sentiment in Versamark then covered it with Heat & Stick powder then applied some contraband Red Glitter (why is it that I don't realize SU products have retired until I got to use them??!!) Then heat again to set the glitter. Preety! I would recommend a "cleaner" sentiment - the writing is a little small to look "sharp" but I do like the card!
OK ... school is back in so I better run. Stay warm ... and have a stampy day!
Tam
I just LOVE it when I have a productive day! That was yesterday. It was one of only two days this MONTH that I had nothing written on the calendar ... and I made the most of it! I was in my "comfort wear" all day and got SO much done! I stepped away from my work and focused on the house. I cleaned top to bottom ... cleaned out the front hall closet (my husband was THRILLED!), cleaned out the "junk drawer", organized the pantry and the Tupperware cupboard, did three loads of laundry, paid bills, cleaned off the fridge from all those random bills, permission slips and lottery tickets, made a batch of and organized paperwork. It was pure bliss! I picked up the kids from school and then my brother came over to pick them up to take them to Grandma's house for a sleepover. Heaven! I SO needed a day of organizing, peace and quiet! In the end Alicia decided she wanted to come home so I picked her up and we headed to Dollarama to finish off the loot bag shopping for her party this weekend (there will be 9 little girls crazy high on sugar come this Sunday *lol*)
I'm slowly chipping away at a few more loose ends while playing "school" with Alicia (the kids are off for PD days today and tomorrow) ... at the moment I'm the teacher who is suppose to be marking their work *lol*.
I better get on with it before she "busts" me :)
Here is the 4th project we made at class on Tuesday - it's a "Fun Fold" little card. I gotta say - I'm loving the Toxic Treats stamp set. I'm really glad I got it!
(yes, a new camera is on my Christmas Wish List!!)
Here it is open:
Here is how you make it:
Start with a 10 1/2" x 3 1/2" piece of card stock - score at 3 1/2" and 7" then fold the two end sqaues on the diagonal. Here is a picture that shows it a little better:
The rest is pretty straight forward. I added a 3 1/4" x 3 1/4" piece of Howlstooth & Scaringbone DSP to the front (cut on the diagonal. The inside pieces are 3 1/4" x 3 1/4" (grey) and 3" x 3" (white). The sentiments is from Wacky Wishes (hostess set) and the image on the front and the little frog are from Toxic Treats. I punched out the graveyard and layer with the new Window Frames Collection Framelits (page 30 of the mini $32.95) I added some Satin Striped ribbon (page 26 of the mini $10.95) to tie it closed. Wa-low!
Wanna see another one? OK ...
On Tuesday night I was playing around with the Heat & Stick powder some more and came up with this one:
Oooo - sparkly! I used the 2 1/2" circle punch as a frame then ran the Little Leaves Sizzlet through the Big Shot. Punched out some Red Glimmer Paper with the owl punch (the eyes) and attached them with glue dots. I stamped the Greetings of the Season sentiment in Versamark then covered it with Heat & Stick powder then applied some contraband Red Glitter (why is it that I don't realize SU products have retired until I got to use them??!!) Then heat again to set the glitter. Preety! I would recommend a "cleaner" sentiment - the writing is a little small to look "sharp" but I do like the card!
OK ... school is back in so I better run. Stay warm ... and have a stampy day!
Tam
Monday, October 8, 2012
Lunch Box Love Notes, Freightening Feline and Falling Leaves
Happy Monday!
Anyone else having a nice, lazy, turkey-hangover kind of day? I'm happy to say I've managed to spend most of the afternoon in my craft room. Good thing too! My stress levels were though the ROOF around 4:00 am due to not having my class planned for tomorrow night yet. Well ... that and a few other things. Namely Alicia! Yesterday morning she announced that she wanted pierced ears! She has NEVER wanted pierced ears before but yesterday she marched into the kitchen and stated that she wanted them. She then spent the next hour or so lamenting over whether to actually go through with it or not due to the pain factor. To make a long rather boring story short (unheard of for me!) she did it! I was so proud of her ... and she of herself ... and to be honest by the end of the day I had heard quite enough about how she "couldn't believe I did it's" and "YOU didn't get YOURS until Grade 5 and I'm only in Grade 2!" and "it seems like a dream that it actually happend" ... and on ... and on ... and on ... and on (I don't know where she gets it from *lol*). ANYWAY! At 3:30 am she came flying into my bedroom and told me that one of her earings had fallen out! Sure enough it was gone. It was in her bed but it SHOULD have been in her ear. So picture the scene. It's 3:30 am. She in her underwear ... I'm in mine ... we're in my bathroom, sitting on the floor with a bottle of rubbing alcohol, cotton balls and a curious cat as I attempt to reinsert the earing into the freshly punctured hole in her ear. Needless to say I couldn't get it back in. The hole was just too new. I could only get it 1/3 of the way in before it hurt too much. She went back to bed and so did I ... and then I layed there for the next 1 1/2 hours stressing over today. She would have to go back and get the earing re-done. You can only imagine how well THAT went down with her! Luckily Craig took her ... I simply couldn't afford the time ... or the mental energy involved. She came home happy as a lark with a brand new earing and said it hardly hurt at all. Thank GOD! Of course the downside is I'm once again exhausted ... which doesn't make for very efficient or stunning crafting! Nonetheless I managed to get 3 projects made ... and I will likely make a 4th bonus project just for fun. So lucky you! I get to show off lots of projects today.
First up is a quickie I made in about 5 minutes. I have had "Make Lunch Box Love Notes" on my "to-do" list since the first day of school. Here we are 1 month later and I finally made the time to do it. As with most projects on my list it only took 5 minutes so I wonder why it took a month to get around to it! Here they are:
Sweet! I simply used the Dress Up set and stamped each image on scrap pieces of card stock I had left over (yes, about once a year I go through all my scrap pieces of whisper white and put them in ziplock bags according to their sizes. These ones were 2 1/4" and various lengths. What a great way to use up those scraps!) Now I'm ready to roll for the next 8 weeks (or so) of lunches!
Next up is a project I rejected yesterday for Technique Class. It used the Versamark Resist techqnique. Lookie:
I like it but ... I dunno ... it didn't blow my hair back for the class. We did Versamark Resist technique a year or two ago so I wanted to do something we've never tried. For the above card I stamped the music notes in versamark and stamped it on Glossy White card stock. I then used my sponges in Certainly Celery, So Saffron and Calypso Coral for the shading and then wiped the image with a dry cloth to remove any leftover ink and reveal the musical background. I stamped the bird image from Serene Silhouettes in Staz-On black - the sentiments is from Pursuit of Happiness. Oh ... and the card is smaller than standard at 5 1/2" x 3". Yep - it's pretty but wasn't the winner ...
As you know from my post the other day I settled on the Heat & Stick powder project (not technically a technique but good to learn how to use!). These are the other projects I came up with for the class ...
I like this card ... I just wish I had the Gold Shimmer paint so I could add it to some alcohol and spritz the leaves to make them gold shimmery but alas ... I don't. Next purchase! I ran the Vanilla card stock through the Woodgrain embossing folder (but before I did that I taped a piece of Vellum Card Stock to the folder ... this keeps the image from embossing too deeply and cracking the paper ... free tip!) I used a small strip of Champagne Glimmer Paper and the images from Falling Leaves. I stamped them in Soft Suede and then used Watercolor Crayons (Cajun Craze, Mor Mustard, Bravo Burgundy and Garden Green) and my Aqua Painter to blend them. I cut them out and attached them with glue dots. I used a Naturals Designer Button for an accent. I used the Thank You Sentiment from Curly Cute and punched it out with the large oval punch ... and popped it up with dimensionals. Just needs that shimmer and it would be perfect ;)
Last but not least is just a fun little halloween card.
I stamped the Freighening Feline stamp in Versamark and embossed it with black embossing powder. I punched it out with the Labels Collection Framelits (this is a MUST OWN item!!) I then punched a layer in black card stock. I used the DSP from the mini - Howlstooth and Scaringbone - and a little Striped Satin Ribbon (also from the mini) for an accent. The sentiment (from Toxic Treats) is in Tangerine Tango. The cat and black layer all all popped up on dimensionals. Fun! (Have you noticed that this week my projects are all quite clean and uncluttered? I do! ... now if only I could get my kitchen to look that way *lol*!)
That's it for now ... if time allows I'll make that 4th project tonight ... until next time ... have a stampy night!
Tam
Anyone else having a nice, lazy, turkey-hangover kind of day? I'm happy to say I've managed to spend most of the afternoon in my craft room. Good thing too! My stress levels were though the ROOF around 4:00 am due to not having my class planned for tomorrow night yet. Well ... that and a few other things. Namely Alicia! Yesterday morning she announced that she wanted pierced ears! She has NEVER wanted pierced ears before but yesterday she marched into the kitchen and stated that she wanted them. She then spent the next hour or so lamenting over whether to actually go through with it or not due to the pain factor. To make a long rather boring story short (unheard of for me!) she did it! I was so proud of her ... and she of herself ... and to be honest by the end of the day I had heard quite enough about how she "couldn't believe I did it's" and "YOU didn't get YOURS until Grade 5 and I'm only in Grade 2!" and "it seems like a dream that it actually happend" ... and on ... and on ... and on ... and on (I don't know where she gets it from *lol*). ANYWAY! At 3:30 am she came flying into my bedroom and told me that one of her earings had fallen out! Sure enough it was gone. It was in her bed but it SHOULD have been in her ear. So picture the scene. It's 3:30 am. She in her underwear ... I'm in mine ... we're in my bathroom, sitting on the floor with a bottle of rubbing alcohol, cotton balls and a curious cat as I attempt to reinsert the earing into the freshly punctured hole in her ear. Needless to say I couldn't get it back in. The hole was just too new. I could only get it 1/3 of the way in before it hurt too much. She went back to bed and so did I ... and then I layed there for the next 1 1/2 hours stressing over today. She would have to go back and get the earing re-done. You can only imagine how well THAT went down with her! Luckily Craig took her ... I simply couldn't afford the time ... or the mental energy involved. She came home happy as a lark with a brand new earing and said it hardly hurt at all. Thank GOD! Of course the downside is I'm once again exhausted ... which doesn't make for very efficient or stunning crafting! Nonetheless I managed to get 3 projects made ... and I will likely make a 4th bonus project just for fun. So lucky you! I get to show off lots of projects today.
First up is a quickie I made in about 5 minutes. I have had "Make Lunch Box Love Notes" on my "to-do" list since the first day of school. Here we are 1 month later and I finally made the time to do it. As with most projects on my list it only took 5 minutes so I wonder why it took a month to get around to it! Here they are:
Sweet! I simply used the Dress Up set and stamped each image on scrap pieces of card stock I had left over (yes, about once a year I go through all my scrap pieces of whisper white and put them in ziplock bags according to their sizes. These ones were 2 1/4" and various lengths. What a great way to use up those scraps!) Now I'm ready to roll for the next 8 weeks (or so) of lunches!
Next up is a project I rejected yesterday for Technique Class. It used the Versamark Resist techqnique. Lookie:
I like it but ... I dunno ... it didn't blow my hair back for the class. We did Versamark Resist technique a year or two ago so I wanted to do something we've never tried. For the above card I stamped the music notes in versamark and stamped it on Glossy White card stock. I then used my sponges in Certainly Celery, So Saffron and Calypso Coral for the shading and then wiped the image with a dry cloth to remove any leftover ink and reveal the musical background. I stamped the bird image from Serene Silhouettes in Staz-On black - the sentiments is from Pursuit of Happiness. Oh ... and the card is smaller than standard at 5 1/2" x 3". Yep - it's pretty but wasn't the winner ...
As you know from my post the other day I settled on the Heat & Stick powder project (not technically a technique but good to learn how to use!). These are the other projects I came up with for the class ...
I like this card ... I just wish I had the Gold Shimmer paint so I could add it to some alcohol and spritz the leaves to make them gold shimmery but alas ... I don't. Next purchase! I ran the Vanilla card stock through the Woodgrain embossing folder (but before I did that I taped a piece of Vellum Card Stock to the folder ... this keeps the image from embossing too deeply and cracking the paper ... free tip!) I used a small strip of Champagne Glimmer Paper and the images from Falling Leaves. I stamped them in Soft Suede and then used Watercolor Crayons (Cajun Craze, Mor Mustard, Bravo Burgundy and Garden Green) and my Aqua Painter to blend them. I cut them out and attached them with glue dots. I used a Naturals Designer Button for an accent. I used the Thank You Sentiment from Curly Cute and punched it out with the large oval punch ... and popped it up with dimensionals. Just needs that shimmer and it would be perfect ;)
Last but not least is just a fun little halloween card.
I stamped the Freighening Feline stamp in Versamark and embossed it with black embossing powder. I punched it out with the Labels Collection Framelits (this is a MUST OWN item!!) I then punched a layer in black card stock. I used the DSP from the mini - Howlstooth and Scaringbone - and a little Striped Satin Ribbon (also from the mini) for an accent. The sentiment (from Toxic Treats) is in Tangerine Tango. The cat and black layer all all popped up on dimensionals. Fun! (Have you noticed that this week my projects are all quite clean and uncluttered? I do! ... now if only I could get my kitchen to look that way *lol*!)
That's it for now ... if time allows I'll make that 4th project tonight ... until next time ... have a stampy night!
Tam
Sunday, October 7, 2012
Snow Flurry Christmas
Happy Thanksgiving!
What a beautiful day to spend relaxing with family. We're heading to mom's for dinner later this afternoon. My brother, Al, is in town from BC which always makes the special occasion even more special. He came by last night - he and Craig watched movies and caught up (Craig and Al were friends back in the '80's ... that's how I met Craig!) while I crafted.
I had quite the creative block all day. I have DOZENS of projects I need to create which always seems to slow things down. My first priority was to come up with a technique card for my class on Tuesday. I really struggled with something new and fresh. I ended up deciding on using the Heat and Stick powder. Even though it's more of a product than a technique I know people are interested in learning how to use it. Truth be told I've only used it once myself. I love that holding classes forces me to try new things! I played, designed, threw it way - played, designed, tweaked, played, played, tweaked, stared and tweaked some more. It took me 3 1/2 hours to come up with my final card!
My first card is beautiful ... but it was quite fiddly and I didn't think it would be a great card for my class. Nonetheless it's a "keeper". Here is what I came up with:
The picture really doesn't do it justice. The snowlakes are REALLY sparkly thanks to our beloved Dazzling Diamonds. I stamped the sentiment "Heart of Christmas" (page 15 from the mini - $10.95) in Marina Mist. This is a great stamp to own ... I can't believe I didn't buy it ages ago! I then ran some Whisper White card stock through the Snow Flurry Bigz Die (page 14 of the mini - $26.95) and then a piece of Marina Mist through to get the medium snowflake. I then inked the big and small snowflake with Versamark. I sprinkled HEat & Stick powder over them and heated them with my new Heat Tool. I then sprinkled them with Dazzling Diamonds and heated them again with the heat tool to set the glitter. Now it won't snow glitter everytime someone touches the card! I attached each of the snowflakes together using Glue dots. It's important to use those when attaching anything to glittery images - snail just doesn't seem to hold. That's it! A pretty, sparkly, simple card. If I WERE to use this in a class I would have people glitter the card stock BEFORE running it through the big shot die. It's quite fiddly to do it the way I did ... you either burn your fingers with the heat tool or can miss areas with the powder ... and/or the snowflakes blow off your desk if you try to use the heat tool with them loose on your desk. Of course the down side of glittering the paper first is that you use a lot more powder and glitter than you need and there is a lot of waste.
While I like the card I needed somthing that still showcased the Heat & Stick powder but was a little more user friendly. Although it took me 3 hours to come up with it, here is the final, rather simple card:
You can see the sparkles a little better on this one. I stamped the image from the ORnament Keepsake set (page 3 of the mini - $31.95 clear; $42.95 wood) in Versamark, applied Heat & Stick powder, heated it, applied Dazzling Diamonds and heat set again. I stamped the sentiment from Merry & Type (page 13 of the main catalogue; $22.95 clear; $31.95 wood) in Staz-on black. I used a small strip of Cherry Cobbler along the side, punching the edge with the Scallop Edge Border punch. A few rhinestones along the edge and at the top of the ornament finished it off. It really is pretty in "real" life.
... speaking of the Ornament Keepsake set ... Stampin' Up! is running a promotion during October with this set. If you purchase one of the bundles and a pack of the Candlelight Christmas Designer Series Paper (page 4 of the mini) you get the Festive Paper Piercing Pack (page 30 of the mini - $10.95) for free!
That's it for today - I'm off to put on my stretchy pants *lol*. Have a wonderful Thanksgiving :)))
Tam
What a beautiful day to spend relaxing with family. We're heading to mom's for dinner later this afternoon. My brother, Al, is in town from BC which always makes the special occasion even more special. He came by last night - he and Craig watched movies and caught up (Craig and Al were friends back in the '80's ... that's how I met Craig!) while I crafted.
I had quite the creative block all day. I have DOZENS of projects I need to create which always seems to slow things down. My first priority was to come up with a technique card for my class on Tuesday. I really struggled with something new and fresh. I ended up deciding on using the Heat and Stick powder. Even though it's more of a product than a technique I know people are interested in learning how to use it. Truth be told I've only used it once myself. I love that holding classes forces me to try new things! I played, designed, threw it way - played, designed, tweaked, played, played, tweaked, stared and tweaked some more. It took me 3 1/2 hours to come up with my final card!
My first card is beautiful ... but it was quite fiddly and I didn't think it would be a great card for my class. Nonetheless it's a "keeper". Here is what I came up with:
The picture really doesn't do it justice. The snowlakes are REALLY sparkly thanks to our beloved Dazzling Diamonds. I stamped the sentiment "Heart of Christmas" (page 15 from the mini - $10.95) in Marina Mist. This is a great stamp to own ... I can't believe I didn't buy it ages ago! I then ran some Whisper White card stock through the Snow Flurry Bigz Die (page 14 of the mini - $26.95) and then a piece of Marina Mist through to get the medium snowflake. I then inked the big and small snowflake with Versamark. I sprinkled HEat & Stick powder over them and heated them with my new Heat Tool. I then sprinkled them with Dazzling Diamonds and heated them again with the heat tool to set the glitter. Now it won't snow glitter everytime someone touches the card! I attached each of the snowflakes together using Glue dots. It's important to use those when attaching anything to glittery images - snail just doesn't seem to hold. That's it! A pretty, sparkly, simple card. If I WERE to use this in a class I would have people glitter the card stock BEFORE running it through the big shot die. It's quite fiddly to do it the way I did ... you either burn your fingers with the heat tool or can miss areas with the powder ... and/or the snowflakes blow off your desk if you try to use the heat tool with them loose on your desk. Of course the down side of glittering the paper first is that you use a lot more powder and glitter than you need and there is a lot of waste.
While I like the card I needed somthing that still showcased the Heat & Stick powder but was a little more user friendly. Although it took me 3 hours to come up with it, here is the final, rather simple card:
You can see the sparkles a little better on this one. I stamped the image from the ORnament Keepsake set (page 3 of the mini - $31.95 clear; $42.95 wood) in Versamark, applied Heat & Stick powder, heated it, applied Dazzling Diamonds and heat set again. I stamped the sentiment from Merry & Type (page 13 of the main catalogue; $22.95 clear; $31.95 wood) in Staz-on black. I used a small strip of Cherry Cobbler along the side, punching the edge with the Scallop Edge Border punch. A few rhinestones along the edge and at the top of the ornament finished it off. It really is pretty in "real" life.
... speaking of the Ornament Keepsake set ... Stampin' Up! is running a promotion during October with this set. If you purchase one of the bundles and a pack of the Candlelight Christmas Designer Series Paper (page 4 of the mini) you get the Festive Paper Piercing Pack (page 30 of the mini - $10.95) for free!
- If you were to buy everything seperately you would pay $94.29 (clear) or $116.42 (wood)
- Through this promotion you pay $79.58 (clear) or $89.97 (wood)
That's it for today - I'm off to put on my stretchy pants *lol*. Have a wonderful Thanksgiving :)))
Tam
Friday, October 5, 2012
Toxic Treats Halloween Favors
Happy Long Weekend!
As usual I'm posting with minutes to go before I pick up the girls .. MAN I'm flyin' a little too close to the sun for my liking these days *lol* .. I'm not alone, though, right? When you have 19 things to do in a day you manage about 17 of them ... when you have 2 things to do in a day you're lucky if you get any makeup on!
As promised I"m finally posting my little Halloween Treats that I made for my Club Girls. I also plan to make these for the firls' classmates (maybe if I start those tomorrow I'll have them 80% done by October 30th!)
Here they are:
Cute! I stole the idea from our monthly Stampin' Success magazine (demonstrators receive this magazine every month and it's FULL of projects ideas and business tips). This project is made using the Petite Pocket Bigz Die (page 194 of the catalogue - $52.95) I punched out the envelope then ran it through my Spider Web folder (hard to see it in this shot but it gives the envelope some GREAT texture!) I then stamped the image with Tangerine Tango using the Toxic Treats stamp (from the holiday mini page 25 $35.95 wood or $25.95 clear). I ran the image through my Big Shot with the Labels Collection Framelit and then a piece of black card stock with the framelit that is 1 size bigger. Oh - I sealed the envelope using 2 pieces of Sticky Strip ... snail doesn't hold for more than about a day and they pop open so Sticky Strip it had to be! I filled them with Pixie Stix (yes, colored/flavlored sugar in a tube!). I found these at Dollarama - a GREAT deal - $1 for 42 sticks! That's my kind of inexpensive treat ... and yes ... they very well could be toxic *lol*
That's it for now ... time to pick up the kids and start celebrating Alicia's birthday. I hope you all have a wonderful Thanksgiving full of food, family, friends and fun. I am so thankful and lucky to have all of these in my life.
Until the next project ... have a stampy day!
Tam
As usual I'm posting with minutes to go before I pick up the girls .. MAN I'm flyin' a little too close to the sun for my liking these days *lol* .. I'm not alone, though, right? When you have 19 things to do in a day you manage about 17 of them ... when you have 2 things to do in a day you're lucky if you get any makeup on!
As promised I"m finally posting my little Halloween Treats that I made for my Club Girls. I also plan to make these for the firls' classmates (maybe if I start those tomorrow I'll have them 80% done by October 30th!)
Here they are:
Cute! I stole the idea from our monthly Stampin' Success magazine (demonstrators receive this magazine every month and it's FULL of projects ideas and business tips). This project is made using the Petite Pocket Bigz Die (page 194 of the catalogue - $52.95) I punched out the envelope then ran it through my Spider Web folder (hard to see it in this shot but it gives the envelope some GREAT texture!) I then stamped the image with Tangerine Tango using the Toxic Treats stamp (from the holiday mini page 25 $35.95 wood or $25.95 clear). I ran the image through my Big Shot with the Labels Collection Framelit and then a piece of black card stock with the framelit that is 1 size bigger. Oh - I sealed the envelope using 2 pieces of Sticky Strip ... snail doesn't hold for more than about a day and they pop open so Sticky Strip it had to be! I filled them with Pixie Stix (yes, colored/flavlored sugar in a tube!). I found these at Dollarama - a GREAT deal - $1 for 42 sticks! That's my kind of inexpensive treat ... and yes ... they very well could be toxic *lol*
That's it for now ... time to pick up the kids and start celebrating Alicia's birthday. I hope you all have a wonderful Thanksgiving full of food, family, friends and fun. I am so thankful and lucky to have all of these in my life.
Until the next project ... have a stampy day!
Tam
Thursday, October 4, 2012
Hello Kitty!
Well look at me! 2 posts in one day ... I must be catching up *lol*
Well I made it to Toys R Us at 9:45 am. By 10:00 am I was totally stressed (what else is new??) over what to buy Alicia for her birthday present. Half an hour later I walked out with a (gulp) Hello Kitty Kareoke Machine. Good Lord! What have I done???!!! I THINK she'll like it. I'm sure she will for about 2 days ... after that I'm not so sure! I suppose if all else fails we can use it at my next Stampin Technique Class *lol* ... now THAT would be a giggle!
I picked up the kids and headed home to make her a birthday card. There is DEFINATELY a Hello Kitty theme going on this year ... Rebecca got her a Hello Kitty figurine set ... so of COURSE I had to make a Hello Kitty birthday card. I LOVE it! Check it out!
Hee Hee! SO cute! I got the idea from Tami White but had to change it a little bit. Tami had used circles for the eyes and added some white gel pen acents to the eyes and drew some eyelashes. She also made straight whiskers. I had a picture of Hello Kitty and her eyes are actually ovals ... with no white ...and the whiskers were slightly curved so that's what I did. The eyes and nose are made with the small oval punch. The bow is red glimmer paper punched with the retired butterfly punch and 3/4" circle punch. The whiskers were made using the Bird Builder punch (part of the branch). I LOVE how it turned out. Rebecca went crazy over it ... so it must be good *lol*. I then made a matching custom envelope to fit the whiskers and bow which slightly extend over the card itself:
When we were in the airport coming home I found a little Hello Kitty stamp set that I bought for the girls. It's the perfect touch for the envelope! I colored it with Real Red and Daffodil Delight markers. Wa-low! The perfect card for my little 7 year old!
So there you have it. 1 project off my never-ending to-do list!
Pop back tomorrow to check out my Halloween treats!
Tam
Well I made it to Toys R Us at 9:45 am. By 10:00 am I was totally stressed (what else is new??) over what to buy Alicia for her birthday present. Half an hour later I walked out with a (gulp) Hello Kitty Kareoke Machine. Good Lord! What have I done???!!! I THINK she'll like it. I'm sure she will for about 2 days ... after that I'm not so sure! I suppose if all else fails we can use it at my next Stampin Technique Class *lol* ... now THAT would be a giggle!
I picked up the kids and headed home to make her a birthday card. There is DEFINATELY a Hello Kitty theme going on this year ... Rebecca got her a Hello Kitty figurine set ... so of COURSE I had to make a Hello Kitty birthday card. I LOVE it! Check it out!
Hee Hee! SO cute! I got the idea from Tami White but had to change it a little bit. Tami had used circles for the eyes and added some white gel pen acents to the eyes and drew some eyelashes. She also made straight whiskers. I had a picture of Hello Kitty and her eyes are actually ovals ... with no white ...and the whiskers were slightly curved so that's what I did. The eyes and nose are made with the small oval punch. The bow is red glimmer paper punched with the retired butterfly punch and 3/4" circle punch. The whiskers were made using the Bird Builder punch (part of the branch). I LOVE how it turned out. Rebecca went crazy over it ... so it must be good *lol*. I then made a matching custom envelope to fit the whiskers and bow which slightly extend over the card itself:
When we were in the airport coming home I found a little Hello Kitty stamp set that I bought for the girls. It's the perfect touch for the envelope! I colored it with Real Red and Daffodil Delight markers. Wa-low! The perfect card for my little 7 year old!
So there you have it. 1 project off my never-ending to-do list!
Pop back tomorrow to check out my Halloween treats!
Tam
Subscribe to:
Posts (Atom)