Happy Saturday!!
I thought I'd post another project that I made over the last few weeks. Just a quick post - short, sweet and to the point (I KNOW!!! NOT the way I usually roll ... but I gotta maintain that work / life balance, right??!!)
Last month my Stamp Set of the Month was French Foliage (page 86 - $17.95 clear; $24.95 wood). I only bought this set this year but I positively LOVE it and don't know how I lived without it for so long!! Seriously! The "splotch" is great for masculine cards or to add a distressed or vintage look to projects ... and of course the leaves can be used for so many occasions! Part of my Stamp Set of the Month "deal" is that when you pay $35 for the clear set you also get (3) full cards using that set. Here is the first card I made (feel free to gasp with shock over how lovely it is *lol*)
Eeeeeeeeeeeeee! Don't you love it?? I love it! So clean and simple ... LOVE it!! I used black Staz-on for the ink since the Basic Black still smudges when used on Whisper White or Very Vanilla cs (SU is still working on the chemical reaction / technical reason why this is happening ... they're on the case!) There isn't much to report about this! I simply used the large ( 1 3/8") Square punch to punch out basic black cs ... stamped the images on some scraps I had lying around and punched them out with the 1 1/4" square punch and popped them up with dimensionals. The sentiment is from Loving Thoughts (page 136 - $28.95 clear; $36.95 wood) That's it! Quick, easy and "WOW"!
I have one more to share ... pop back tomorrow - until then ... have a stampy day :))
Tam
Welcome to my Blog - a place where you can learn how to make quick, cute cards using Stampin' Up! products!
Saturday, February 16, 2013
Friday, February 15, 2013
Tea Bag Thank You
Happy Friday!!!
Did y'all have a nice Valentine's Day? I had a relaxing day ... once I walked the dog (and CHOSE to skip the eliptical!!) I picked up the girls - one headed to my mom's for a play date - the other had a friend over to our house for a play date so I tidied up, did a LITTLE work and a little crafting. I went to yoga with a girlfriend for a little excercise and relaxation (I suppose I SHOULD have spent the night at home snuggling with my husband on the couch but ... well ... maybe tonight ;) )
So I thought I'd pick up the pace a little on my blogging!! Today I want to show you the "Thank You" treat my club girls got this month. They were SUPER quick and easy to make. This is MY KIND OF TREAT!! Check it out:
I LOVE these!! Seriously - SO quick and easy to make!!
Take a piece of cs 10 1/2" x 3 1/2" (I used Soft Suede) - score at 3 1/2" and 7". Fold Then cut the end panel from corner to corner (I found using my NEW Stampin' Up Paper Trimmer worked better for this than my big cutter - more precise ...)
Then you simply decorate as desired! For mine I grabbed my From the Heart set (page 139 - $35.95 clear; $48.95 wood) and stamped it on a 3" x 3" piece of vanilla c.s. (in soft suede). I used a strip of sticky strip along the bottom and attach some of our delicious Victoria Crochet Trim (page 173 - $9.50) in a "scrunchy" manner (yes, it's a word!!). I then added an Antique brad (page 174 - $7.50 ... I go through these things like Tic Tacs!!!). For the inside I used a little tick of sticky strip at the point of the fold ... and snail along the rest to keep it closed. Snail alone is not enough - gravity pops it open every time ... trust me ... I've tried it over and over and over again ... and every time I resort to sticky strip! I used "A Cup of Thanks" in soft suede from the Tea Shopped set (page 57 - $33.95 clear; $42.95 wood) ... I FINALLY got to ink up this set!!! I punched the sentiment out with the Modern Label punch. On the right hand side of the inside flap I stamped a little cup and tea bag from "Morning Cup" (page 56 - $20.95 clear; $26.95 wood). Again! I got to ink up a set I HAD to have ... but that has sat unused for months!!! (Sound familiar???) And that's it! Tuck a tea bag inside and you have a SWEET little Thank You gift!
I hope you like it as much as I do! Until next time ... have a stampy day!
Tam
Did y'all have a nice Valentine's Day? I had a relaxing day ... once I walked the dog (and CHOSE to skip the eliptical!!) I picked up the girls - one headed to my mom's for a play date - the other had a friend over to our house for a play date so I tidied up, did a LITTLE work and a little crafting. I went to yoga with a girlfriend for a little excercise and relaxation (I suppose I SHOULD have spent the night at home snuggling with my husband on the couch but ... well ... maybe tonight ;) )
So I thought I'd pick up the pace a little on my blogging!! Today I want to show you the "Thank You" treat my club girls got this month. They were SUPER quick and easy to make. This is MY KIND OF TREAT!! Check it out:
I LOVE these!! Seriously - SO quick and easy to make!!
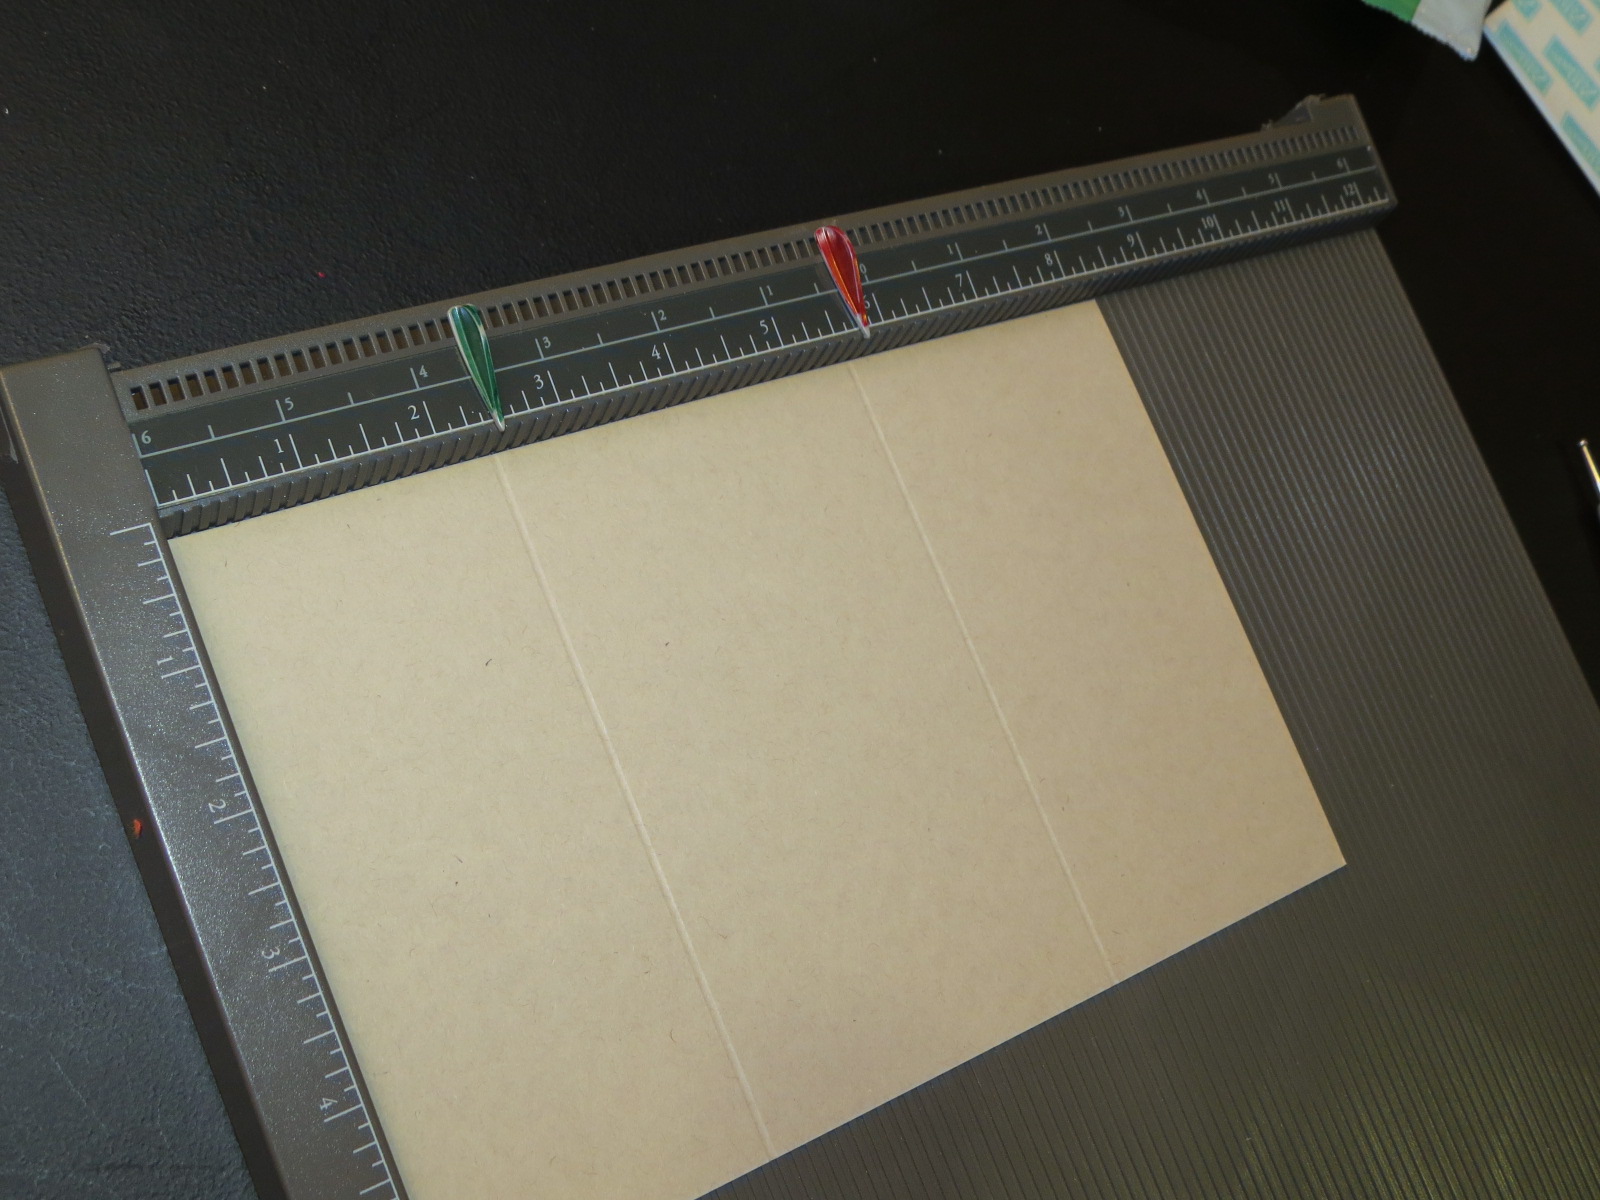
Take a piece of cs 10 1/2" x 3 1/2" (I used Soft Suede) - score at 3 1/2" and 7". Fold Then cut the end panel from corner to corner (I found using my NEW Stampin' Up Paper Trimmer worked better for this than my big cutter - more precise ...)
Then you simply decorate as desired! For mine I grabbed my From the Heart set (page 139 - $35.95 clear; $48.95 wood) and stamped it on a 3" x 3" piece of vanilla c.s. (in soft suede). I used a strip of sticky strip along the bottom and attach some of our delicious Victoria Crochet Trim (page 173 - $9.50) in a "scrunchy" manner (yes, it's a word!!). I then added an Antique brad (page 174 - $7.50 ... I go through these things like Tic Tacs!!!). For the inside I used a little tick of sticky strip at the point of the fold ... and snail along the rest to keep it closed. Snail alone is not enough - gravity pops it open every time ... trust me ... I've tried it over and over and over again ... and every time I resort to sticky strip! I used "A Cup of Thanks" in soft suede from the Tea Shopped set (page 57 - $33.95 clear; $42.95 wood) ... I FINALLY got to ink up this set!!! I punched the sentiment out with the Modern Label punch. On the right hand side of the inside flap I stamped a little cup and tea bag from "Morning Cup" (page 56 - $20.95 clear; $26.95 wood). Again! I got to ink up a set I HAD to have ... but that has sat unused for months!!! (Sound familiar???) And that's it! Tuck a tea bag inside and you have a SWEET little Thank You gift!
I hope you like it as much as I do! Until next time ... have a stampy day!
Tam
Thursday, February 14, 2013
Envelope Gift Card Holder - Valentine
Happy Valentine's Day!!!
Hmmm ... I've made over 80 valentines for the girls' friends ... perhaps I should make a card and/or a treat for my girls!! *lol* WHY is it that EVERY holiday, birthday and special occasion my family is last on the list to create for??? I guess on the upside the girls didn't have one for me either :)
So! What's new in my world?? Not much! And that's GREAT! I'm thrilled to say that since holidays I have managed to keep that work / family balance just perfect! I've been VERY relaxed, VERY calm and VERY happy! I don't fly off the handle very much (and if I do it isn't nearly as quickly as "usual"), I'm much more patient and I'm much more focused on what is important to me. I'm sure you are all familiar with the "put the large rocks in the bowl first, then the smaller ones, then the smallest, then the sand" story. No? Essentially, if you put the rocks in a glass in that order they will all fit ... but if you put them in any other way (like sand first) then there is no room for the large rocks. Of course the large rocks are suppose to be the "important things in your life". In my instance the biggest, most important rock is SUPPOSED TO BE family ... THEN work. I realized I had it the other way around ... I was putting work first and there was no time ... or ENERGY left for family. SInce my return I HAVE put family first ... then I've put ME second ... THEN work ... and I've been MUCH better off! That's why this post didn't happen Monday ... or Tuesday ... or Wednesday. I simply took things slowly and calmly, focused on the family, making a healthy meal, spending QUALITY time with the girls AND Craig ... and THEN I would work. Needless to say, not a LOT of work actually got done *lol* ... but that's OK. This morning I woke up and realized I really DO need to put work a little higher on the list today ... so here I am (well, that and I really don't feel like getting my butt on the eliptical yet ... yay for procrastination! *lol*)
So that's what's new with me. A new focus, a new balance, a new happier me :))) Now! What's new in my projects?? Quite a few, actually ... while I haven't been blogging I HAVE been crafting ... like CRAZY! Aside from the 80 Valentines I made I also made 50 of those cute little Collage Curios cards I posted last week ... that took a bit of time! I am also making up the extra templates from my classes last week so I can increase my stash of cards. Last night I made the time to take pictures so I could share a tutorial with you. So here we go ...
I shared a tutorial on how to make these littel envelope gift card holders quite about a year and a half ago ... and it is one of my most popular (and requested) posts. This year I made a Valentine version .. and since it's Valentine's Day here it is:
LOVE it!!! Here are some more pics of the inside:
(OK ... ignore the "Merry Christmas" sentiment ... same inside, different season *lol*)
I got this idea from Tamye Dunbar way back when and I just LOVE how quick and easy it is to put together. Here are the details ... and lots of pictures to help ...
Start with a standard sheet of card stock - 8 1/2" x 5 1/2"
Score at 2 1/2" and 5 3/4" and fold on score lines:
Here it is all taped up and closed ...
Next make your little inserts. Mine use Early Espresso measuring 4" x 2 1/2" and a layer of Vanilla card stock measuring 3 3/4" x 2 1/4". I added punched hearts using the large heart punch for little tabs. The sentiment is from You are Loved (FINALLY broke down and bought it - love this set!) and I attached a gift card holder using mini glue dots:
Here it is all put together ...
Have a balanced, stampy day :)
Tam
Hmmm ... I've made over 80 valentines for the girls' friends ... perhaps I should make a card and/or a treat for my girls!! *lol* WHY is it that EVERY holiday, birthday and special occasion my family is last on the list to create for??? I guess on the upside the girls didn't have one for me either :)
So! What's new in my world?? Not much! And that's GREAT! I'm thrilled to say that since holidays I have managed to keep that work / family balance just perfect! I've been VERY relaxed, VERY calm and VERY happy! I don't fly off the handle very much (and if I do it isn't nearly as quickly as "usual"), I'm much more patient and I'm much more focused on what is important to me. I'm sure you are all familiar with the "put the large rocks in the bowl first, then the smaller ones, then the smallest, then the sand" story. No? Essentially, if you put the rocks in a glass in that order they will all fit ... but if you put them in any other way (like sand first) then there is no room for the large rocks. Of course the large rocks are suppose to be the "important things in your life". In my instance the biggest, most important rock is SUPPOSED TO BE family ... THEN work. I realized I had it the other way around ... I was putting work first and there was no time ... or ENERGY left for family. SInce my return I HAVE put family first ... then I've put ME second ... THEN work ... and I've been MUCH better off! That's why this post didn't happen Monday ... or Tuesday ... or Wednesday. I simply took things slowly and calmly, focused on the family, making a healthy meal, spending QUALITY time with the girls AND Craig ... and THEN I would work. Needless to say, not a LOT of work actually got done *lol* ... but that's OK. This morning I woke up and realized I really DO need to put work a little higher on the list today ... so here I am (well, that and I really don't feel like getting my butt on the eliptical yet ... yay for procrastination! *lol*)
So that's what's new with me. A new focus, a new balance, a new happier me :))) Now! What's new in my projects?? Quite a few, actually ... while I haven't been blogging I HAVE been crafting ... like CRAZY! Aside from the 80 Valentines I made I also made 50 of those cute little Collage Curios cards I posted last week ... that took a bit of time! I am also making up the extra templates from my classes last week so I can increase my stash of cards. Last night I made the time to take pictures so I could share a tutorial with you. So here we go ...
I shared a tutorial on how to make these littel envelope gift card holders quite about a year and a half ago ... and it is one of my most popular (and requested) posts. This year I made a Valentine version .. and since it's Valentine's Day here it is:
LOVE it!!! Here are some more pics of the inside:
(OK ... ignore the "Merry Christmas" sentiment ... same inside, different season *lol*)
I got this idea from Tamye Dunbar way back when and I just LOVE how quick and easy it is to put together. Here are the details ... and lots of pictures to help ...
Start with a standard sheet of card stock - 8 1/2" x 5 1/2"
Score at 2 1/2" and 5 3/4" and fold on score lines:
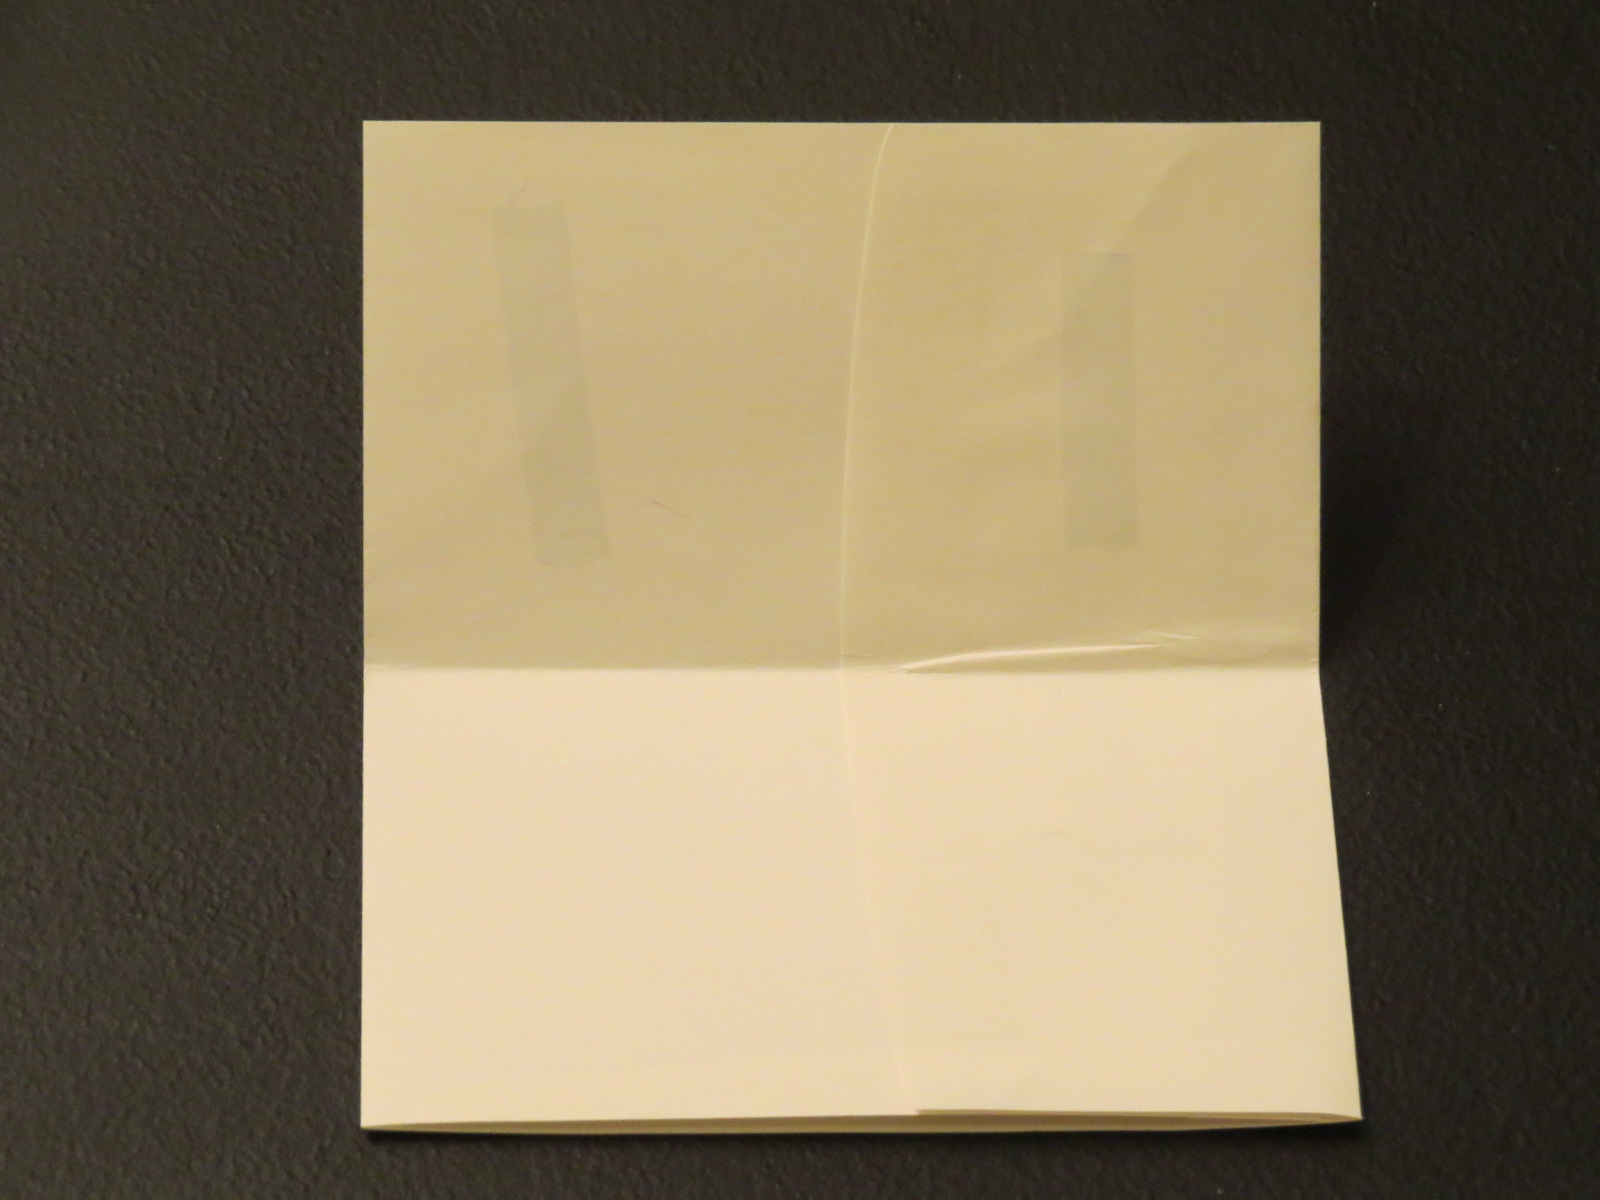
The shorter flap is the inside ... the longer flap the outside ...
Take an old, used envelope (I have LOTS of these lying around!!) and lick it closed - then fold it in half. Placing the fold lione at the 2 1/2" mark on your paper cutter trim off the envelope. Flip the envelope around - again place the fold on the 2 1/2" mark and cut the side of the envelope off. You will now have an opening on both ends of the sealed envelopes:
The next picture doesn't show it very well, but you are going to apply snail to the inside fold of the envelope so you tape the two folded halves together (you are taping the envelope to itself so you have now created two seperate compartments to hold your little notes and/or gift card):
Run the front of the base through the Big Shot with the hearts embossing folder and a 1" x 5 1/2" strip of Cherry Cobbler through with the xxxxx strip (from the new Needlepoint Border folders in the Spring mini). Tape the cobbler strip to the base:
Tape BOTH sides if the envelope to the inside of the base - this picture shows one side taped down ... and the stripes of tape so it stickes to the other side as well ...Here it is all taped up and closed ...
Next make your little inserts. Mine use Early Espresso measuring 4" x 2 1/2" and a layer of Vanilla card stock measuring 3 3/4" x 2 1/4". I added punched hearts using the large heart punch for little tabs. The sentiment is from You are Loved (FINALLY broke down and bought it - love this set!) and I attached a gift card holder using mini glue dots:
Here it is all put together ...
Now for the belly band. For these I cut a 1" x 7 1/2" strip of cs but I don't "formally" score it. You don't want the band to be too tight or too loose so I just put the note and gift card IN the holder and THEN take the strip of cs and just wrap it around ... this way you get just the right fit ...
I punched out a heart using my Hearts a Flutter framelit (page 11 of the mini) and stamped the sentiment (from the SAB set Smarty Pants) in Cherry Cobbler afterwards.
Ta da!
There you have it! It really only takes about 10 minutes to put together! Quick, easy and fun to give! OK - that's enough "work" for now. Off to walk the dog, hit the eliptical then pick up the kids (half day today). I have 3 or 4 more projects to post so keep popping back to check them out.Have a balanced, stampy day :)
Tam
Friday, February 8, 2013
Collage Curios Birthday
Happy Happy Friday!!
Woo Hoo! Rollin' on into the weekend! It's going to be another great one! A carbon copy of last weekend would suit me just fine!
Craig is off work today so we are having a "Date Day". No kids. No work. Just fun! Once the kids are back from school one is going over to her BFF's for her very first sleep over ... and the other one is being shipped off to Grandma's house for a sleepover. Woo Hoo!! Once they are gone I have my Technique Class - I have some great stampers coming over for a fun night making some great projects. I can't wait! Saturday is play dates for the girls ... and crafting for me ... Sunday is wiiiiiiiiide open. Yep - it's shaping up to be a great weekend :)))
So let's get the day rolling with pictures of another of the cards we'll be making tonight. I'm not sure if I say this was "cased" or "inspired" by fellow demonstrator Deena Boos. I think it would classify as a case. I started off copying it exactly ... but as always I ended up changing and adding a few things. Either way hers is a great card! Here is hers:
You can check out Deena's other great projects on her blog: www.myhomegrownart.blogspot.com. TFS Deena! Here is my version of her card:
Which version do you prefer? I prefer the first one .. on the Vanilla base. Alicia and Craig prefer the second one, on the Raspberry Ripple base. Whereas Deena used Primrose Petals cs and ink I went with Raspberry Ripple and the images are stamped in Early espresso (on the First Edition DSP). What I love most about tis card is that there is no wrong way to do it! You just stamp the images wherever you want! You don't have to get them straight or centered ... just stamp wherever!! I used the 1" square punch to punch the DSP ... and the Postage Stamp punch for 2 of the squares (you can't see it but the DSP on those 2 squares are popped up on dimensionals). All of the images are from the Collage Curios set ... the Happy Birthday Sentiment is from "From My Heart" (page 139 of the catty - $35.95 clear; $48.95 wood) (oh ... and that's the 3rd time THIS WEEK I've used that set!!!) I used the new tiny butterfly from the mini ... added 2 small pearls for the bodies and a jumbo pearl under the sentiment for some continuity. I LOVE it!! I think this may be my swap card for the Calgary Regionals next month!!
That's it for today! I still have my Valentine Gift Card Holder project to share ... and my Club Girl treats ... hmmm ... was I supposed to post that gift card holder yesterday? Oh well! Soon! I guess you'll just have to come back soon to check it out! Until then ... have a stampy weekend!!!!
Tam
Woo Hoo! Rollin' on into the weekend! It's going to be another great one! A carbon copy of last weekend would suit me just fine!
Craig is off work today so we are having a "Date Day". No kids. No work. Just fun! Once the kids are back from school one is going over to her BFF's for her very first sleep over ... and the other one is being shipped off to Grandma's house for a sleepover. Woo Hoo!! Once they are gone I have my Technique Class - I have some great stampers coming over for a fun night making some great projects. I can't wait! Saturday is play dates for the girls ... and crafting for me ... Sunday is wiiiiiiiiide open. Yep - it's shaping up to be a great weekend :)))
So let's get the day rolling with pictures of another of the cards we'll be making tonight. I'm not sure if I say this was "cased" or "inspired" by fellow demonstrator Deena Boos. I think it would classify as a case. I started off copying it exactly ... but as always I ended up changing and adding a few things. Either way hers is a great card! Here is hers:
You can check out Deena's other great projects on her blog: www.myhomegrownart.blogspot.com. TFS Deena! Here is my version of her card:
Which version do you prefer? I prefer the first one .. on the Vanilla base. Alicia and Craig prefer the second one, on the Raspberry Ripple base. Whereas Deena used Primrose Petals cs and ink I went with Raspberry Ripple and the images are stamped in Early espresso (on the First Edition DSP). What I love most about tis card is that there is no wrong way to do it! You just stamp the images wherever you want! You don't have to get them straight or centered ... just stamp wherever!! I used the 1" square punch to punch the DSP ... and the Postage Stamp punch for 2 of the squares (you can't see it but the DSP on those 2 squares are popped up on dimensionals). All of the images are from the Collage Curios set ... the Happy Birthday Sentiment is from "From My Heart" (page 139 of the catty - $35.95 clear; $48.95 wood) (oh ... and that's the 3rd time THIS WEEK I've used that set!!!) I used the new tiny butterfly from the mini ... added 2 small pearls for the bodies and a jumbo pearl under the sentiment for some continuity. I LOVE it!! I think this may be my swap card for the Calgary Regionals next month!!
That's it for today! I still have my Valentine Gift Card Holder project to share ... and my Club Girl treats ... hmmm ... was I supposed to post that gift card holder yesterday? Oh well! Soon! I guess you'll just have to come back soon to check it out! Until then ... have a stampy weekend!!!!
Tam
Thursday, February 7, 2013
Chalkboard Valentine
Happy Thursday!
Well! I HAVE to say that yesterday was one of those "perfectly balanced" days. It ran like clockwork! I did a little bit of housecleaning, a little bit of paperwork, a little bit of bill sorting, a little bit of "working" (aka card making!!), a little bit of excercising, a little bit of relaxing, a little bit of baking with the kids and I even made a "proper" dinner. Ahhhh - felt great! Especially when the day COULD have gone so wrong! I woke up quite hormonally emotional. Ever been there? I KNOW you have! You know what I'm talkin' about. You get up, look in the mirror ... do your daily search of your chin for any stray black hairs growing ... and you find one ... that is about an INCH LONG (HOW does this happen??? Every day I look ... every day I find nuthin ... then one day I find something that looks like it should be growing out of my dad's EAR ... NOT my FACE!!! AND ANOTHER THING! WHEN the hell did I get to the age where I started looking for stray black hairs in my face???!!!) ..... but I digress .... yes ... the day didn't start off on the best of notes. I dropped the girls off at school and as I was pulling away I could feel my eyes starting to well up with tears (been THERE?) I was all set to get home, have a good cry and spend most of the day having a little pity party with me, myself and I (and the cat and the dog). But half way home I made a decision. "They" say that happiness is a choice. So I mulled it over. Maybe today I would choose to be miserable. Then I thought better of it. Nope - I decided to choose to stay positive ... and that's what I did! I got home, grabbed my "I Choose Journal" and wrote "Today I Choose to be POSITIVE!". Ya know what? It worked! I turned the day around and had a GREAT day. I guess "they" are right ... and I'm glad :))) So! Now that you know a little more than you wanted to about my morning face-searching ritual how 'bout we get to some projects *lol*?
Here is the project I put together last weekend for the girls' classmates for Valentines Day this year:
Three Pixie Stix fit PERFECTLY into the SU 1" x 8" cello bags. I used the Heart Framelits to punch out the hearts and THEN stamped the sentiment from Wacky Wishes (hostess set) in either Real Red or Pacific Point ink. I punched a hole with my "pokey tool" and threaded some Bakers Twine through it. I then stuck the cello bag sticky strip down, with the Bakers Twine under it so the tag wouldn't slide off. For about the first dozen or so I tied a nice bow on each one ... then I realized I'd be there until NEXT Valentines Day if I did that for all 63 of them so for the rest I just knotted them. I somehow don't think the 7 and 9 year old crowd will mind :)
Yesterday my mission was to create a quick "male" Valentine card using the chalkboard technique (for class this Friday). Mission accomplished! Approximately 7 minutes later I was done. This is what I came up with:
It has been "guy approved" by Craig. Yes, this is his card ... and yes I had to show it to him yesterday just to get the endorsement :) I wasn't sure I would keep it of the Technique card ... it's quick and simple! ... but in the end I decided to get over myself and leave it as it was. Guys don't WANT fancy, frilly or sparkly ... and it's supposed to look like a chalkboard ... so how fancy can you get anyway??!! It's so easy to get this great look. I started by very lightly and very gently swirling some white Staz-On onto the black card stock (that's when I thought SU no longer carried theWhite Craft Ink). Now that I know I'll use the Craft Ink ... it "moves" better. Another method to get a great look is to simply tap the black cs with your embossing buddy so the white powder "poofs" onto the cs. It looks great ... but doesn't stay in place so I prefer the craft swirling method :) I stamped the "Love You" which was one of the single stamps you could purchase up until January 3rd. Did they carry those over? I don't think so ... I have to check into that. It's the perfect sentiment for MY guy ... we're not all mushy gooshy in our cards ... a simply "Love You" is perfect for us (we leave the mushyness for the inside *lol*). I used the heart image from Hearts a Flutter and the "love" from Pennant Parade. Those were all stamped in the white craft ink. A little strip of red and a rhinestone colored red with a Sharpie and you're done! The quickest card EVER!
I'll leave it there for now ... but pop back tomorrow for an AWESOME card which will be another one we are making in class Friday. LOVE IT!!! Until then ....
Have a stampy day (and stay positive!!!)
Tam
Well! I HAVE to say that yesterday was one of those "perfectly balanced" days. It ran like clockwork! I did a little bit of housecleaning, a little bit of paperwork, a little bit of bill sorting, a little bit of "working" (aka card making!!), a little bit of excercising, a little bit of relaxing, a little bit of baking with the kids and I even made a "proper" dinner. Ahhhh - felt great! Especially when the day COULD have gone so wrong! I woke up quite hormonally emotional. Ever been there? I KNOW you have! You know what I'm talkin' about. You get up, look in the mirror ... do your daily search of your chin for any stray black hairs growing ... and you find one ... that is about an INCH LONG (HOW does this happen??? Every day I look ... every day I find nuthin ... then one day I find something that looks like it should be growing out of my dad's EAR ... NOT my FACE!!! AND ANOTHER THING! WHEN the hell did I get to the age where I started looking for stray black hairs in my face???!!!) ..... but I digress .... yes ... the day didn't start off on the best of notes. I dropped the girls off at school and as I was pulling away I could feel my eyes starting to well up with tears (been THERE?) I was all set to get home, have a good cry and spend most of the day having a little pity party with me, myself and I (and the cat and the dog). But half way home I made a decision. "They" say that happiness is a choice. So I mulled it over. Maybe today I would choose to be miserable. Then I thought better of it. Nope - I decided to choose to stay positive ... and that's what I did! I got home, grabbed my "I Choose Journal" and wrote "Today I Choose to be POSITIVE!". Ya know what? It worked! I turned the day around and had a GREAT day. I guess "they" are right ... and I'm glad :))) So! Now that you know a little more than you wanted to about my morning face-searching ritual how 'bout we get to some projects *lol*?
Here is the project I put together last weekend for the girls' classmates for Valentines Day this year:
Three Pixie Stix fit PERFECTLY into the SU 1" x 8" cello bags. I used the Heart Framelits to punch out the hearts and THEN stamped the sentiment from Wacky Wishes (hostess set) in either Real Red or Pacific Point ink. I punched a hole with my "pokey tool" and threaded some Bakers Twine through it. I then stuck the cello bag sticky strip down, with the Bakers Twine under it so the tag wouldn't slide off. For about the first dozen or so I tied a nice bow on each one ... then I realized I'd be there until NEXT Valentines Day if I did that for all 63 of them so for the rest I just knotted them. I somehow don't think the 7 and 9 year old crowd will mind :)
Yesterday my mission was to create a quick "male" Valentine card using the chalkboard technique (for class this Friday). Mission accomplished! Approximately 7 minutes later I was done. This is what I came up with:
It has been "guy approved" by Craig. Yes, this is his card ... and yes I had to show it to him yesterday just to get the endorsement :) I wasn't sure I would keep it of the Technique card ... it's quick and simple! ... but in the end I decided to get over myself and leave it as it was. Guys don't WANT fancy, frilly or sparkly ... and it's supposed to look like a chalkboard ... so how fancy can you get anyway??!! It's so easy to get this great look. I started by very lightly and very gently swirling some white Staz-On onto the black card stock (that's when I thought SU no longer carried theWhite Craft Ink). Now that I know I'll use the Craft Ink ... it "moves" better. Another method to get a great look is to simply tap the black cs with your embossing buddy so the white powder "poofs" onto the cs. It looks great ... but doesn't stay in place so I prefer the craft swirling method :) I stamped the "Love You" which was one of the single stamps you could purchase up until January 3rd. Did they carry those over? I don't think so ... I have to check into that. It's the perfect sentiment for MY guy ... we're not all mushy gooshy in our cards ... a simply "Love You" is perfect for us (we leave the mushyness for the inside *lol*). I used the heart image from Hearts a Flutter and the "love" from Pennant Parade. Those were all stamped in the white craft ink. A little strip of red and a rhinestone colored red with a Sharpie and you're done! The quickest card EVER!
I'll leave it there for now ... but pop back tomorrow for an AWESOME card which will be another one we are making in class Friday. LOVE IT!!! Until then ....
Have a stampy day (and stay positive!!!)
Tam
Wednesday, February 6, 2013
Doggie Thank You
Happy Wednesday!
Ahhh ... today is MY kind of day ... I have NOTHING written on the calendar!!! The plan is to do a little cleaning and a LOT of crafting - PERFECT!!!
Today I want to share the card I will be giving to my friend Tammie as a Thank You for her watching my pup while we were in Hawaii. I had booked Koda in at the kennels months ago but I just couldn't cope with the thought of leaving him there for 2 weeks. Luckily Tammie offered to watch him for us!! We we thrilled ... and SO grateful! I have a little thank you gift for her and I made a card to go with it. I can't take credit for it ... it's a case from the fabulous Mary Fish. Here is her original card:
Isn't it fabulous? So clean!! I tried to make a similar card but using punches to make a dog bone. It sucked. It hit the garbage pretty quickly and I turned to Mary's card for inspiration. I 100% cased the paw idea ... the rest a changed slightly. Here is my version:
That's all for today. Pop by soon for my tutorial on how to make an adorable Valentine Gift Card Holder ... until then - have a stampy day!!
Tam
Ahhh ... today is MY kind of day ... I have NOTHING written on the calendar!!! The plan is to do a little cleaning and a LOT of crafting - PERFECT!!!
Today I want to share the card I will be giving to my friend Tammie as a Thank You for her watching my pup while we were in Hawaii. I had booked Koda in at the kennels months ago but I just couldn't cope with the thought of leaving him there for 2 weeks. Luckily Tammie offered to watch him for us!! We we thrilled ... and SO grateful! I have a little thank you gift for her and I made a card to go with it. I can't take credit for it ... it's a case from the fabulous Mary Fish. Here is her original card:
Isn't it fabulous? So clean!! I tried to make a similar card but using punches to make a dog bone. It sucked. It hit the garbage pretty quickly and I turned to Mary's card for inspiration. I 100% cased the paw idea ... the rest a changed slightly. Here is my version:
I used some retired DSP I had lying around (ONE day I'll actually USE my DSP the same year it is current!). The paw (which my husband didn't "see" as a paw ... all he saw was an upside down heart *lol*) is made from the large heart punch and the small oval punch from Crumb Cake card stock. The DSP is layered on some Soft Suede cs. The sentiment is from Wacky Wishes - one of the hostess sets in the main catalogue, stamped in Soft Suede. The ribbon is the Soft Suede Taffeta. I added a jumbo pearl and a few regular ones for accent. LOVE IT!!! I can't wait to give it to her :)
That's all for today. Pop by soon for my tutorial on how to make an adorable Valentine Gift Card Holder ... until then - have a stampy day!!
Tam
Tuesday, February 5, 2013
"Today I Choose ..." Journal
Alooooooohaaaaaa!
Yes ... I'm back from the beach, re-charged and ready to roll!! I've been PLANNING to post for a few days now but ... well ... apparently I'm still in relaxation mode and nothing has been happening very quickly around here! While I guess that's a good thing in THEORY it doesn't really help you when you pop in and see the same post for 2 weeks straight, right? *lol*
I'll bore you with just a FEW pics and highlights from our trip. Here are a few pics (well, maybe a more than a FEW ...):
We went to Maui .. and stayed in Honokowai. Do I even need to say it was fantastic?? Some of the things we did:
Now! About stamping! While I was away I did the usual holiday-type-thinking ... you know ... replecting on your life ... what is good about it .. what needs changing and so on. I realized (after it took me about 4 days to catch up on some sleep and 7 days to truly unwind!) that I needed to adjust the balance (or lack-there-of) in my life. I realized that I was spending SO many hours THINKING about stamping and my business that I was missing out on the things I wanted to be able to do by HAVING a home-based business! I didn't have TIME to volunteer at school ... I was spending too many evenings and weekends WORKING than spending time with my family ... if I DID spend time with them I wasn't truly "present" .. always multitasking and/or my mind thinking about other things. SO! As happens everytime I come home from a holiday I vowed to change things. Oh I know ... changes usually only last about as long as a New Year's resolution but so far ... in the first week ... I have already made 2 or 3 decisions that let me know that I was CHOOSING to do things rather than HAVING to do things. IT was VERY empowering. Case in point. 2 days ago I was supposed to go to the Belinda Elsworth seminar here in Edmonton. Anyone who knows me knows how much I love and respect Belinda. She has helped my business in SO many ways! When I got the e-mail about her seminar I signed up right away ... and couldn't wait to see her in action for the second time. Then Sunday came. I had a WONDERFULLY relaxing Friday and Saturday, spending time with friends, family and crafting (just for FUN!). Sunday came and I realized I didn't want to GO to the seminar! I started getting grumpy because of course PART of me wanted to go ... and I had already paid for it ... blah, blah, blah ... but as I was showering and getting grumpier about it I stopped and realized ... I didn't HAVE to go!!! Duh! Hello? Yes, I'd already paid for it - so what?! That's a sunk cost! IT's paid for whether you go or not! I wanted to stay home, craft with the girls and make Cake Pops. So I DID!!! OMG! It felt SO amazing to make that little decision!!! I made a few others in the last week that felt equally as good! I've given myself permission NOT to do everything every other Stampin' Up! Demonstrator is doing .. it's OK not to earn the crusie I really wanted to earn ... I realzed that the return on investment just wasn't worth the cost of my time to the family. So things have changed. I am working smarter, not harder now and hope that I can maintain it. Wanna see what I did to HELP myself maintain it? I made what I call a "Today I Choose ..." Journal. It's like the popular Gratitude Journals you hear about all the time (but frankly I could never keep that going ... after about day 16 I think I'd be stretching for decent things to be thankful for !!) So this is a picture of what I created:
Isn't it pretty? I just love it! Originally it started out as a project I wanted to make with Rebecca, my eldest daughter. I saw the idea on Pinterest ... a lady created a journal whereby her and her daughter wrote letters to each other in the journal and then left it under the others' pillow. It was their form of communication. I thought it was a lovely idea ... but then I realized Rebecca and I still talk about EVERYTHING. I'm sure one day ... when she's in her teens ... she might be embarrassed to talk about certain subjects and at that point I will bring up that idea ... but in the meantime we just created these. What I plan to do every day is to write a positive thought, affirmation and/or "choice" for the day. I've only done it for 2 days but so far I found it really starts the day off on a positive note. My first day was "I CHOOSE to eat healthy today". Today's was "I CHOOSE to have a healthy work / life balance today". Other ideas will be "I choose to smile today" ... "I'm beautiful WITHOUT makeup" ... "Today I choose to focus on ME" and so on. I'm encouraging Rebecca to come up with positive affirmations to help her with her self confidence "I am smart" ... "I am kind" ... "I am silly" ... "I can do anything I put my mind to" and so on. I decorated a few of the pages inside ... and will do more when I want to stamp "freely":
I think it's such a fun idea! So ... just some details about the book itself ... I bought a 5 x 8 journal at Home Sense. It is a hard cover. I covered it with some retired Attic Boutique paper (SO pretty!) using Modge Podge. I then just started playing! I grabbed my Artisan Embellishmant Kit that is in the new mini (page 10 - $11.95) I used a sponge to color the doiley in Baja Breeze Ink. I grabbed my Pop-Up Posies Designer Kit (also in the mini - page 18 - $15.95 for the embossed tag that I stamped with Soft Suede one of the sentiments from "From My Heart" (page 139 of the main catty - $35.95 clear; $48.95 Wood) - it's perfect! "The secret to life is enjoying the passing of time". LOVE IT! I then used more items from the Artisan Kit to decorate it. A little Bakers Twine and a Tea Time Trinket (mini - page 3 - $7.95) as well as a little key (I used one I bought in Hawaii). I added a few pearls here and there and then used my Spritzer Tool to spritz some Soft Suede all over it (you can see it very well in the photo. That was it - I just "went with the flow" and love how it turned out. I highly encourage you to make one .. for whatever purpose! It's just fun to "play" with no particular reason required and no particular deadline to meet. Just do it for YOU and for FUN!!!
That's it for now. Pop back again soon to check out the cute little card I made for my friend who watched my pup while we were away. Until then ... have a stampy night!
Tam
Yes ... I'm back from the beach, re-charged and ready to roll!! I've been PLANNING to post for a few days now but ... well ... apparently I'm still in relaxation mode and nothing has been happening very quickly around here! While I guess that's a good thing in THEORY it doesn't really help you when you pop in and see the same post for 2 weeks straight, right? *lol*
I'll bore you with just a FEW pics and highlights from our trip. Here are a few pics (well, maybe a more than a FEW ...):
(Yep - somehow our Elf on the Shelf "Trixie" made it to Hawaii too!! Imagine our surprise when we were going through our pictures and found some of Trixie!!!)
We went to Maui .. and stayed in Honokowai. Do I even need to say it was fantastic?? Some of the things we did:
- Whale Watching
- Snorkeling to the Crater and Tutrle Town
- Hyatt Luau
- Zip-lining
- Shopping, browsing and more shopping :))
- Beach, pool and more beach :))
- Relaxed
- Bickered and whined (this was more the girls than me *lol* ... there was a LOT of 24/7 family-together-time ... while you would HOPE that would lead to many "Hallmark Moments" in reality it often leads to trouble!!
Now! About stamping! While I was away I did the usual holiday-type-thinking ... you know ... replecting on your life ... what is good about it .. what needs changing and so on. I realized (after it took me about 4 days to catch up on some sleep and 7 days to truly unwind!) that I needed to adjust the balance (or lack-there-of) in my life. I realized that I was spending SO many hours THINKING about stamping and my business that I was missing out on the things I wanted to be able to do by HAVING a home-based business! I didn't have TIME to volunteer at school ... I was spending too many evenings and weekends WORKING than spending time with my family ... if I DID spend time with them I wasn't truly "present" .. always multitasking and/or my mind thinking about other things. SO! As happens everytime I come home from a holiday I vowed to change things. Oh I know ... changes usually only last about as long as a New Year's resolution but so far ... in the first week ... I have already made 2 or 3 decisions that let me know that I was CHOOSING to do things rather than HAVING to do things. IT was VERY empowering. Case in point. 2 days ago I was supposed to go to the Belinda Elsworth seminar here in Edmonton. Anyone who knows me knows how much I love and respect Belinda. She has helped my business in SO many ways! When I got the e-mail about her seminar I signed up right away ... and couldn't wait to see her in action for the second time. Then Sunday came. I had a WONDERFULLY relaxing Friday and Saturday, spending time with friends, family and crafting (just for FUN!). Sunday came and I realized I didn't want to GO to the seminar! I started getting grumpy because of course PART of me wanted to go ... and I had already paid for it ... blah, blah, blah ... but as I was showering and getting grumpier about it I stopped and realized ... I didn't HAVE to go!!! Duh! Hello? Yes, I'd already paid for it - so what?! That's a sunk cost! IT's paid for whether you go or not! I wanted to stay home, craft with the girls and make Cake Pops. So I DID!!! OMG! It felt SO amazing to make that little decision!!! I made a few others in the last week that felt equally as good! I've given myself permission NOT to do everything every other Stampin' Up! Demonstrator is doing .. it's OK not to earn the crusie I really wanted to earn ... I realzed that the return on investment just wasn't worth the cost of my time to the family. So things have changed. I am working smarter, not harder now and hope that I can maintain it. Wanna see what I did to HELP myself maintain it? I made what I call a "Today I Choose ..." Journal. It's like the popular Gratitude Journals you hear about all the time (but frankly I could never keep that going ... after about day 16 I think I'd be stretching for decent things to be thankful for !!) So this is a picture of what I created:
Isn't it pretty? I just love it! Originally it started out as a project I wanted to make with Rebecca, my eldest daughter. I saw the idea on Pinterest ... a lady created a journal whereby her and her daughter wrote letters to each other in the journal and then left it under the others' pillow. It was their form of communication. I thought it was a lovely idea ... but then I realized Rebecca and I still talk about EVERYTHING. I'm sure one day ... when she's in her teens ... she might be embarrassed to talk about certain subjects and at that point I will bring up that idea ... but in the meantime we just created these. What I plan to do every day is to write a positive thought, affirmation and/or "choice" for the day. I've only done it for 2 days but so far I found it really starts the day off on a positive note. My first day was "I CHOOSE to eat healthy today". Today's was "I CHOOSE to have a healthy work / life balance today". Other ideas will be "I choose to smile today" ... "I'm beautiful WITHOUT makeup" ... "Today I choose to focus on ME" and so on. I'm encouraging Rebecca to come up with positive affirmations to help her with her self confidence "I am smart" ... "I am kind" ... "I am silly" ... "I can do anything I put my mind to" and so on. I decorated a few of the pages inside ... and will do more when I want to stamp "freely":
I think it's such a fun idea! So ... just some details about the book itself ... I bought a 5 x 8 journal at Home Sense. It is a hard cover. I covered it with some retired Attic Boutique paper (SO pretty!) using Modge Podge. I then just started playing! I grabbed my Artisan Embellishmant Kit that is in the new mini (page 10 - $11.95) I used a sponge to color the doiley in Baja Breeze Ink. I grabbed my Pop-Up Posies Designer Kit (also in the mini - page 18 - $15.95 for the embossed tag that I stamped with Soft Suede one of the sentiments from "From My Heart" (page 139 of the main catty - $35.95 clear; $48.95 Wood) - it's perfect! "The secret to life is enjoying the passing of time". LOVE IT! I then used more items from the Artisan Kit to decorate it. A little Bakers Twine and a Tea Time Trinket (mini - page 3 - $7.95) as well as a little key (I used one I bought in Hawaii). I added a few pearls here and there and then used my Spritzer Tool to spritz some Soft Suede all over it (you can see it very well in the photo. That was it - I just "went with the flow" and love how it turned out. I highly encourage you to make one .. for whatever purpose! It's just fun to "play" with no particular reason required and no particular deadline to meet. Just do it for YOU and for FUN!!!
That's it for now. Pop back again soon to check out the cute little card I made for my friend who watched my pup while we were away. Until then ... have a stampy night!
Tam
Subscribe to:
Posts (Atom)