Monday, February 25, 2013

By The Tide Easel Card

Happy Monday!!

Woo Hoo!  Monday!  I'm not sure which makes me happier ... Fridays or Mondays *lol*.  Soooo ... did you check out my Stampin' Success projects?  Here again are all 4 projects that are featured in the magazine:
Didn't see the article yet?  Here is the link (I THINK it will work ... I'm not sure if you have to be a demonstrator to access it or not ... my article is on page 16 ... and 17)

http://www.stampinup.com/ca/documents/US_SS_03_04.pdf

I love how these projects all turned out ... despite the fact that it resulted in 3 week of sleepless nights!  It really was a challenge to come up with these projects.  The stamp set just screams SCRAPBOOK ME! ... but I'm not a scrapbooker ... and I didn't want to make projects that weren't "me" ... so I come up with a standard, quick and easy card, an envelope gift card holder, a card that has a bookmark in it and an easel card.  It really stretched my thinking and creativity and I'm really proud of what I came up with.  Today I'll share how I made the Easel Card.  Here is close up of it ...
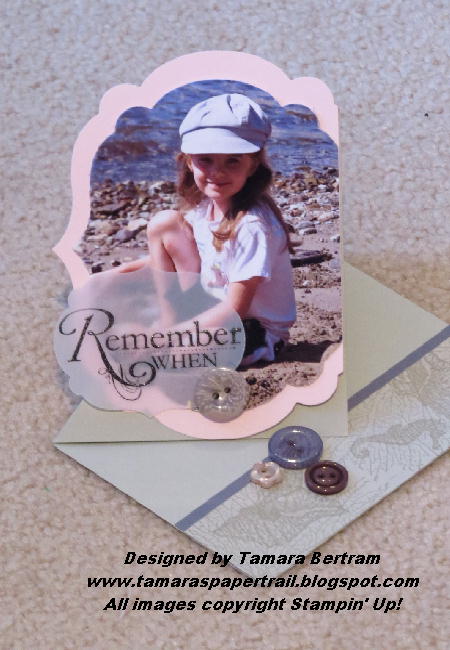
Love it!  This is a picture of my Rebecca when she was about 4 years old ... in San Diego.  That was her "signature hat" ... I still have it *sniff*.  But I digress ...

I had never made an Easel Card before ... so this was a learning process for sure!  Thank goodness for all the talented card makers out there ... and Google!  Here is the "recipe" to make the card ... I hope it makes sense ...


PAPER: Sahara Sand, Basic Grey, Pink Pirouette, Vellum
STAMP SETS: By the Tide, Word Play
INK PADS:  Sahara Sand, Black Staz-on
ACCESSORIES: Simply Scored Scoring Tool, Labels Collection Framelits, Big Shot, Mini Glue Dots, Black Emboss Powder, Heat Tool, Neutrals Designer Buttons
INSTRUCTIONS: 
·         Start with a piece of Sahara Sand card stock measuring 8” x 5 ½” and fold it in half.
·         Take what will be the front of the card and score it from the top right hand corner to bottom left hand corner fold line (look at the picture to understand where the score line is).  I used my Simply Scored Scoring Tool – I placed the angled card on the very edge of the tool and scored it using the very last groove.  I found this more accurate than using the diagonal plate.
·         Fold the front inwards.
·         Stamp a piece of Sahara Sand card stock measuring 1 ½” x 5 ½” with your By the Tide images in Sahara Sand ink.
·         Attach a strip of Basic Grey card stock measuring 1 ¼” x 5 ½” to the Sahara Sand strip and attach to your card base.
·         Cut your photograph using whichever Labels Collection Framelit best fits your picture best.  For my picture I used the two largest framelits – the larges for the Pink Pirouetts mat and one size smaller for the photograph. 
·         Attach your photo and mat to the card base but ONLY the lower right hand portion.  You need the upper right hand section to be loose so it will “stand up” when the card is open.
·         Stamp your sentiment in Staz-on, sprinkle it with Black Embossing Powder and heat set.  Punch it out using the appropriate size of framelit.  Attach to the photo with snail.
·         Attach buttons using mini glue dots making sure to apply the inside buttons at a height that will prop the front at an appropriate level when open.

 So that's the first project!  I hope you like it ... and that the instructions make sense!  Come back tomorrow for the second project.  Until then ... have a stampy day!

Tam

Sunday, February 24, 2013

Honeycomb Embossed Embossing

Happy Sunday!

I couldn't wait to share this card with you!!!  I just LOVE it!  It really is one of those cards you need to see in person to get the full effect ... I'm not sure the pictures show the shimmer sufficiently but ... here goes ...
Ok ... I can't see any shimmer on that one ... let's try this one ...
A little better.  Well ... you're just going to have to take my word for it ... it's FABULOUS (yes, I love myself *lol*).  The outline of the honeycomb shapes are all shimmery ... and remind me of golden honey ... mmmmm ... honey ....

This is the card we will be making at my Technique Class in March.  I'm calling it "Embossed Embossing".  The colors used are Very Vanilla and Soft Suede (apparently Soft Suede is my new "go-to color this month!!) and So Saffron.  I applied Versamark directly to my honeycomb folder (on the NON bumpy side) put the vv layer in the folder (making SURE to use my embossing buddy on the cs first!!) and ran it through the big shot.  (**NOTE:  I was making this card again and I found that you want to use an OLD Versamark pad if you have one ... if your pad it too new ... or too "juicy" you get Versamark ... and subsequently powder all over the inside of the honeycomb ... which I don't think looks as nice.  If you use an older, less juicy pad it seems to only stick on the outline of the honeycombs.  If you DO get powder all over the inside of the honeycomb just take a small paintbrush and brush awy the powder where you don't want it before you heat set it**)  I then sprinkled it all over with Iridescent Ice embossing powder ... is that how you spell iridescent?  Looks wrong ... hang on ... hmmm .. yep, that's how you spell it ... Right!  Then I heat embossed it.  The embosing powder only sticks to the bumpy parts of the honesycomb shape and gives it a fabulous golden shimmer.  LOVE IT!!!  I ran some scrap pieces of Soft Suede and So Saffron through the honeycomb folder as well (after cleaning the folder off with a wet baby wipe) and then used my paper snips to cut the shapes out (I DO hope Stampin' Up! is planning to release a honeycomb punch in their next catty ...while it isn't a LOT of work to snip the shapes out life is a little too short to be making too many of them!!)  I stamped the bee from Collage Curios (page 24 of the mini - $19.95 clear; $25.95 wood) in Soft Suede.  Stamped the Thank You in Soft Suede (from Lacy & Lovely - page 99 of the catty - $21.95 clear; $30.95 wood) and punched it out with the Decorative Label Punch.  I used a finger dauber with Soft Suede to color the edges and popped the whole thing up on dimensionals.  Can you see the itty bitty pearls on the bums of the bees?  Hee hee ... I crack me up :))  I added one more, medium sized pearl on one of the honeycombs ... you know ... just to be wild and crazy :)  I popped 3 of the snipped out honeycombs on dimensionals.  DO you like it?  Do ya, huh?  I do ... a LOT :)

That's it for today ... check back tomorrow for my Stampin' Success projects!  Have a stampy Sunday!

Tam

Saturday, February 23, 2013

Madison Avenue Case ... from Shelli!!

Happy Saturday!

Can I just say I had a FABULOUS time last night with my stampers??!!  ... and can I just say (once again) I LOVE MY JOB!!!  Sharing what I love with others makes my heart smile.  Stampin' Up! demonstrators are always saying "the best part of being a demonstrator are the relationships I've formed through stamping".  For the first few years of hearing that again and again I thought it was a little cheesey ... but ya know what?  The longer I do this ... and the more people I meet ... and the more friends I make ... I gotta say ... they are all 100% right.  I truly cherish the friendships I have made (and am making!) through this passion of mine.  Stamping truly is more than just crafting ... and stamping parties are SO much more than making a few cards.  They really ARE like the quilting bees from days gone by.  Most of my customers, club members and stampers don't come over to learn something new (but they often do!) ... I believe they come from the fun night out ... the escape ... the girlie yick-yack ... the "just be"ing.  I'll say it again ... I love my job :)

You know who else loves her job?  Our mighty leader, Co-Founder and CEO Shelli Gardner.  She has such a genuine passion for stamping ... and an even more genuine love for her demonstrators and employees.  You know that everything she says and does is truly from her heart.  She's an amazing, inspirational lady in SO many ways.  The card I'm posting today is HER card - 100% cased ... I just added a few rhinestones for some shine.  She created hers digitally on her MDS system.  I made mine the old fashioned way ... with paper and ink (and my stamp-a-ma-jig).  Her it is:
Isn't it great?  I was struck by it's simplicity ... it could be used for any occasion.  Love it!  It uses the Madison Avenue SAB set - and I grabbed the sentiment from Best Dad Ever.  The inks are Island Indigo, Crumb Cake and Rich Razzleberry - all on Sahara Sand cs with a Whisper White base.  Quick, easy and striking.  Love it.  Thanks Shelli for sharing what you love :)

Pop back soon to check out my By The Tide projects.  They make me smile :)  Until then ... have a stampy weekend!

Tam

Thursday, February 21, 2013

Bloomin' Marvelous Case

Happy Friday!!

Woo Hoo!  The weekend!  ... you'd think it wouldn't matter to a SAHM whether it was Monday or Saturday but mentally there is just something about the weekend that puts you in a good mood!  Perhaps for me it's because Friday nights are usually my Stamping Classes/Parties .. or maybe it's because I somehow give myself permission to eat really "bad" food *lol*  Whatever the reason I'm glad it's Friday ... and yes, I DO have a party tonight ... my OWN party!  This was a bit of a stretch for me and oddly took me out of my comfort zone!  I'm very good at telling OTHER people what to do but not so great at doing it myself.  This party is a case in point!  I'm very good at telling my potential hostesses to "invite EVERYONE" but when push comes to shove it's not an easy thing to do!  However, do it I did ... after all ... I didn't want to look like a real goat by having my own party and then having no one show up, now did I?  I'm thrilled that I asked all different friends, aquaintances, customers and stampers ... and that 8 said "yes"!  I have a great mix of seasoned stampers and complete novice stampers (our favorite kind!!!) coming to play tonight.  Eeeeeee!  So excited! 
So!  What projects are we making?  Well .... with a little help from my friend Mary (hi Mary!) I've decided on these 3 (The first 2 you've seen before ...)


This one is new ...
I can't take credit for it ... I cased it from fellow demonstrator Linda Pasmore - great card Linda!  I'm SO ready for some bright, spring cards (although you really wouldn't think so given that all my cards lately are vintage and/or earth tones!!)
For this card I used Whisper White with a layer of Old Olive to mat it.  The stamp set is Bloomin' Marvelous (one of the Sale-a-bration sets) stamped in Tangerine Tango.  The dark flowers are inked then stamped ... then stamped again to get the softer orange flowers.  The leaves are old olive and the sentiment is in Early Espresso.  The butterly uses the Bitty Butterfly from the spring mini and the ribbon is from the SAB Sycamore Street Ribbon/Button bundle.  I added a few rhinestones to some of the flowers and to the butterfly body.  Wa-low!  Super quick, easy and pretty.  This set has really grown on me ... hope you like it too!

Pop back tomorrow ... I have another case ... from none other than Co-Founder and CEO Shelli Gardner! ... AND ... make sure you check back next week to see the projects that I had published in our magazine - Stampin' Success!!  I'll have full pics and tutorials on them ... yay!  I've been published :)))  Until tomorrow ... have a stampy day!

Tam

Oops!

Oops *lol* ... looks like I forgot to schedule my Friday post for Friday!  (I'm not used to being a day ahead of the game!!)

In the meantime ... let's see if the link to my Stampin' Success article works!  The article where I'm the Featured Guest Artist is on page 16 and 17 ... :)

http://www.stampinup.com/ca/documents/US_SS_03_04.pdf

Here is a picture of all four projects I made ... the details and tutorials will follow starting Monday :)


Have a stampy day!

Tam

Postage Due Thank You

Happy Thursday!

Another "quick" post today ... I need to finalize my projects for my class tomorrow night (SO excited to see some old friends!!)

This is the third card I made using Postage Due ...
I like it!  So!  How do you think I got the vanilla image on the Soft Sued card stock?  Yes ... it DOES look like I used Vanilla Craft Ink ... or maybe that I used vanilla embossing powder ... but I didn't!  I actually started with a piece of 5" x 3 3/4"WHISPER WHITE card stock.  I stamped the image in Versamark and used CLEAR embossing powder to emboss it.  I then broke out my brayer (haven't used that in 100 years!!) - inked it up with Soft Sued ink and completely and uterly saturated the whisper white with it.  When I wiped the image with a dry baby wipe it is a real vanilla shade - who knew?!?  I added a piece of vanilla to layer it (4" x 5 1/2") and used the eyelet border punch along one side.  The whole thing is then mounted on a Soft Suede base.  Before taping the layers down I stamped "Thank You" - from "Essentails" - page 22 of the mini - $8.95!!! in soft suede on the Natural 7/8" Cotton Ribbon (page 36 of the mini - $9.95) - wrapped it around the corner and used an In Color Designer Printed Brad for an accent (page 152 - $9.95).  Oh!  and I added a little piece of Calypso Coral cs (1 1/2" x 3 3/4" plus 2 ticks *lol*) behind the image layer for a little pop of color.

Well?  Have I convinced you that the Postage Due set is one worth ordering?  I think I will bring it out more often and challenge myself to use it in a new way.  You should do the same!

Until next time - have a stampy day :)))

Tam

Wednesday, February 20, 2013

Postage Due - Monochromatic

Happy Wednesday!

I'll get right to it today as I have a VERY busy day ahead (well ... when Isay "busy" I mean I have a lot of coffee dates lined up for the day *lol*)

This is the second card I made using Postage Due.  It took me quite a while for me to be happy with all of the little details on this card ... but I AM really happy with how it turned out (I seem to be on a bit of a monochromatic roll this month!)  Here it is:
Eeeee!  Love it!  So crisp and clean!  I stamped the main image with White Craft Ink on a piece of  3 1/2" x 4" piece of Soft Suede cs.  After having the strip of white Details Lace Tape (page 3 of the mini - $7.95 ... LOVE this stuff!!) in every conceivable position I settled on it being down the LHS of the suede piece.  Perfect!  The stamps are all in Soft Suede and punched out with the Postage Stamp punch.  To get the "writing" along the background I simply used my Crumb Cake marker to color JUST the writing on the stamp and stamped it in various positions.  Of course AFTER I made the card I realized there is a Builder Wheel called Travel Journal (page 108 - $5.95) that I will use next time to make the job a lot faster (of course I don't really USE my wheel any more - I now always cut the rubber image down the seam and then peel the rubber OFF the wheel (it's just stuck on with double sided tape) and then use the rubber with a clear block.  I find this method a lot more accurate and a lot less frustrating than wheeling - one day I'll take some pictures of how I do this!)

S o that's it for this card!  It's much quicker than yesterday's card *lol*.  Come back tomorrow to see my third and final card using this set.  Until then - have a stampy day!

Tam

Tuesday, February 19, 2013

Postage Due Vintage

Happy Tuesday!

I hope those who had the day off yesterday had some fun!  I realized this morning that not everyone in Canada HAD the day off - some provinces have "Family Day" ... but not all!  I failed in my mission for a "tech-free" day.  In fact I spent a LOT of time on the computer placing orders, doing the paperwork and so on - it was a very productive (and relaxing) day!  We DID spend time together as a family - Craig built a snow fort with the girls and later in the day we played a family game of Charades.  It's actually FUN playing games with the girls now that they are a little older.  Alicia is still at the "I always want to win" phase but at least she doesn't have full-on tantrums if she loses anymore *lol*! 

Now ... crafting.  I've gotta say I'm actually feeling on-top of things in that regard!  Rather than being a week BEHIND in my Stamp Set of the Month projects I'm actually a little ahead of the game!  I've designed my three projects ... now I just have to mass-produce them!  The set for February is "Postage Due" - page 108 of the catalogue - $20.95 clear; $26.95 wood.  This is yet another set that I just HAD to have ... but hadn't used!  I love the challenge of the Stamp Set of the Month Club in that it forces me to sit and make at least three cards with a set.  It really stretches my thinking and creativity - something I don't force myself to do very often - I generally want the "quick wow" rather than just letting my mind quietly create.  Well Friday I did just that and came up with three cards that I love.  The first one I came up with I LOVE!  It's looks complicaed (and yes ... it probably took me well over an hour to come up with it) but it really doesn't take long to put together.  Check it out:
I probably should have taken the photo against a darker carpet - the colors really strike you in person.  I stamped the main image with Crumb Cake ink on a 3 1/4" x 4" piece of Very Vanilla cs.  I then cleaned the stamp and used my Soft Suede marker to color directly on the bicycle image on the stamp.  I used my Stamp-a-ma-jig tool (an absolute MUST HAVE tool!!!) to stamp the darker bike on top of the lighter one.  I cleaned the stamp and used my Pool Party marker (which I discovered desperately needs re-filling!!) to color the number 3 on the stamp ... again - the stamp-a-ma-jig to line it up and stamp in on the VV piece.  Cleaned the stamp - used my Calypso Coral marker to color the flower image directly on the stamp - stamp-a-ma-jig to line it up on the main image.  The VV piece is matted with a 3 1/4" plus 2 ticks x 4" plus 2 ticks (technical, huh?) of Pool Party cs.  I then stamped the 2 cent postage stamp image in Soft Suede ink, punched it out with the Postage Stamp punch and layered it with a 1 1/4" square punch in Pool Party.  I inked the Tower stamp in Crub Cake, wiped off the "1932" with a blender pen and then colored the 1932 with my Coral marker.  It's layered with Coral cs.  The truck was stamped in Crumb cake, I colored OVER the truck image with my Soft Suede marker, wiped off the "10" with a blender pen then colored the "10" with my Pool Party marker.  Finally I used a piece of Sticky Strip to tape down some of the new (and FABULOUS) natural 7/16" Trim Ribbon for that "final touch".  Ok ... maybe it isn't the quickest card to make ... but it really isn't that hard ... just lots to type *lol* ... hope it makes sense!  I love that the Coral and Pool Party stamped images are "faded" - they aren't as bright as they would be if I just stamped those images directly on the vanilla card stock.  It is softened and made more "vintage" because of the Crumb Cake that is underneath it.

So that's the first of my three creations.  I hope you like it!  Leave me a comment - I'd love to hear what you think! 
Pop back tomorrow when I'll show you my second card using this set!  Until then ... have a stampy day!


Tam

Monday, February 18, 2013

Bumblebees and Valentines

Happy Monday!

It's "Family Day" here in Canada ... and I think it's President's Day in the US ... I hope everyone has lots of fun planned for the day!  I'm hoping to have a "Technology Free" day for ALL of us ... so I'm actually typing this 2 days ago :)

I wanted to post the Valentines that I made for the girls ... and for Craig.  Of course I didn't make them until 2:00 pm ON Valentine's Day ... but they were OK with that.  Craig doesn't get home until 5:00 pm and Rebecca doesn't want to open anything without the whole family being together so it didn't matter that they weren't ready bright and early.  I can't believe how much I like these quick, clean cards!!  I usually manage to whip something up quickly when it's for the kids.  I suppose it's because I know all I have to do is make it sparkly and they'll love it.  Mission accomplished!  Here is the one I made for them:
Love it!  I simply used my Scalloped Squared punch for the silver glimmer paper ... and the Hearts A Flutter framelits for the red glimmer hears.  Hmmm ... you can't see the detail but under the swack of rhinestones I dry embossed a scallop border using the new Simply Scored Borders Scoring Plate (page 26 o fhte mini - $19.95).  The rhinestones are in the middle of each scallop.  I stamped the little XO from the My Little Valentine Bundle set in Real Red.  Oh!  And I added one larger rhinestone on the middle heart.  So quick, easy and sparkly!

I wanted to make a card for Craig too ... and to be honest I just couldn't give him the chalkboard card I made.  I like it ... but don't love it.  I figured I could do better (even though I knew he wouldn't care!)  So I took the same layout as for the girls' card, changed the colors and the border and came up with this:
LOVE it!  I used Crumb Cake and Midnight Muse for his.  I changed the scalloped embossed border for some straight lines (just using the "normal" scoring plate).  I HAD to add one rhinestone.  Yep - love this one!

Moving on ... Friday night I had about half an hour to play and decided to crack open my Spring Sampler set.  It was 7 degrees on Friday and I certainly was feeling some Spring Fever!  I fell to the same quick, simple layout as the cards above ... a few minutes later I had this:
Hmm .... lousy picture.  You can't see the layer of white ... or the embossed cloudy.  Here is a close up ...
Hmmm - a little better ... well ... suffice it to say it's quite cute in person.  See the little stingers?  Hee hee - love that part!  I used the new Cloudy Day embossing folder (page 28 of the mini $9.95).  The bees are from the Spring Sampler (mini page 23 - $33.95 clear - $47.95 wood) and are punched out with the 1" circle punch and layered with the 1 1/4" circle punch in Daffodil Delight.  The bees are stamped in black Staz-on and cololred with the DD marker.  The Happy Day to you is from the Friendy Phrases (page 137 - $17.95 clear; $22.95 wood) and are popped up on dimensionals.  Quick, easy and cute!

That's it for now ... I think I'll head down and see what else I can come up with.  Until next time ... have a stampy day off!

Tam


Sunday, February 17, 2013

French Foliage "Thoughts"

Happy Sunday!

Another quick one just to bring me up-to-date on my projects ...

Here is another card I made with the "French Foliage" set (page 86 - $17.95 clear; $24.95 wood)
Hmmm ... my lighting is off a little so the colors aren't "true" but still pretty, no?  I used a hint of Always Artichoke as a layer behind the whisper white panels.  I stamped the leaves in More Mustard and then used my Cajun Craze marker to color around the edges and the stems to add a little hint of fall to them.  The splotches are in artichoke, as is the sentiment.  I used the sentiment from Word Play (page 135; $35.95 clear; $51.95 wood) - I don't personally like the full phrase "You're in my thoughts you're in my heart" ... a little to cheesey for my liking ... but I do like the You're in my thoughts part ... so I used my artichoke marker to color just that part of the sentiment before stamping.  I used some of the Naturals Designer Buttons (page 176 - $6.95) with mini glue dots for accents.  I really like this card - it's very calm .. just what you want when you are telling someone you are thinking about them.

So that's it!  I think I'm up to date on my projects!  Let's see what I can come up with next, shall we??  Have a stampy day :)


Tam