Ahhh Monday - sweet, quiet, back-to-normal Monday. How I love you!
Craig is back at work - the kids are back at school and I am back to normal. Holidays are great but I DO love routine!!
A busy week ahead with classes and my Open House / Catalogue Launch on Friday. You DO realize the new catalogue and Sale-a-Brations start TOMORROW, don't you???? Ska-WHEEL! LOVE new catalogue time!!!!!
Yes, I have plenty of samples to share using my new toys from the new catalogues … but first I have to get caught up on projects made using my "old" toys!
Today I'm sharing what I (finally) made for the girls to log their wishes in. Yes, Christmas Eve I managed to put together their annual Wish List Books. It's a tradition I started when Rebecca was very little. It's a little 5 1/2" x 4 1/4" booklet with 6 pages where they write down what they want and we leave it on the coffee table for Santa to read. In the past we also wrote/e-mailed Santa our lists … this year we skipped that step and went straight to the Wish List books.
They write what they WANT on one side of the page and then, Christmas Day, I flip it over and write what they GOT on the other side of the page. I LOVE that they have a permanent record of their sans and gifts over the years. SUCH a great keepsake!
Here is the version I made this year;


The sentiment is from the Good Greetings Hostess set (which FLEW off the Clearance Rack shelves last month!) stamped in Lost Lagoon. A few sequins finish it off with a dash of bling.
Love the card (we will be doing a winter birthday version for class this week) and love the Wish List booklets. Wanna know how to make your OWN booklets? Okee Dokee - here's a picture tutorial!
Here are all the supplies you need to make 2 booklets:

- score 5 of the sheets at 1" (score on the short side i.e. have the 5 1/2" length facing you)
2 pieces of Lost Lagoon card stock cut 4 1/4" x 2 ", scored in half, at 1"
2 pieces of vellum cut 5 1/2" x 4 1/4", scored at 1"
4 strips of All is Calm DSP, cut 4" x "3/4
2 strips of Dazzling Diamond paper, cut 3"x 1"
2 strips of Silver Glimmer paper, cut 3/4" x 1"
4 pieces of Whisper White DSP cut 2 1/4" x 1/2"
8 jumbo eyelets
crop-o-dile tool
Silver Satin Ribbon
The below picture is the vellum - you can see the 1" score line. We score the sheets so that when you open the booklet the pages bend easily and cleanly, without cracking the paper. Here have stamped the snowflakes in versa mark and heat embossed with the silver embossing powder.


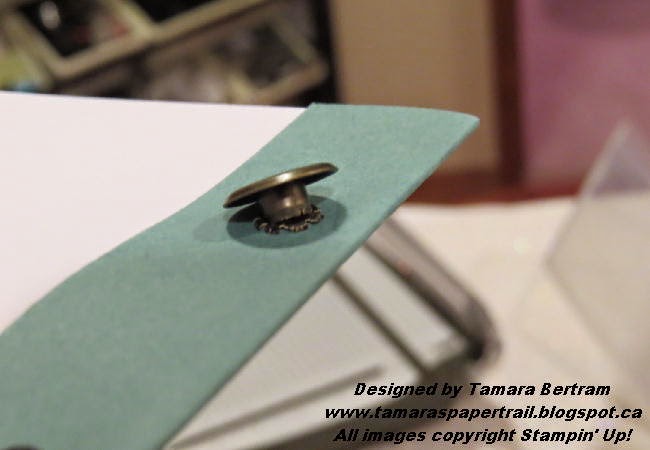
Put all the pages of your booklet together in a oil and then wrap the 2" 'binding" around them. Punch two holes using the crop-o-dile. These jumbo eyelets that I use retired about 4 years ago. I hoarded a few packs knowing that I would be making these booklets for years to come. You can buy them on-line but I can't find any here in the city :(
The eyelets are slightly bigger than the hole made by my crop-o-dile so I punch each hole twice, making it slightly bigger:


This is my favourite holiday tradition. Yes, I left it until the last minute this year but it got done - and will for a few more years yet!
These little books can be used for so many different things - a little recipe book, a brag-book for grandma, a gratitude journal, a sign-in book for a wedding - the sky is the limit! You don't HAVE to have the eyelets - you can just punch holes and tie with ribbon - I just use the eyelets because I always have … and I like the look.
Try making one - but be careful - they are a little addictive!
Pop in again soon. Until then, have a stampy Monday!
Tam
No comments:
Post a Comment